
Upgrade Your Kegerator – 6 Improvements!
 After years of faithful service in it’s current configuration, my beloved kegerator was in need of some upgrades and enhancements.
About My Kegerator:
- My kegerator based on a 7-ish cubic foot Kenmore chest freezer.
- I’ve installed a 10″ collar that hosts four faucets. I’ve also used the collar as a mounting point for my four way CO2 manifold.
- I have a dual pressure CO2 regulator. One regulator body maintains what I call a house pressure, 10 PSI. That body feeds the manifold and the manifold, in turn, feeds each keg. The second regulator body is for tasks like flushing kegs, force carbonating more quickly or for a keg that I want to serve at a different carbonation level.
- The gas side of my setup is QD based. I can swap out or remove lines without turning off the CO2 tank. The valved disconnects automatically shut off CO2 flow when disconnected.
- I use a recirculating fan to keep a more uniform temperature. See: Kegerator Beer Line Temperatures & Reducing Foam with a Recirculating Fan
- I use an Eva-Dry E-500 to fix condensation – See: Damp Kegerator? Fix Kegerator Condensation
About the Upgrades
- I had been using a temperature controller from a now defunct manufacturer for a while. That was replaced by an ITC-308 Digital Dual Stage Temperature Controller – Hands on Review
- Inkbird Temperature & Humidity Smart Sensor IBS-TH1 – my previous controller, had the ability to log temperatures and I really liked that. I added this to give me logging capabilities.
- Intertap Faucets and Accessories! – time to modernize my setup with these great faucets and accessories. NukaTap Faucets (Intertap v2!) are also a great choice.
- DuoTight Fittings – DuoTight Fittings work in concert with EVABarrier tubing. This system of disconnects offers loads of flexiblity and features. I’ve used multiple types of disconnect systems in previous versions of my kegerator and DuoTights are, by far, my choice.
- EVABarrier Tubing – This is an update to… this update. This post originally featured Ultra Barrier coiled tubing. That tubing was very expensive and has since become difficult to find. EVABarrier tubing is high-quality double walled tubing that offers protection against oxidation, CO2 loss and microbial growth. It’s BPA and PVC free. EVABarrier is also very reasonably priced.
- San Jamar VM5280 Versa-Mat Interlocking Bar Mat, 12″ Length x 12″ – also available in different colors and quantities – search san jamar interlocking bar bat on Amazon – for the bottom of the kegerator. I had already used a single square of this to set the CO2 tank on. This upgrade including lining the entire bottom with this great mat. Related: Not Just for Bars Anymore… Using Interlocking Bar Mats Around Your Home Brewery!
Bonus Upgrade! Rebuild Your Kegs!
Installing the Upgrades
1. Installing the Temperature Controller
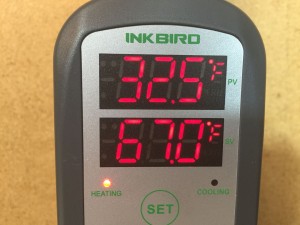 Getting the ITC-308 going is about as simple as it gets. I swapped out the cords, set the controller how I wanted it and installed the probe.
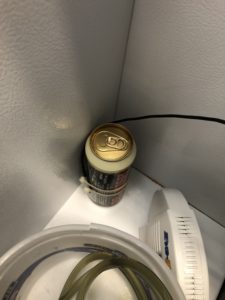 It has been my practice to install my kegerator temperature probe using zip ties onto a can of beer. See: Kegerator Temperature Probe Placement – To Immerse or Not To Immerse? – three tests to determine optimal placement
2. Installing the Temperature Logger
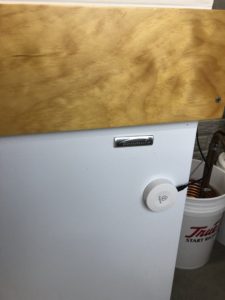 The Inkbird Temperature Logger took all of 30 seconds to install. A couple minutes more to download the app and sync it with the device. The temperature probe lives happily zip tied to that same can of beer.
3. Upgrading to Intertaps!
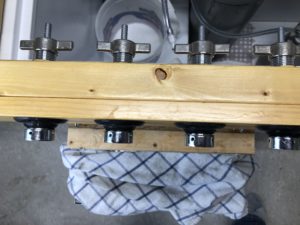 For the faucets, I removed the old Perlicks and pulled out all of the liquid lines.
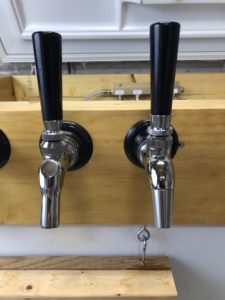 Here is the new Intertap on the right and the old Perlick (525SS) on the left. I chose the stainless steel forward sealing model. All Intertaps are forward sealing. They are available in chrome, brass and stainless.
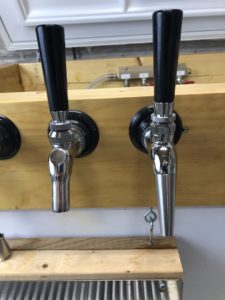 One of the cool things about Intertaps is that they are designed to be used with several accessories. Here is the Intertap with a stout nozzle installed. The Perlick continues to look the same :).
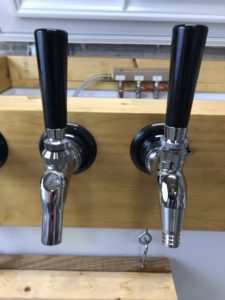 Here is the Intertap with a growler filling attachment installed. I need to add some 1/2″ ID tubing to this to actually use it for filling up a growler.
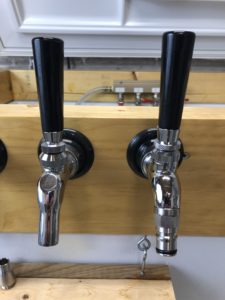 Here is the Intertap with a ball lock attachment installed.
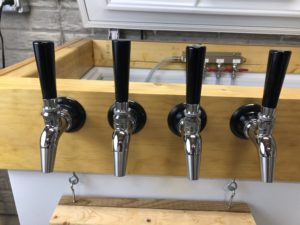 All four faucets upgraded to Intertaps. I have limited experience with these as of this post, but first impressions are very positive. Beautifully built faucets, thoughtful and helpful accessories and these things feel rock solid with you’re operating them. Very smooth operation. They are also some of the most reasonably priced faucets on the market. I think these are a game changer in the world of faucets.
4. Upgrading to DuoTights!
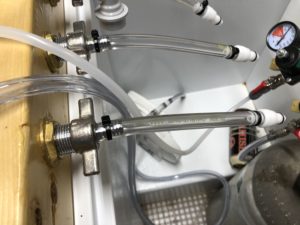 Old setup. Each shank required a beer nut, tail piece, tubing clamp and piece of tubing. In my case I had small sections of tubing and then QDs to attach beer lines.
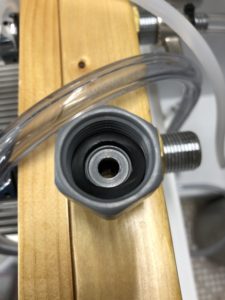 DuoTight Female Beer Thread Fittings – replaces beer nut, tail piece and tubing.
 Installed! One well thought out fitting to replace three.
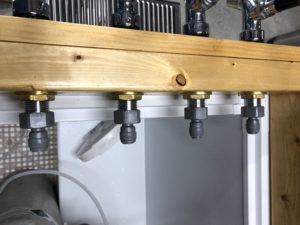 All four taps converted to DuoTight. You can see the edges of my Intertap Faucets at the top of this photo – Hands on Review
5. Installing EVABarrier
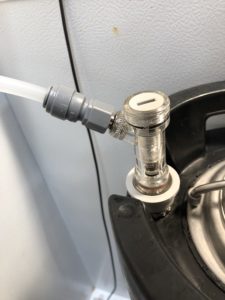 This upgrade is as simple as installing the correct fittings and connecting them with proper lengths of tubing. One of the great things about the DuoTight system is that you don’t need a manifold. You can install as many tees as you want and keep adding kegs. I recommend using a gas QD with check valve. This picture shows a CMBecker QD with check valve. The integrated check valve stops beer from back-flowing into gas lines. Keg Connection carries both pin lock and ball lock CM Becker brand QDs. Look for an MFL version to work with DuoTight fittings.
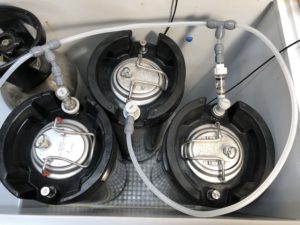 Three kegs installed without a manifold using DuoTights and EVABarrier Tubing. Related: Build a DuoTight CO2 Gas Manifold! – for Kegland EVABarrier Tubing
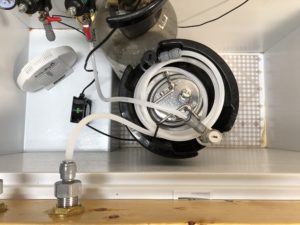 Complete setup – DuoTight Fittings and EVBarrier Tubing installed in my kegerator
6. Installing San Jamar Mats
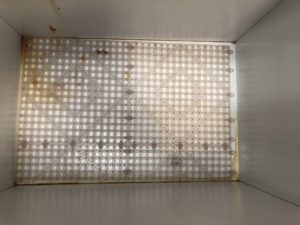 Drying mat installed. I already used one square of this for my CO2 tank. This is two full 12″ x 12″ panels and two trimmed panels. I trimmed using a utility knife. The panels are designed so they attach to each other. These help increase airflow under the kegs and should help with keeping temperatures more uniform and keep moisture from getting caught under kegs. Related: Not Just for Bars Anymore… Using Interlocking Bar Mats Around Your Home Brewery!
Upgrades Installed!
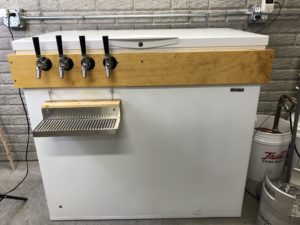
That’s it! Several great upgrades and a couple hours of fun putting it altogether!
- ITC-308 Digital Dual Stage Temperature Controller – Hands on Review
- Inkbird Temperature & Humidity Smart Sensor IBS-TH1
- San Jamar VM5280 Versa-Mat Interlocking Bar Mat, 12″ Length x 12″ – also available in different colors and quantities – search san jamar interlocking bar bat on Amazon – Related: Not Just for Bars Anymore… Using Interlocking Bar Mats Around Your Home Brewery!
DuoTight and EVABarrier
- Hands on Review: Kegland DuoTight Fittings & EVABarrier Tubing!
- Kegland DuoTight Fittings and Accessories! at William’s Brewing
- DuoTight Push In Fittings & EVABarrier Double Wall Draft Tubing at MoreBeer
- Build a DuoTight CO2 Gas Manifold! – for Kegland EVABarrier Tubing
Intertap Faucets
- Intertap Faucets and Accessories at MoreBeer
- Intertap Faucets and Accessories at Adventures in Homebrewing
- Intertap Stainless Steel Faucet at Amazon
- Search Amazon for “Intertap Faucet” – offerings vary
- Intertap Faucets and Accessories at Keg Connection
- Intertap Faucets and Accessories at William’s Brewing
- Intertap Hands on Review
NukaTap Faucets
- Nukatap Faucets and Accessories at MoreBeer
- Nukatap Faucets and Accessories at Adventures in Homebrewing
- Nukatap Faucets and Accessories at William’s Brewing
- NukaTap Hands on Review
Related: Intertap & NukaTap Flow Control Faucet Availability
Bonus Upgrade! – Rebuild Your Kegs!
DuoTight Review!
duotightreviewIntertap Reveiw
NukaTap Review
Inkbird Review
More Homebrew Finds!
- Last 50 Finds!
- Top Deals – a curated list of the best deals
- Homebrew Reviews – one of the largest libraries of homebrew reviews in existence!
- Our Top Posts – tips, how-tos, resources posts and more
- Let’s be Friends!
Recent Deals!
10 Most Recent Homebrew Resource Posts & How-To’s!
We are Homebrew Review HQ! Our 10 Most Recent Reviews
Also: Kegerator Tips & Gear | Keg Repair Part #s | Recent Keg Finds
Our Top Draft Resources!
Check our our Top Draft Related Resources- Commentary: Pin Lock Keg Pricing and Availability
- Check Your CO2 Regulator for Leaks!
- How to get a keg ready for first use? New Keg Cleaning and Prep
- Portable Draft Beer Serving Options!
- Pin Lock Keg Pricing and Availability
- The Most Difficult Spot to Check for CO2 Leaks
- Keg O-Ring Materials Selection! – EPDM, Silicone and Buna-N?
- Why Do I Have Bubbles in My Beer Line? Diagnosing and Fixing Kegerator Foam Problems
- Five Benefits of Using Corny Kegs As Fermenters
- Rebuilding & Reconditioning Homebrew Kegs!
- Food Safe Replacement Keg O-Rings in Bulk
- Hands on Review: Kegland DuoTight Fittings & EVABarrier Tubing!
- Why Won’t My Beer Carbonate? Fixing Draft Beer Carbonation Problems
- What Does a Flow Control Faucet Do?
- Upgrade Your Kegerator – 6 Improvements!
- Serve Homebrew on Any Kegerator & Convert Commercial Kegerator to Homebrew
- Tips and Gear for Growler Filling
- What’s the Difference Between Ball Lock Kegs and Pin Lock Kegs?
- Checking for Draft System CO2 Leaks – Using The Pressure Gauge Method
- Tip: Consider Oetiker Stepless Clamps for Kegerator Gas and Beer Lines
- Hands On Review: Inkbird ITC-308 Dual Stage Temperature Controller +WiFi Version
- Universal Poppets Tips and Tricks!
- Convert Your Mark II Keg & Carboy Washer to a Recirculating Draft Line Cleaning Pump!
- Step by Step: Finding and Fixing Keg CO2 Leaks
- Kegerator Temperature Probe Placement – To Immerse or Not To Immerse? – three tests to determine optimal pla…
- Kegerator Beer Line Temperatures & Reducing Foam with a Recirculating Fan
- Kegging CO2 Use Estimations and Calculations
- Balancing Your Kegerator Draft System
- Building a Simple Ball Lock Draft Line Flushing Setup
- Build a Recirculating Draft Line Cleaning Pump
- Home Brew Keg Roundup – New & Used, 5 and 2.5 Gallon & More!
- Damp Kegerator? Fix Kegerator Condensation
- Homebrew Temp Controller Roundup! – Kegerator and Fermentation – concepts, applications and models
- Bulk Keg Orings and Keg Parts Reference
This post may contain affiliate links. We may make a commission when you use our links. This will never cost you extra. Thank you for supporting Homebrew Finds!
greatdealsMake sure the components you use are compatible and rated for your intended application. Contact manufacturer with questions about suitability or a specific application. Always read and follow manufacturer directions. tag:lnksfxd toppost:kegeratorupgrades rs:7 tag:tpr





You missed a great feature of the Intertap faucets – they support an auto-shutoff spring !
If you happen to jostle a handle, you won’t get a stream of beer flowing, just a dribble.
And I find they help the novice pourers open the tap fully instead of half-way, for some reason.
What size oetikers are you using to connect the 5/16″ gas line to the 1/4″ quick disconnects? Or do you use a different ID gas line? I just got some of these QDs but I’m worried about CO2 leaks.
Hey Sam! I use the same 3/16″ ID for gas lines, although, I suppose it doesn’t really matter too much. Since OD’s can vary, I’m not sure what size to tell you. I like my oetikers, to slip on easily without much excess space prior to clamping. Oetikers are usually sized in mm without a period. So, 133 is 13.3 mm. I’d look for clamps just slightly larger than your OD.
Nice tips, thanks. I am looking at upgrading to the QD connectors for my gas and beer. You might extend the life of your freezer if you use a gallon jug of water with a thermowell to insert the temp probe into. You will probably see less temperature fluctuation and save your compressor from cycling too much.
I’ve got a whole post on this subject. It would kick on and off less, but there would be more temperature fluctuation. The larger mass of a gallon of water would respond more slowly. As it stands now, this freezer is close to 10 years old and it shows no signs of stopping. I don’t think compressor cycles are an issue.
Can you link to aforementioned post?
https://www.homebrewfinds.com/2014/09/kegerator-beer-line-temperatures-reducing-foam-with-a-recirculation-fan.html Doesn’t specifically talk about a gallon jug, but addresses the general issue.
Thanks for the link. Good info. I don’t serve out of my freezers, I use them for cold keg storage. As such, I am not as worried about the temp fluctuation in beer lines. I do like the idea though, and I might use this in my two tap kegerator in the house.
Awesome post! Any recommendations on the type of tubing clamps you would use if you did?
I would definitely use Oetikers. Clean, do not loosen and they don’t have the tab that worm clamps have to slice you open. The only down side is they are single use. Not a big deal for this application as these things don’t typically change very often.
Thanks for the recommendation! I’ll take a look! Again, this post is very timely!!!