
Hands on Review: BrewBuilt Icemaster 100 Glycol Chiller with Stainless Bulkheads
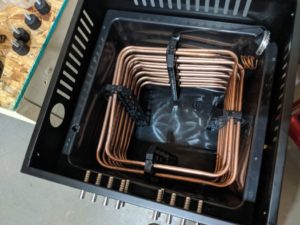
Thanks to HBF Reader Nate for conducting this review. Nate is a long time HBF Reader, serial tipster and advanced homebrewer
BrewBuilt Icemaster 100 Glycol Chiller
If you’ve really jumped into the hobby of homebrewing you’ve probably struggled with ways to keep your fermenting beer dialed in to your desired fermentation temperature. All in hopes of making that perfect beer. If this doesn’t describe you, it probably will in the near future.
The fact is… temperature plays a major role and has a significant impact on the finished beer. A few degrees either way can make a big difference. I know for my German Hefeweizen I have on tap using WLP3068 yeast if you ferment at around 62 you don’t get near as much banana in the aroma/flavor as you would if you fermented at 60-72. Fermentation temperature is important!
From starting out in buckets and keeping them in closets/basement, to swamp coolers, to modifying deep freezers to control fermentation temp, there are all sorts of creative ways to control temperature.
When folks upgrade to conical ferments (best investment ever by the way!), temperature control becomes more complicated. Do I have room for a fridge to hold my conical? Should I build a larger collar around my keezer and then lug my large and heavy conical in and out? Do I buy an AC unit and temp controller and build a fermentation chamber? Or maybe another alternative.
With all these questions there are now a few different options on the market for folks who have a little money to spend to really take their game to the next level.
Get the Current Price, Review Continues Below
BrewBuilt® IceMaster 100 | Glycol Chiller | Bulkhead Sets for 5 Fermenters | 2600btu | 110V | 8 Gal. Tank Capacity GLY353 – via MoreBeer
Icemaster 100 vs Kegland G40 vs Ss Brewtech Glycol Chiller
Before I purchased this bad boy, I did a lot of research. I looked at the Kegland G40 through Williams Brewing, but decided against it because of the need to purchase a transformer and the space it takes up. It also seemed more tuned to cooling beer lines.
I looked at Ss Brewtech Glycol Chiller, but for what I want to control (3-5 conicals). their 1/5hp just wasn’t going to do it and their 3/8hp is another 500 bucks!
I also looked at Penguin and others but, in the end, their costs were all closer to 1k+ which for what I was wanting was out of my price range,
The price and features made my choice clear and I decided on the Icemaster 100.
Hands on Review
So the Glycol Chiller got to my house in a week or less. The setup was well packed and arrived to me in perfect condition. No damage, not even a cosmetic issue. This was something that concerned me based on other reviews I’d read.
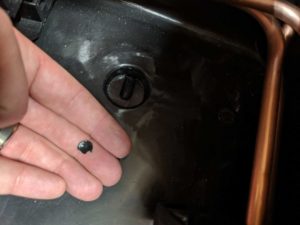
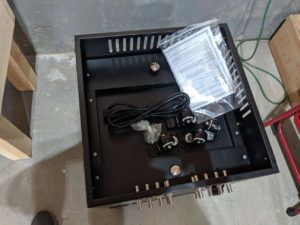
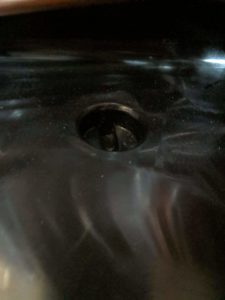
The one thing I will mention is double check and make sure the plastic piece that was drilled out for the drain hole at the very bottom of the tank is removed. In the picture you can see how mine was still in there. I think is why some folks have had issues with draining (based on other product reviews). My theory for people struggling with that problem is that this plastic piece wasn’t removed and made it clogged or partially clogged the drain. I had no leaks or issues after removing the little plastic piece and was able to drain it using the plug in the back. The overall factory inspections/QA could have been better, now you know this tip.
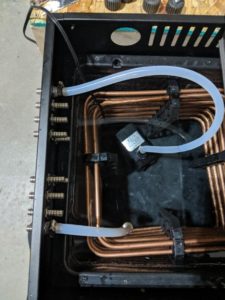
Next up, getting pumps and tubing ready. You need a piece of tubing to connect to the inside of the 3/8″ stainless steel bulkhead, That tubing connects to your pump in the bottom of the water pan. You will need 3/8″ ID tubing for this part of the process so make sure you have the lengths you want/need.
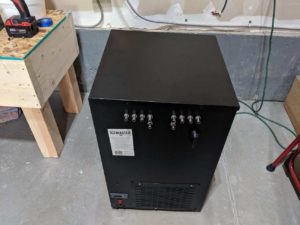
Next you connect lines outside the chiller and take those up to your coils on your conical. I used the left side for my outputs, and the right side for my returns. Then, of course, on the inside of the bulkhead you need tubing to take the liquid back into the tank. This completes the circuit.
MoreBeer has a good description of the connections required, per fermenter…
In order to hook up the Icemaster to your fermenter or tank’s cooling system, you will need 4 lengths of tubing. All tubing connections should be secured with hose clamps.
Length 1: Submersible pump outlet to inner barb of 1st bulkhead
Length 2: Outer barb of 1st bulkhead to cooling system inlet
Length 3: Cooling system outlet to outer barb of 2nd bulkhead
Length 4: Inner barb of 2nd bulkhead to Icemaster resevoir (should drain freely, no connection necessary)
A couple things worth noting….
- You’ll need one pump per fermenter.
- The Icemaster 100 Glycol Chiller has a number of applications and compatibility with a variety of systems. Coolstix, Ss Brewtech Fermetners, Spike Conicals, Grainfather, Speidel and more. Check the product page for a complete list.
As far as pumps go, MoreBeer has a number of options. You can also source your own pump. If you do that I would recommend a pump that has a strong output and height ability. The bigger the better.
It’s Quiet! One item I was really surprised by is the sound. This thing is so quiet! I have it in my garage and if I’m out there tinkering around, I don’t even hear it really running.
Caveats and Things to Consider
Condensation: You will want to consider condensation on your fermenter. As the chiller cools it will create condensation. A pool of water on your floor isn’t fun. An insulation sleeve can help. There are some ready made options out there, you can also make your own.
Displays in Celsius: Not a huge deal, but I wish the controls were in Fahrenheit.
Conclusions
So far, this sucker has been quite impressive to me. I can dial in fermentation temps for my conicals and cold crash as necessary.
Get the Gear
BrewBuilt® IceMaster 100 | Glycol Chiller | Bulkhead Sets for 5 Fermenters | 2600btu | 110V | 8 Gal. Tank Capacity GLY353 – via MoreBeer
Documents: Icemaster 1000 setup and user guide
More Photos
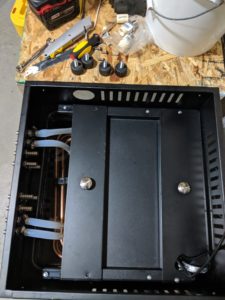
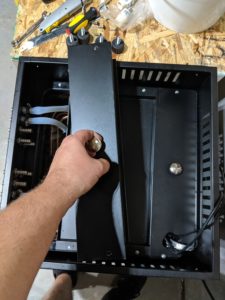


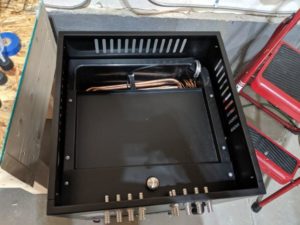
From the product description, check product page for current description, price and availability:
The Icemaster is designed to cool fermentations in small vessels. It can be used with any vessel that has a glycol jacket or submersed cooling coil/rod. For each vessel you want to cool you will need to buy one of our BrewBuilt™ Chilling Pump Kits. Each tank is able to be separately temperature controlled. Each Glycol Pump Kit includes a submersible pump that is placed in the cool bath of this chiller along with a digital controller. The digital controller includes a thermal probe that should be inserted into a thermal well in your vessel or can be taped to the outside of the vessel if you don’t have a thermal well. The digital controller then measures the temperature of your tank and turns the submersible pump on or off to cool to your desired set temperature. Up to four tanks can be controlled separately with one Icemaster and four BrewBuilt™ Chilling Pump Kit (GLY355).
Compatibility
The Icemaster can be used with any fermenter that has a built in cooling jacket, added Coolstix, or a submersed cooling coil. It works well as the cooling source for the following sytems and fermenters.
- Coolstix – Coolstix can be added to a wide range of carboys, fermenters, and tanks and the Icemaster works really well in combination. Each Coostix Complete Kit comes with a pump kit and controller.
- Ss Brewtech Fermenters and Brites with optional FTS Temperature Control Systems – Because FTS systems include a pump and controller you will not need to buy a separate Glycol Pump Kit.
- Spike Conical with Optional Cooling Package – Because the optional Spike cooling system includes a pump and controller you will not need to buy a separate Glycol Pump Kit.
Speidel Tanks with Optional Cooling Jackets – You will need one Glycol Pump Kit for each tank. - Grainfather Fermenters – Grainfather fermenters have standard cooling jackets. You will need one Glycol Pump Kit for each fermenter
- Blichmann Fermenators with Optional Cooling Coil – You will need one Glycol Pump Kit for each Fermenator.
Capacity
It is always difficult to determine exactly how many tanks can be chilled at one time as it depends on what is happening in each tank, if the tank is insulated, and what the ambient temperature is. Cold crashing always requires the most energy and requires tank insulation. We have experimented with capacities and can provide this general guide based on a 75 degree ambient and neoprene insulation. Neoprene a modest amount of insulation so you would obtain better results using Armaflex or a higher R rated insulation. If only controlling fermentation temps the capacity would be higher. Four BrewBuilt™ Chilling Pump Kit (GLY355) is the maximum that will fit in the Icemaster. We are working on smaller glycol pump kits, where the pumps have smaller footprints, so the Icemaster right now has the capacity to use 5 pumps through the bulkhead fittings.
Cold Crashing capacity at 75F with neoprene insulation (double for fermentation temperature control):
2 – 1BBL (31 Gallon) Tank with neo
3 to 4 – 1/2BBL (15-20 Gallon) Tanks
4+ – 10-14 Gallon Tanks
4+ – 5-7 Gallon Tanks
Set Up
In order to hook up the Icemaster to your fermenter or tank’s cooling system, you will need 4 lengths of tubing. All tubing connections should be secured with hose clamps.
- Length 1: Submersible pump outlet to inner barb of 1st bulkhead
- Length 2: Outer barb of 1st bulkhead to cooling system inlet
- Length 3: Cooling system outlet to outer barb of 2nd bulkhead
- Length 4: Inner barb of 2nd bulkhead to Icemaster resevoir (should drain freely, no connection necessary)
Specifications:
- Tank Capacity: 30L/8 Gal. Water Capacity
- Compressor: 3/8 HP
- Cooling Capacity: 950 Watt/3200btu/.26 tons
- Refrigerant: r134a
- Voltage: 110V (3.6 amps)
- Dimensions: 410mm x 410mm x 660mm
- Includes 10 stainless bulkheads with 3/8″ OD barbs
- Wheels included
More MoreBeer Reviews+Related:
More Homebrew Finds!
- Last 50 Finds!
- Top Deals – a curated list of the best deals
- Homebrew Reviews – one of the largest libraries of homebrew reviews in existence!
- Our Top Posts – tips, how-tos, resources posts and more
This post may contain affiliate links. We may make a commission when you use our links. This will never cost you extra. Thank you for supporting Homebrew Finds!
greatdealsreview:icemaster tag:tpr

I know this is an old post but how much glycol/distilled did you put in? I believe its an 8 gallon reservoir
I just got one of these, I added 2×2.5G of distilled water and 1G of Glycol. I think I topped it off with some additional distilled or “drinking water” as the coils weren’t completely submerged. The documentation calls for a 4:1 water:glycol mixture.
There is absolutely no way to get all the hoses (out to AND from the fermenters) and electrical cords through that tiny slot, however. I skipped the smaller cover which I’m sure will affect performance during the 117F Phoenix summers.