
Adding a Tri-clamp Fitting to a Homebrew Keg Lid!
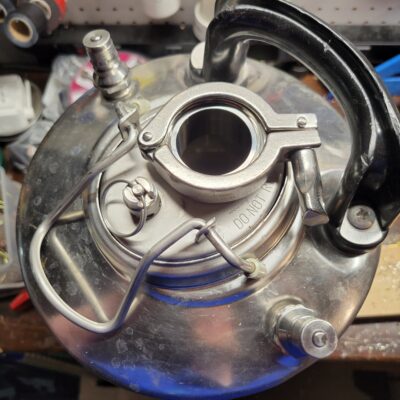
This article is by Homebrew Finds Reader Kris G. Thank you Kris for your creativity and hard work!
Editors Note: This is an advanced project that requires additional tools, skill and materials. This post outlines the process that Kris took to modify his keg lid with a weldless tri-clamp bulkhead. Product specifications can change over time, double check to make sure that current specifications match your needs.
Adding a Tri-clamp Fitting to a Homebrew Keg Lid
Carboys, conicals, buckets, kegs, etc. There is an ever-growing number of options for fermentation vessels. I recently moved away from carboys to experiment with pressurized fermentation. I didn’t feel like buying anything new, so why not repurpose a corny keg for fermentation? This past year I “right-sized” my batches down to 2.5-3 gallons making a corny the perfect size for fermenting. With a couple modifications (shortened dip tube, hop screen, etc), I had an old 5 gallon corny now as a dedicated fermenter. An added bonus was that it fit perfectly in my temp-controlled chest freezer.
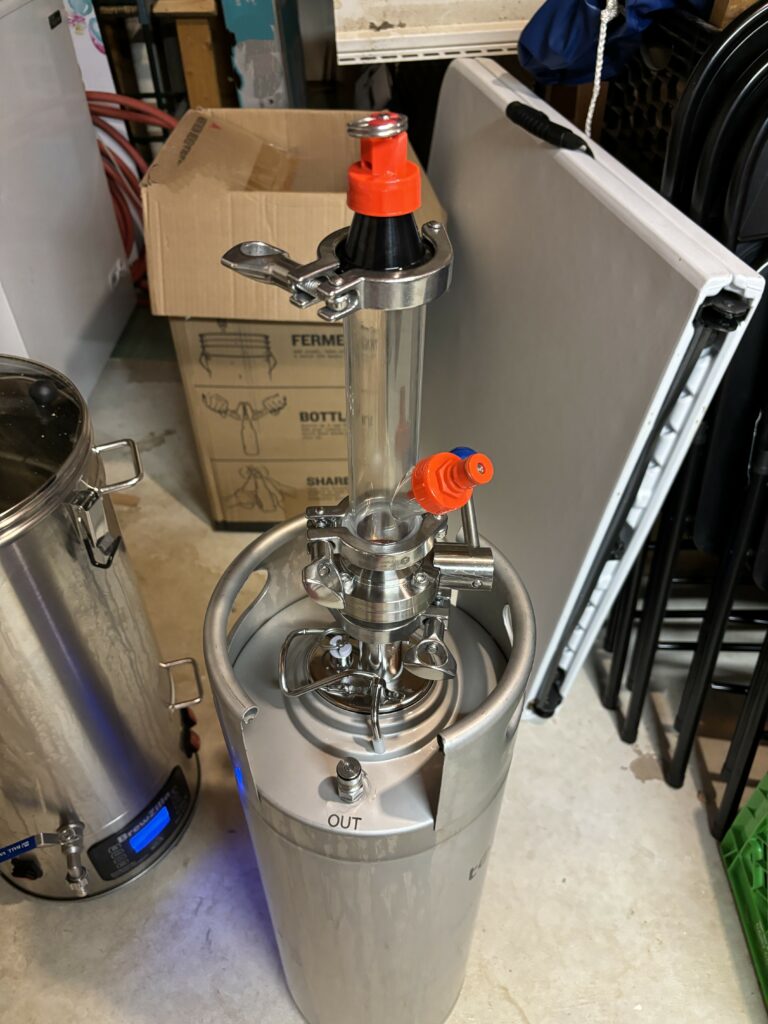
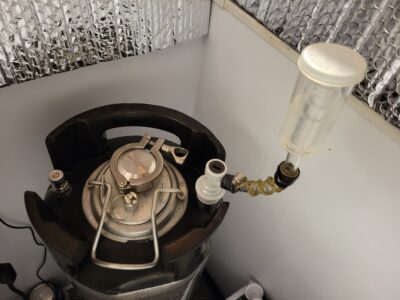 Fermenting in a Keg Using TC Equipped Lid
Related: Fermenting Under Pressure
Commercial Option Now Available, Build Continues Below:
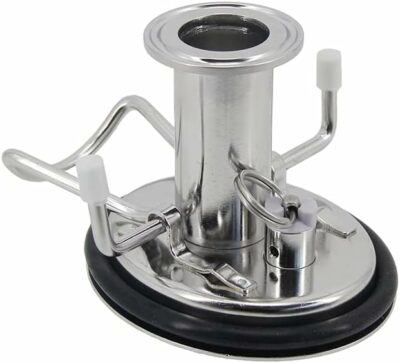
304 stainless steel Cornelius Keg Lid with 1.5″ Tri-clamp Ferrule,NEW Corny Beer Keg Lid 60PSI PRV Food Grade Dry Hopper – affiliate link, note that multiple variations of this product may be available, as such a different version may appear at this link
This article contains affiliate links. We may make a small percentage if you use our links to make a purchase. You won’t pay more and you’ll be supporting Homebrew Finds and more content like this. Thank you for your support!
I started seeing some other homebrew fermenters with tri-clamp connections on top. Blogs all around showed them used with blowoff tubes, thermowells, carbonation stones, CIP spray balls, etc. It seemed like a great universal connection with a ton of uses. Most importantly to me, I wanted the tri-clamp connection to build an oxygen-free dry hop dropper (that build is an article for another day).
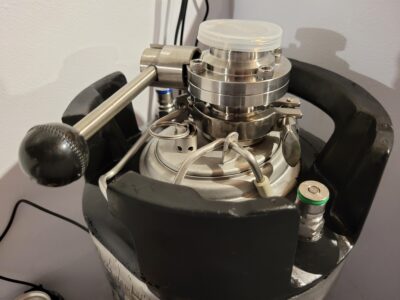 TC Equipped Lid with Butterfly Valve – Also: Color Coded Keg O-Rings
Read on to see my trials and tribulations while adding a TC bulkhead to my corny lid.
Build note: This is a weldless build. If you’ve got the ability/skill/tools to weld stainless, go for it!
Safety Note: Ensure that you are using all tools properly and wearing all the proper PPE. You will be drilling/cutting metal which is both sharp and hot.
PLEASE BE CAREFUL WHEN FOLLOWING THESE INSTRUCTIONS.
HBF is not responsible for your irresponsibility. At time of this writing, I am fully up to date with my tetanus shot. That may or may not be related…
Supplies
- Cornelius keg lid with wideset bail (the lids that have the narrow straight bails don’t leave enough room)
- Weldless tri-clamp bulkhead
- 1-5/8” (41mm) Tungsten Carbide Hole Saw (or step bit)
Editors Note: Note that multiple variations of these products may be available, as such a different version may appear at these links. Double check sizes and features.
Converting a Homebrew Keg Lid to Tri-Clamp
This breaks down into 3 steps: (1) reversing/flipping the direction of the bail, (2) marking and drilling the hole, and (3) installing the bulkhead
Reversing the bail
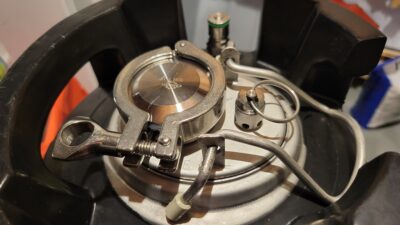 Modified Lid with Reversed Bail
This is, by far, the hardest part of this build. If I knew I could have just welded it after, I would have cut the bracket that held the bail in place. If I try this again, I may attempt to cut the bracket and re-attach it with JB Weld KwikWeld for steel.
- Use pliers to pull off one of the rubber ends on the bail
- Then using a combination of pliers, vise grips, trigger clamps, and workbench vise, I straightened the 90º bend as flat as possible at the end of the bail. (This is one of those times that I wish I just had the right tool for the job. I just don’t know what the ‘right’ tool would have been).
- Using both trigger and C-clamps, I squeezed the bail until I could pull through the hole in the bracket.
- To add some extra space to work, use a hacksaw to front part of the bracket that has the hole to lock the bail. Once it’s cut off, it would be a good idea to file down any sharp edges. I used a small rotary tool with a grinding stone for that, but a hand file would work, too.
- Now feed the bail back into the brackets so that it faces the opposite direction closing over the PRV.
- Using the vise grips, vise, pliers, elbow grease, brute force, etc, bend the end of the bail back down to a 90-ishº angle and push the rubber tip back on.
Marking and drilling the hole
The hard part is done. This next step is relatively easy, but requires some accuracy.
- Turn the lid over and place the large nut of the bulkhead on its underside.
- The nut should be as far from the PRV as possible while still being able to rotate. Using a punch or auto-punch, mark the center point inside the nut.
- Remove the nut and prepare to drill. Place the lid on a scrap piece of wood.
- The tungsten carbide hole saw works perfectly in a cordless hand drill. No special drills or machines are needed to cut though the stainless. I successfully did it on 2 lids with no issue.
- Once the hole is cut, file any sharp edges using a hand file or rotary tool.
Installing the bulkhead
The bulkhead comes with 2 large red o-rings. You only need one. The other is a spare. If you use both, the bulkhead will not hold pressure properly.
- Slide the bulkhead through the hole with the o-ring on the top of the lid.
- Tighten the nut on the bottom. I used channel lock pliers on the nut and I threw a clamp on the ferrule to tighten it as far as I could by hand.
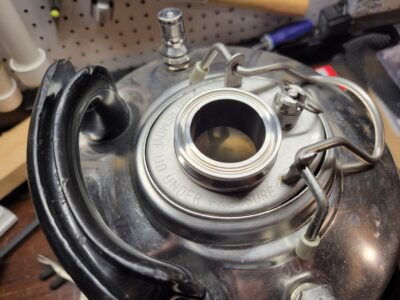 There you have it! You have installed a tri-clamp ferrule on your corny keg lid. Now go out and find all the possible uses for this excellent connection.
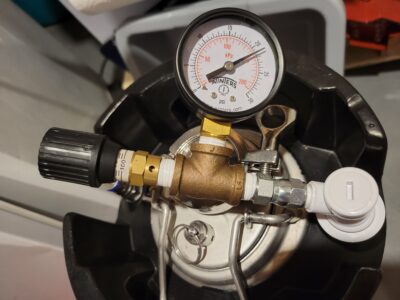 Pressure Test Using Spunding Valve
Results
- Fully functioning 1.5” tri-clamp ferrule now attached to the corny keg lid
- The lid easily goes on and off corny kegs, even with the new bulkhead. I actually find it easier than the carbonation caps I have.
- Pressure tested at 22psi for 24+ hours with no leaks
Limitations
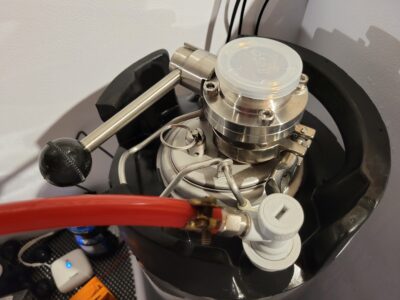
- The reversed bail doesn’t fit on a standard keg with 2 rubber handles. I cut one of the handles to make room for the bail. It was easy enough with a reciprocating saw and 24tpi blade, but not ideal.
- The lid can be installed or removed only when there are no attachments on the bulkhead. A cover and clamp is even too much.
- The 1.5” tri-clamp butterfly valve isn’t quite big enough to reliably be used for a dry hopper setup. I have a new design in mind to solve that. I just haven’t purchased the pieces needed yet.
- There is little room for error when drilling the hole. If it’s too far near the edge, the nut can’t tighten enough to seal the bulkhead. If it’s too close to the PRV, there’s not enough room to get a clamp around the ferrule.
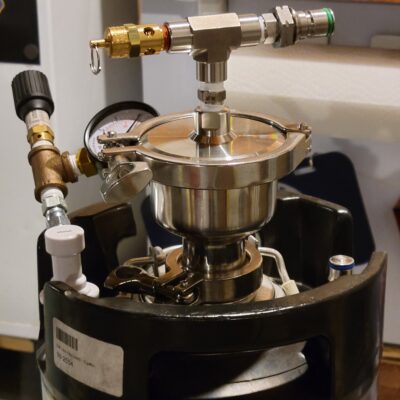 Fermenting Under Pressure. Kveik NEIPA Day 6. Real life test, no leaks! This is a sneak peek at Kris next write up – a Dry Hopper attachment. Connect with Us to stay in the loop and see build details.
Supplies
- Cornelius keg lid with wideset bail (the lids that have the narrow straight bails don’t leave enough room)
- Weldless tri-clamp bulkhead
- 1-5/8” (41mm) Tungsten Carbide Hole Saw (or step bit)
Editors Note: Note that multiple variations of these products may be available, as such a different version may appear at these links. Double check sizes and features.
Ready Built Option: 304 stainless steel Cornelius Keg Lid with 1.5″ Tri-clamp Ferrule,NEW Corny Beer Keg Lid 60PSI PRV Food Grade Dry Hopper – affiliate link, note that multiple variations of this product may be available, as such a different version may appear at this link
Single Strap Handle Kegs
Single strap handle keg design is required to work correctly with this build.
- KOMOS® Homebrew Keg – 5 Gallon Ball Lock Keg KEG685 – via MoreBeer
- Five Gallon Keg, Ball Lock, New, Italian AEB – via Keg Connection
- Premium Refurbished AEB 5 Gallon Ball Lock Keg, Single Metal Handle – via Keg Connection
- Search Amazon for “strap handle homebrew keg” to shop around
Related: Build a Dry Hopper for Cornelius Kegs!
 Building a Dry Hopper for Corny Kegs – Dry Hop Under Pressure!
More Tri-Clover/Tri-Clamp! Tri-Clamp Fittings at Proflow Dynamics
More Homebrew Hacks!
This post is part of our Homebrew Hacks Series of Posts, Check out the full lineup…
More Homebrew Finds!
- Last 50 Finds!
- Top Deals – a curated list of the best deals
- Homebrew Reviews – one of the largest libraries of homebrew reviews in existence!
- Our Top Posts – tips, how-tos, resources posts and more
Most Recent Deals
Our Spunding Valve Resource Post!
tsrspund pinnedThis post may contain affiliate links. We may make a commission when you use our links. This will never cost you extra. Thank you for supporting Homebrew Finds!
greatdealsBy Brad Probert. Check out Brad’s website – beersnobby.com
This is a Top Post! See: All Top Posts
Important Information and Disclaimers
Make sure the components you use are compatible and rated for your intended application. Contact manufacturer with questions about suitability or a specific application. Always read and follow manufacturer directions.
All data and information provided on this site is for informational purposes only. Homebrew Finds makes no representations as to accuracy, completeness, currentness, suitability, or validity of any information on this site and will not be liable for any errors, or omissions in this information or any losses, injuries, or damages arising from its display or use. All information is provided on an as-is basis. To use Homebrew Finds you must be 21 years or older.
Price, promotions and availability can change quickly. Check the product page for current price, description and availability. tag:lnksfxd top:tckeglid tag:tpr


I did this recently with a 15 gallon corny keg. It just so happened to have the correct lid and the keg handles are 90 degrees, so no worries about cutting one of them off. The only money I was out of was the triclamp bulkhead, carbide bit, and dolly. I doubt I’ll find a 15 gallon stainless fermenter for under $150. Thanks for the idea and cheers!
This is awesome, I’ve been looking in to doing this for dry hoping within the keg an stumped on this great work.
Couple questions do you reckon you could squeeze a 2″ triclamp on it ?
An how did you go about dry hopping with just the 1.5 triclamp ? Maybe it would work better with a 1.5 ball valve instead of a butterfly valve ??
Cheers for your feed back.
The keg lid suggested from Amazon is not the same to the keg lid used on this article, i ordered it and the hang bends in the other side, the TC fitting does not fit.
Hey there, The lid requires modification, check out the section on reversing the keg lid bail.
Hey, reversing the bail on the lid was definitely the hardest part of this project.
With the amount of hardware and the labor involved, it appears it would have been cheaper to buy an actual fermenter, designed for pressure fermenting.
Maybe, but where’s the fun in that? It took some labor, but not much time, and definitely not much money. My big reason for going with corny kegs is that I had limited space in the fermenting chamber, but can still fit 2 of them. Plus they were just laying around unused. All in all, if I could weld, it would’ve been a significantly easier task. Plus I’m now loving the TC connection for my dry hopper.
Having made my own TC Corny lid, I strongly recommend using a step bit over a hole saw— soooo much easier and considerably faster too.
Hey, I tried both as trial and error. The carbide bit went through so much easier than I anticipated. I was very happy with it.