
BrewZilla Gen 4 Temperature Control and Programming Tips and Tricks

Updated: February 27, 2025
This write up is by Homebrew Finds Contributor Brad Probert. Brad is an engineer, expert homebrewer and experienced reviewer. Grab a link to Brad’s website at the end of this review.
BrewZilla Gen4 Temperature Control and Programming Tips and Tricks
The BrewZilla Gen4 has a list of features that make it unique from other All-In-One brew units. Those are covered here: https://www.homebrewfinds.com/hands-on-review-brewzilla/. But there are some significant functions and features that need a deeper look to fully understand them. In this write-up, I will focus on temperature control as well as programming tips to automate your brew day.
Temperature
When I first got the BrewZilla Gen 4 with the Bluetooth temperature probe, I didn’t understand it. I thought it just gave me the option to use either the temperature sensor in the base of the unit (like most other AIO units), or the Bluetooth as a wireless probe sitting in the grain bed. But that’s not it. It uses both sensors SIMULTANEOUSLY. No mass market controller does that- AIO or otherwise. To get that kind of functionality you’re talking a custom-built controller running some of the advanced brew control software.
Limited Time Deal, Closeout Pricing at William’s Brewing
Brewzilla 35 Liter Gen 4 via William’s Brewing
- As of this posting, William’s Brewing has this on sale for just $469.99. That’s a savings of $80.
- Shipping is free or reasonably priced flat rate to addresses in the contiguous US depending on your order size for most items.
Brewzilla 35 Liter Gen 4 110 volt
Learn More: Hands on Review: BrewZilla All Grain Brewing System!
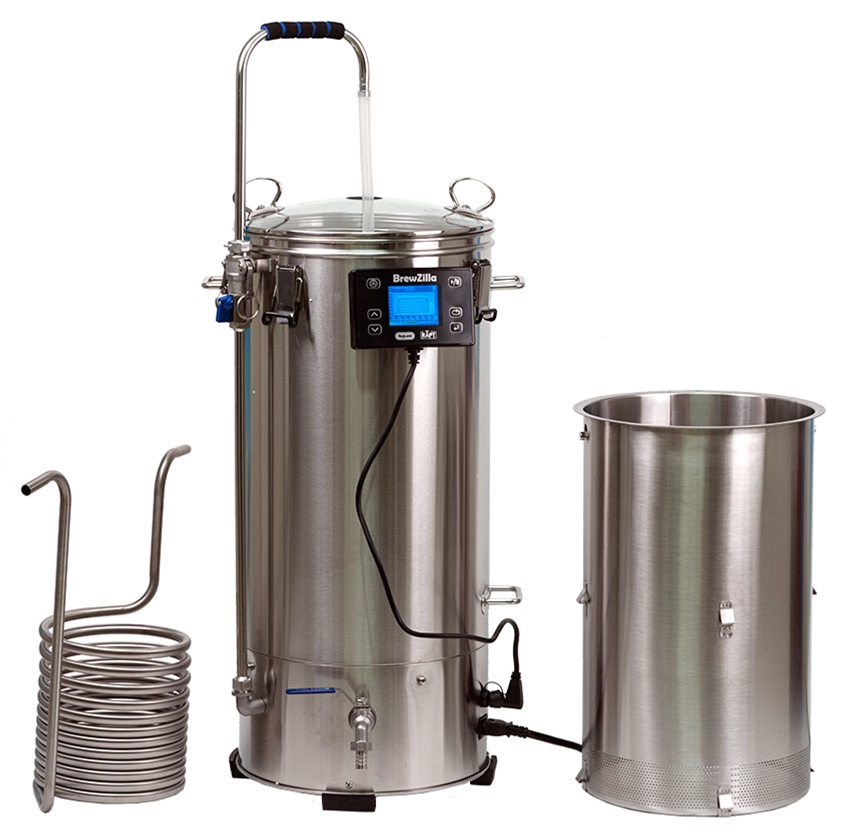
Kegland’s implementation of dual-probe control is very simple and straightforward in the BrewZilla. To best understand how this works, you need to think of your system in its recirculation loop. The wort drains down from the grain bed to the bottom, gets heated by the elements in the base, then gets sucked into the pump to get dumped on top of the grain again. The Bluetooth probe sits in the middle of the grain bed, and base sensor sits in the small volume of wort getting heated by the elements. When you’re at a steady target temperature, both of these probes should read about the same, as you ideally have uniform temperature throughout your system.
Compare BrewZilla Prices, How-To Continues Below:
- BrewZilla William’s Brewing
- BrewZilla at MoreBeer
- BrewZilla All Grain Brewing System | Gen 4 | Integrated Pump | Includes Wort Chiller | Wifi | Bluetooth| Rapt | 35L | 9.25G | 110V AG500
- Gen 4 BrewZilla | All Grain Brewing System | Integrated Pump | Includes Wort Chiller | Wifi | Bluetooth| Rapt | 65L | 17.1G | 220V AG502.US
- BrewZilla All Grain Brewing System With Pump | Gen 3.1.1 | 35L/9.25G (110V) AG475A3
- BrewZilla All Grain Brewing System | Gen 3.1.1 | 65L/17.1G | Built-in pump | Wort chiller included | 220V AG490A3
- Search Amazon for “BrewZilla” – offerings and availability vary
This article contains affiliate links. We may make a small percentage if you use our links to make a purchase. You won’t pay more and you’ll be supporting Homebrew Finds and more content like this. Thank you for your support!
When running a stepped mash profile and you step up to a new temperature, the heating element kicks on and the wort at the bottom of your system will get heated first. But the temperature you are most interested in is your grain bed, and your Bluetooth probe hasn’t seen that heated wort yet. If you ONLY monitored the probe in your grain bed, the wort at the bottom of your mash pipe could get really hot until wort trickled down to reach the probe in the middle of your grain bed. At that point, you’d blow right past your target temp as more of that super-heated wort filters through your grain bed. On the other hand, if you ONLY monitored the probe in the bottom of your mash, it would take longer before the probe in the middle of your grain bed reaches the new target temperature.
Hopefully now you’re seeing where monitoring BOTH is advantageous. With the RAPT controller, you set an allowed temperature difference between the bottom probe and your target temperature. You then figure out the right balance between the speed of hitting your next temperature step and minimizing overshoot. The controller allows you to get as crazy as a 50F differential. Kegland suggests a value of 20-30F is good. The exact value will depend on your heating element power, pump duty cycle/flow restriction, and mash details (amount of grain, crush size). For me, I found 4F to be ideal. It gave me a strong enough overshoot that I could reliably program mash triggers to start their timers once the target temperature is reached, but not have a long/lengthy period above the target temp.

First you need to calibrate your temperature sensor. In this case, you aren’t trying to make ice water = 32F and boiling water = 212F (less altitude adjustments). You just want both of your sensors to match. Again, thinking of your brewing recirculation loop, you’re measuring wort at the bottom of the unit and tracking its progress of heating the grain bed as measured by the Bluetooth probe. If these 2 sensors don’t match, you’ll be making incorrect decisions to stop heating or keep heating just due to them being out of sync. For me, since my step mashes vary between 100F and 168F, I used those two temperatures as my 2-point calibration (I could care less if it’s able to accurately measure an ice water slurry).

I set the unit temperature to 100F. Then once it was stabilized, I lowered the Bluetooth thermometer down to physically touch the temperature sensor on the bottom of the vessel. Once that stabilized, I used the Bluetooth temperature reading and adjusted the calibration data so the brew unit matched it. Then I repeated that process at 168F.
Developing PID Gains
Before you set out to program your PID gains, you need to start by asking yourself what your ideal temperature response is. If you do single temperature mashes, you’re going to just be looking at stability and ability to stay centered around your target. If you do step mashes, you’ll be interested in how the system handles steps up to a higher temperature. And even on step mashes, you might be obsessed with not overshooting the target and instead getting as close to a square wave response as you can. Or if you use the programming features in the RAPT environment to start your step timer when you hit target temperature, you’re going to need to ensure you always get an overshoot, otherwise you may never trigger your timer to start.


To develop your gains, you will have to experiment. There’s no other way around it. And it takes a lot of experiments, so trying something out one batch at a time isn’t practical. You’ll have to suffer through so many batches where your temperature control is out of whack. And that’s frustrating. I went through about 15-20 test runs, with each test run having 4 temperature steps. I sacrificed a batch of grain of my typical volume and added water to my normal mash thickness. Then I would heat it about 20 degrees or so and see how it responded. Once I got up to 168F, I’d drain off the wort and fill it again with cold water and go again. If felt wasteful, but since it was planned, it was much better than figuring it out on brew day and messing up a recipe with out of whack temperature response.

Since you’re trying to tune a dynamic system, you can’t do this with simply the BrewZilla filled with water. You need grain in there to give you the thermal mass and make your temperature changes slow to react. You need a grain bed that slows down your recirculation to make sure it accurately captures how quickly you can react to temperature changes from your probe buried in the mash to the heating element at the bottom. And you need to have your pump flow and recirc valve position the same for the same reasons. Controller power has to be at the % you will use when running mash as well.
My Settings
Heating hysteresis: 0.1 F
Allowed sensor diff.: 4 F
Relay cycle time: 5 sec
PID P coefficient: 0.380
PID I coefficient: 0.0100
PID D coefficient: 0.0500
Programming A Profile – Options

An important concept to grasp when programming profiles on the BrewZilla is that the source copy of your profiles exists on the RAPT cloud. When you create a profile or edit it, you do that on the cloud. When you’re happy with it, you click a button on the RAPT portal and download it to your BrewZilla controller. You edit the profile on the cloud via a laptop at https://app.rapt.io or on the app interface on your phone. This was confusing to me for a while, as on my other brew controllers, I set up the profile directly in the brew controller, there’s no “transfer” step. But once you grasp this concept, it quickly doesn’t seem so odd.
Kegland is continually working on the BrewZilla software, so I’m sure what I list here will undoubtedly change and grow over time. This is current as of late April 2024. I’ll start by listing out all the choices/options the RAPT portal gives you for programming a profile. Then in the next section, I’ll describe how I’ve used these in my profiles.
NAME. Pretty self-explanatory text field.
STEP TYPE. You can either heat to a target temperature or do a gradual/linear ramp of temperature over a specified time.

TARGET TEMPERATURE. Again, self-explanatory. One thing you’ll find is that even though you can select the interface to be in Fahrenheit, the Australian controller likes to think in Celsius, so sometimes it will tweak your number to a step point that it can readily convert from Celsius. For example, even though I type in “168F” for my target temperature, it changes it to “168.08F”.


GO TO NEXT STEP WHEN. You get three choices here: When the step timer is finished, When the target temperature is reached, or When you push a button on the controller screen. If you select the timer option here, it obviously goes hand in hand with what you pick for the next option. If you pick the option of pushing a button on the screen, it will hold to the target temperature continually until you tell it to go to the next step.

START THE STEP TIMER. This also has three choices: As soon as the step starts, When the target temperature is reached, or When you push a button on the controller screen. So the difference between the first two choices is whether you want to control open loop or closed loop. Both cases run the timer, but in the first case, the timer starts immediately when the step starts. In the second case, the timer doesn’t start until you reach the target temperature. Most other brew controllers on the market are just open loop where they run a certain time. That’s definitely the simpler path. If you do decide to go the path of waiting until it hits the step temperature, be advised that it doesn’t count to be just “close” to the target temperature. You have to reach it. So when dialing in your controller gains, keep this in mind. You must have some controller overshoot to get it to trigger. The button push option here is if you want to manually monitor it and decide when you think it’s effectively reached the step temperature.
 STEP DURATION. You type a number and then select minutes, hours, or days. Obviously the “days” option pertains to when you use this RAPT programming interface for their fermentation temperature controller. You can type in a number with decimal places. For example, when programming a step to be an overnight delay, I’ve programmed in “9.2 hours” instead of doing the math and making it “552 minutes”.


Programming A Profile – Example Steps
DELAYED START TIMER. Other brew controllers have a much more straightforward input for this, but the BrewZilla can still do it, too. Once you have this set up and saved as a profile step, you don’t have to rethink it, you just edit the step time for the delay and download the updated profile to your BrewZilla. For my timer, I just set the target temperature to room temperature and then set the step timer to the time I plan to start the profile on my BrewZilla and the time I want it to start heating the strike water. The logic then gives you a target temperature in a linear ramp between the current temperature and the target temperature over that duration. If you don’t want it to apply any heat, you could set the target temperature really low like 32F and then the heating elements will never kick on.


HEAT STRIKE WATER. This is my next step after my delayed start timer (or my first step if I’m not doing a delayed start). I simply set the strike water temperature from my Brewfather recipe, and then don’t let it progress to the next step until I hit a button on the controller. It gets to strike temperature and just sits there holding the temperature until I’m ready to drop in my grains. I also use the Alarm feature on this step, and have it let me know that the strike water is heated (BrewZilla beeps, notification pops up on my phone, and I get an email at the same time).

MASH IN. Once the strike water is heated and I’m ready to put the grains in, I hit the button from the HEAT STRIKE WATER step, and it goes to my MASH IN step. Here I just step down to the target mash step temperature and it holds there as I lower the grain basket into the water, filled with grain. After stirring it well and getting everything mixed in and dough balls broken up, I end this step by pushing a button to go to the next step.
 MASH STEP(S). I typically do at least one mash temperature and then a Mash Out, but sometimes multiple steps before Mash Out. These are all pretty straightforward. I like starting the timer when mash temp is reached. It just feels more consistent/controlled. I have the controller set up to always give a slight (~2 degrees) overshoot that lasts only briefly, but reliably starts the timer.
 MASH OUT HOLD. After my 10 minutes @ 168F Mash Out step, I go to this holding step. At this step, I leave it at 168F and have an Alert report that Mash Out is done. This way, if I’m in the middle of something else, I know it’s just sitting there waiting for me to pull the grain basket. I lift the grain basket and set it on its feet to drain while I sparge. Once the grain basket is out of the wort, I hit a button, and it goes to the next step where it starts to heat the wort to just before boil while I’m sparging.


 HEAT TO BOIL. I set this to control to just at/before boil while sparging. I figure the basket sitting above the heating wort helps keep heat in and heat to boil faster. To help get the hot wort off the bottom, where the temp sensor is, I recirculate the wort during this process, with the hose snuck in between the draining basket and the rim of the BrewZilla. The reason I don’t just let it go to boil here is because I want to get a pre-boil gravity reading so I know how to adjust my boil intensity higher or lower to try to end up at my OG.
Summary
The dual temperature probe option available on the BrewZilla is unique for entry-level brew controllers, so it puts a lot of power in your hands. The Profile programming also has lots of unique options to do creative things. But to really get the most benefit out of it, you have to put in a bit of work. At a minimum, you have to do the temperature calibration procedure so that both of your temperature probes are aligned. From there, you can take the easy path of copying someone else’s controller settings and you might get lucky. The more involved path is spending an afternoon doing trial runs to get the behavior that matches what you’re looking for. To some, that sounds like a PITA, to others it sounds like fun! Lastly, programming the profiles just takes a bit of time until you get your brain adjusted to thinking the way they have it set up. Then you’ll be off to the races doing all kinds of unique things designed exactly for the way you do your brew day.
Get a BrewZilla, Compare Prices:
- BrewZilla William’s Brewing
- BrewZilla at MoreBeer
- BrewZilla All Grain Brewing System | Gen 4 | Integrated Pump | Includes Wort Chiller | Wifi | Bluetooth| Rapt | 35L | 9.25G | 110V AG500
- Gen 4 BrewZilla | All Grain Brewing System | Integrated Pump | Includes Wort Chiller | Wifi | Bluetooth| Rapt | 65L | 17.1G | 220V AG502.US
- BrewZilla All Grain Brewing System With Pump | Gen 3.1.1 | 35L/9.25G (110V) AG475A3
- BrewZilla All Grain Brewing System | Gen 3.1.1 | 65L/17.1G | Built-in pump | Wort chiller included | 220V AG490A3
- Search Amazon for “BrewZilla” – offerings and availability vary
Learn More: BrewZilla Hands on Review!
 Hands on Review: BrewZilla All Grain Brewing System
Related: Hands on Review: Robobrew (BrewZilla v1) All Grain Brewing System
Kegland Gear Reviews!

More Homebrew Finds!
- Last 50 Finds!
- Top Deals – a curated list of the best deals
- Homebrew Reviews – one of the largest libraries of homebrew reviews in existence!
- Our Top Posts – tips, how-tos, resources posts and more
Recent Deals!

We are Homebrew Review HQ! See Our 10 Most Recent Reviews

This post may contain affiliate links. We may make a commission when you use our links. This will never cost you extra. Thank you for supporting Homebrew Finds!
greatdealsBy Brad Probert. Check out Brad’s website – beersnobby.com
Price, promotions and availability can change quickly. Check the product page for current price, description and availability.
Make sure the components you use are compatible and rated for your intended application. Contact manufacturer with questions about suitability or a specific application. Always read and follow manufacturer directions. tag:lnksfxd review:brewzillatips #tag:tpr