Category Archives: Brew Systems

Coldbreak Brewing Equipment 50′ Stainlesss HERMS Coil

Coldbreak Brewing Equipment CBHC1250SS Herms Coil, 1/2" by 50', 0.5" OD, Stainless Steel, Silver

Coldbreak Brewing Equipment CBHC1250SS Herms Coil, 1/2″ by 50′, 0.5″ OD, Stainless Steel, Silver


From the product description, check product page for current description, price and availability:

  • 1/2-inch x 50-foot stainless steel herms coil
  • 12-Inch diameter 2.5-Inch inlet/outlet length
  • 8.5-Inch distance between inlet/outlet. Can be stretched to 18-inches
  • Perfect for step mashing 10-15 gallon batches
  • Attach to a kettle with weld-less compression fittings or direct welded fittings

Coldbreak Brewing Equipment CBHC1250SS Herms Coil, 1/2″ by 50′, 0.5″ OD, Stainless Steel, Silver


This post contains affiliate links. We may make a commission when you use our Amazon links. This will never cost you extra. Thank you for supporting Homebrew Finds!

pinned

amazon

Vinyl Vessel Decals “WATER, MASH, BOIL” – from $3.75

VINYL VESSEL DECALS "WATER, MASH, BOIL"

Vinyl vessel decals from Brew Hardware

More Info

From the product description, check product page for current description, price and availability:

Every time we build a three vessel system for someone here in the shop, we put these vessel labels on the front just as a nice extra touch of class. Until now, it hadn’t occurred to us that a lot of you would also appreciate the ability to DIY.

These labels are made from black 7-year outdoor rated vinyl so they can stand up to the heat and repeated washings.

You have a choice of either the bold or stylish fonts as seen in the picture. The letters are about 1.5″ high.


These are $3 each.  If you buy 4, you’ll automatically receive a 25% discounting making them $3.75 each.  Details on that promotion can be found on the Vinyl Decals landing page.

.VINYL VESSEL DECALS “WATER, MASH, BOIL”

Also Consider – CARBOY CALIBRATION DECALS | Complete Lineup of Vinyl Decals

pinned

This post may contain affiliate links. We may make a commission when you use our links. This will never cost you extra. Thank you for supporting Homebrew Finds!

greatdeals

Prices, shipping and availability can change quickly. Please note that product prices and availability are subject to change. Prices and availability were accurate at the time this post was published; however, they may differ from those you see when you visit the product page. Check the product page for current price, description and availability. rp:vesseldecals

Coldbreak Brewing Equipment 50′ Stainlesss HERMS Coil

Coldbreak Brewing Equipment CBHC1250SS Herms Coil, 1/2" by 50', 0.5" OD, Stainless Steel, Silver

Coldbreak Brewing Equipment CBHC1250SS Herms Coil, 1/2″ by 50′, 0.5″ OD, Stainless Steel, Silver


From the product description, check product page for current description, price and availability:

  • 1/2-inch x 50-foot stainless steel herms coil
  • 12-Inch diameter 2.5-Inch inlet/outlet length
  • 8.5-Inch distance between inlet/outlet. Can be stretched to 18-inches
  • Perfect for step mashing 10-15 gallon batches
  • Attach to a kettle with weld-less compression fittings or direct welded fittings

Coldbreak Brewing Equipment CBHC1250SS Herms Coil, 1/2″ by 50′, 0.5″ OD, Stainless Steel, Silver


This post contains affiliate links. We may make a commission when you use our Amazon links. This will never cost you extra. Thank you for supporting Homebrew Finds!

pinned

amazon

Inkbird PID Temperature Controller + Sensor, Relay and Heat Sink

Inkbird F Display PID Temperature Controllers Thermostat ITC-106VH, K Sensor, Heat Sink and Solid State Relay, 100ACV - 240ACV (ITC-106VH + 40A SSR + White heat sink + K Probe)

Inkbird F Display PID Temperature Controllers Thermostat ITC-106VH, K Sensor, Heat Sink and Solid State Relay, 100ACV – 240ACV (ITC-106VH + 40A SSR + White heat sink + K Probe) by Inkbird

More Info

From the product description, check product page for current description, price and availability:

  • Support reading with Centigrade or Fahrenheit unit
  • Dual display window, be able to display measured temperature and set temperature at the same time
  • Simplify operational processes and you don’t need to operate more steps if you want to set the definite value
  • High accuracy of displaying and controlling. Manual and Auto turning are available


PID Temperature Controllers can be used in conjunction with a relay and a temperature probe to control the your kegerator and fermentation temps. You can also integrate a PID controller into your brew system to control mash temps and more.

Inkbird F Display PID Temperature Controllers Thermostat ITC-106VH, K Sensor, Heat Sink and Solid State Relay, 100ACV – 240ACV (ITC-106VH + 40A SSR + White heat sink + K Probe) – affiliate link, note that multiple variations of this product may be available, as such a different version may appear at this link


Also: Inkbird Temperature Controller Deals and Reviews!

This post contains affiliate links. We may make a commission when you use our Amazon links. This will never cost you extra. Thank you for supporting Homebrew Finds!

pinned

amazon

Canada: Inkbird PID Temperature Controller + Sensor, Relay and Heat Sink

Inkbird Pid 100ACV – 240ACV Temperature Controllers Thermostat ITC-106VH, K Sensor, Heat Sink and 40A Solid State Relay


From the product description, check product page for current description, price and availability:

  • Character: PV: 4 digital 9.9mm height Red LED Letters. SV: 4 digital 8mm height Green LED Letters
  • Self-adjusting function and intelligent control of the instrument to ensure the long-term stability
  • PID and ON/OFF Control Mode with high standard self-adjust function
  • Multiple temperature sensors (K, S, Wre, T, E, J, B, N, CU50, PT100)
  • 1 Year Warranty, accuracy of displaying and controlling 0.1ºC

PID Temperature Controllers can be used in conjunction with a relay and a temperature probe to control the your kegerator and fermentation temps. You can also integrate a PID controller into your brew system to control mash temps and more.

Update: Since this post was published the price, availability or promotion has changed.  Check the product page for current description, price and availability.

Looking for a current deal?  Inkbird Temperature Controller Deals and Reviews!

Inkbird Pid 100ACV – 240ACV Temperature Controllers Thermostat ITC-106VH, K Sensor, Heat Sink and 40A Solid State Relay for Home Brewing, Pump,BBQ,Industrial,Hatching

US Based on Homebrewe?  Check out this similar offering available in the US – Inkbird F Display PID Temperature Controllers Thermostat ITC-106VH, K Sensor, Heat Sink and Solid State Relay, 100ACV – 240ACV (ITC-106VH + 40A SSR + White heat sink + K Probe) – AND – Inkbird Deals

This post contains affiliate links. We may make a commission when you use our Amazon links. This will never cost you extra. Thank you for supporting Homebrew Finds!

pinned

amazon

Hands on Review: Wort Hog Turnkey Electric e-BIAB System

highgravitybrew.com wort hog review

This review is by Homebrew Finds Contributor Brad Probert.  Brad is an engineer, expert homebrewer and experienced reviewer.  Grab a link to Brad’s website at the end of this review.

Wort Hog 120V eBIAB System

When it comes to electric Brew In A Bag (eBIAB) systems, there are several choices out there. I’ve tried both 240 Volt and 120 Volt systems. While I love the speed of heating water/wort on the 240V systems, I don’t love the constraints/expense of wiring a 240V plug in a convenient place. The 1500 Watt and 1600 Watt eBIAB units out there are good, but they do lack when it comes to speed of heating strike water or getting a really vigorous boil. The Wort Hog 120V system slides into this niche with the convenience of a 120V system, but using a 2250W Blichmann heating element to give a notable boost.


adyeast


Also Consider… BrewZilla!

BrewZilla and DigiBoil at MoreBeer

Hands on Review: BrewZilla Gen 4 All Grain Brewing System

System Overview

The Wort Hog Turn Key System via High Gravity Fermentations Supplies uses a Bayou Classic 11-gallon kettle. I’d never seen a Bayou Classic kettle in person before, and I’ll admit I had a pre-conceived opinion of them. I thought of them as “cheap turkey fryers” based on their low price and marketing, but I found my baseless opinion was completely off. This 11-gallon kettle has a super shiny, polished exterior, but most importantly it was made of a very robust thick gauge stainless steel. With high quality, clean welds, this baby is certainly going to live up to wear and tear for a long time, and cleaned up very easily.


Continue reading

Custom Stainless Steel Tubing – choose diameter, lengths, bend angles, multiple bends

Customized stainless steel tubing created just for you to your specifications from Brew Hardware for your brew system, brew stand and more.

From Brew Hardware: “We get calls every day to create pieces of stainless tubing with certain dimensions and bends. Until now, everything had to be quoted case by case. We hope this configuration tool helps automate the process a bit. First, we have 304 welded tubing in sizes ranging from 1/4″ OD all the way up to 5/8″ OD and we have the ability make clean bends up to 180 degrees.”

Prices vary based on the options you choose.  Check out Brew Hardware for options and explanations on how to enter your order.

CUSTOM STAINLESS TUBING WITH OPTIONAL BENDS

pinned

This post may contain affiliate links. We may make a commission when you use our links. This will never cost you extra. Thank you for supporting Homebrew Finds!

greatdeals

Prices, shipping and availability can change quickly. Please note that product prices and availability are subject to change. Prices and availability were accurate at the time this post was published; however, they may differ from those you see when you visit the product page. Check the product page for current price, description and availability. rp:customsstubing

Inkbird PID Temperature Controller + Sensor, Relay and Heat Sink

Inkbird F Display PID Temperature Controllers Thermostat ITC-106VH, K Sensor, Heat Sink and Solid State Relay, 100ACV - 240ACV (ITC-106VH + 40A SSR + White heat sink + K Probe)

Inkbird F Display PID Temperature Controllers Thermostat ITC-106VH, K Sensor, Heat Sink and Solid State Relay, 100ACV – 240ACV (ITC-106VH + 40A SSR + White heat sink + K Probe) by Inkbird

More Info

From the product description, check product page for current description, price and availability:

  • Support reading with Centigrade or Fahrenheit unit
  • Dual display window, be able to display measured temperature and set temperature at the same time
  • Simplify operational processes and you don’t need to operate more steps if you want to set the definite value
  • High accuracy of displaying and controlling. Manual and Auto turning are available


PID Temperature Controllers can be used in conjunction with a relay and a temperature probe to control the your kegerator and fermentation temps. You can also integrate a PID controller into your brew system to control mash temps and more.

Inkbird F Display PID Temperature Controllers Thermostat ITC-106VH, K Sensor, Heat Sink and Solid State Relay, 100ACV – 240ACV (ITC-106VH + 40A SSR + White heat sink + K Probe) – affiliate link, note that multiple variations of this product may be available, as such a different version may appear at this link


Also: Inkbird Temperature Controller Deals and Reviews!

This post contains affiliate links. We may make a commission when you use our Amazon links. This will never cost you extra. Thank you for supporting Homebrew Finds!

pinned

amazon

Buy a Mash & Boil System from William’s Brewing – get free hops + Hands on Review

Mash and Boil via William’s Brewing


From the product description, check product page for current description, price and availability:

Do you want to get into mashing but want something simple? The patented Brewer’s Edge® Mash & Boil makes it easy. No need for an outdoor burner, complicated brewing stand, or a 220 volt special circuit – it plugs into any 110 volt GFI household outlet. The Mash and Boil’s exclusive double wall stainless construction conserves heat to achieve a rolling boil with only 110 volts and 1600 watts, and its precise thermostat and internal sparging basket lets you mash and boil in the same vessel. Protected by U.S. patent D819,385 S.

A typical brew day with the Mash & Boil begins with formulating your 5 gallon all grain recipe (up to 16 pounds of crushed grain can be mashed), and then heating your strike water to 162° F, the preset heat temperature. After 40 minutes or so, your strike water is 162° F, and you mix your crushed grain into the sparging basket already inside the Mash and Boil. The mash will cool to 152° or so, and then you set your thermostat to 150°, cover, and let mash for 1 hour. During this mash time you will need to separately heat 3 gallons of sparge water to 175° in a separate pot you provide. A thermometer hole is provided in the lid, in case you want to monitor the temperature of the top of the mash with any long probe analog or digital thermometer.

After one hour, lift the sparging bucket and lock on its included legs, and let the malt sugar drip into your Mash & Boil, which has now became a boiling pot. Turn the thermostat up to 218° F. and give it about 40 minutes to heat to a boil. During this time, ladle one gallon of hot sparge water at a time into the top of the sparging basket until you get to 5½ gallons. Now remove the grain basket, and when the boil begins, add your hops as per your recipe. Boil for 1 hour, and then cool with a suitable wort chiller (not included, our item E81 works well as does any immersion chiller that is up to 11″ in diameter). Or use the stainless valve with ½” hose barb to run the wort through your external chiller.

The Mash & Boil features an adjustable thermostat with a range of 45° F. to 218° F. (switchable from Fahrenheit to Centigrade) with an adjustable run time preset at 3½ hours for safety. It also features a delayed start timer, so you can program the Mash and Boil to turn on up to 24 hours after setting. For example, load it with strike water, and have it set to be hot when you come home from work to save time. Intended for 5 gallon batches, maximum capacity is 7½ gallons. 28” tall closed, 40” tall with basket, 14” wide. A 5′ power cord is included.
Convert the Mash & Boil to a still with optional Mash & Boiling Distilling Package (see at right).


Check out our Hands on Review of the Mash & Boil System

Brewer’s Edge Mash & Boil

Check sale or product page for current availability & pricing


This post may contain affiliate links. We may make a commission when you use our links. This will never cost you extra. Thank you for supporting Homebrew Finds!

pinned

Visit William’s Brewing – Web Only Clearance Sale

williams

tag:wmmandb

Buy a Mash & Boil System from William’s Brewing – get a FREE set of Drinking Jars + Mash and Boil Hands on Review

Mash and Boil via William’s Brewing


From the product description, check product page for current description, price and availability:

Do you want to get into mashing but want something simple? The patented Brewer’s Edge® Mash & Boil makes it easy. No need for an outdoor burner, complicated brewing stand, or a 220 volt special circuit – it plugs into any 110 volt GFI household outlet. The Mash and Boil’s exclusive double wall stainless construction conserves heat to achieve a rolling boil with only 110 volts and 1600 watts, and its precise thermostat and internal sparging basket lets you mash and boil in the same vessel. Protected by U.S. patent D819,385 S.

A typical brew day with the Mash & Boil begins with formulating your 5 gallon all grain recipe (up to 16 pounds of crushed grain can be mashed), and then heating your strike water to 162° F, the preset heat temperature. After 40 minutes or so, your strike water is 162° F, and you mix your crushed grain into the sparging basket already inside the Mash and Boil. The mash will cool to 152° or so, and then you set your thermostat to 150°, cover, and let mash for 1 hour. During this mash time you will need to separately heat 3 gallons of sparge water to 175° in a separate pot you provide. A thermometer hole is provided in the lid, in case you want to monitor the temperature of the top of the mash with any long probe analog or digital thermometer.

After one hour, lift the sparging bucket and lock on its included legs, and let the malt sugar drip into your Mash & Boil, which has now became a boiling pot. Turn the thermostat up to 218° F. and give it about 40 minutes to heat to a boil. During this time, ladle one gallon of hot sparge water at a time into the top of the sparging basket until you get to 5½ gallons. Now remove the grain basket, and when the boil begins, add your hops as per your recipe. Boil for 1 hour, and then cool with a suitable wort chiller (not included, our item E81 works well as does any immersion chiller that is up to 11″ in diameter). Or use the stainless valve with ½” hose barb to run the wort through your external chiller.

The Mash & Boil features an adjustable thermostat with a range of 45° F. to 218° F. (switchable from Fahrenheit to Centigrade) with an adjustable run time preset at 3½ hours for safety. It also features a delayed start timer, so you can program the Mash and Boil to turn on up to 24 hours after setting. For example, load it with strike water, and have it set to be hot when you come home from work to save time. Intended for 5 gallon batches, maximum capacity is 7½ gallons. 28” tall closed, 40” tall with basket, 14” wide. A 5′ power cord is included.
Convert the Mash & Boil to a still with optional Mash & Boiling Distilling Package (see at right).


Check out our Hands on Review of the Mash & Boil System

Brewer’s Edge Mash & Boil

Check sale or product page for current availability & pricing


This post may contain affiliate links. We may make a commission when you use our links. This will never cost you extra. Thank you for supporting Homebrew Finds!

pinned

Visit William’s Brewing – Web Only Clearance Sale

williams

tag:wmmandb

Brewer’s Edge Sparge Water Heater from William’s Brewing

Brewer’s Edge Sparge Water Heater.  About, from William’s: “On your brew day, the last thing you want to think about is sparge water. If you want something as simple and easy to use as possible, so you can concentrate on your brewing process, the Brewer’s Edge® Sparge Water Heater is the solution. It heats up to 4 gallons of sparge water to precisely 168° F., and is a perfect companion to the Mash & Boil, Grainfather, or Robobrew.

Features a preset temperature of 168° F. which is digitally controlled to plus or minus 2°. The great thing about this is how simple it is – just fill the Sparge Water Heater with the gallons desired, plug in, and choose either 750 or 1500 watts depending on how loaded your circuit is. Then wait for the green light and you are ready to sparge! It generally takes about 45 minutes to heat 4 gallons when using 1500 watts, or 2 hours when using 750 watts (this time can be shortened considerably by filling the unit with hot water from your tap). Double wall construction means the Brewer’s Edge Sparge Water Heater holds heat better than competing units, and costs less to run as it is better insulated than a single wall heater. It will run for hours and hold your sparge water ready at precisely 168° F.’

  • Simplicity – No adjustments, just plug it in and wait for the green light
  • Quality double wall construction for more efficiency
  • Choose from 750 or 1500 watts depending on your circuit capacity

As of this posting, William’s Brewing has this for $158.99.  Check the product page for current price and availability.

BREWER’S EDGE SPARGE WATER HEATER

Also: Hands on Review: Robobrew All Grain Brewing System

This post may contain affiliate links. We may make a commission when you use our links. This will never cost you extra. Thank you for supporting Homebrew Finds!

pinned

Visit William’s Brewing – Web Only Clearance Sale

williams

prod:wmsphtr

Buy a Mash & Boil System from William’s Brewing – get a free stainless hop filter + Hands on Review

Mash and Boil via William’s Brewing


From the product description, check product page for current description, price and availability:

Do you want to get into mashing but want something simple? The patented Brewer’s Edge® Mash & Boil makes it easy. No need for an outdoor burner, complicated brewing stand, or a 220 volt special circuit – it plugs into any 110 volt GFI household outlet. The Mash and Boil’s exclusive double wall stainless construction conserves heat to achieve a rolling boil with only 110 volts and 1600 watts, and its precise thermostat and internal sparging basket lets you mash and boil in the same vessel. Protected by U.S. patent D819,385 S.

A typical brew day with the Mash & Boil begins with formulating your 5 gallon all grain recipe (up to 16 pounds of crushed grain can be mashed), and then heating your strike water to 162° F, the preset heat temperature. After 40 minutes or so, your strike water is 162° F, and you mix your crushed grain into the sparging basket already inside the Mash and Boil. The mash will cool to 152° or so, and then you set your thermostat to 150°, cover, and let mash for 1 hour. During this mash time you will need to separately heat 3 gallons of sparge water to 175° in a separate pot you provide. A thermometer hole is provided in the lid, in case you want to monitor the temperature of the top of the mash with any long probe analog or digital thermometer.

After one hour, lift the sparging bucket and lock on its included legs, and let the malt sugar drip into your Mash & Boil, which has now became a boiling pot. Turn the thermostat up to 218° F. and give it about 40 minutes to heat to a boil. During this time, ladle one gallon of hot sparge water at a time into the top of the sparging basket until you get to 5½ gallons. Now remove the grain basket, and when the boil begins, add your hops as per your recipe. Boil for 1 hour, and then cool with a suitable wort chiller (not included, our item E81 works well as does any immersion chiller that is up to 11″ in diameter). Or use the stainless valve with ½” hose barb to run the wort through your external chiller.

The Mash & Boil features an adjustable thermostat with a range of 45° F. to 218° F. (switchable from Fahrenheit to Centigrade) with an adjustable run time preset at 3½ hours for safety. It also features a delayed start timer, so you can program the Mash and Boil to turn on up to 24 hours after setting. For example, load it with strike water, and have it set to be hot when you come home from work to save time. Intended for 5 gallon batches, maximum capacity is 7½ gallons. 28” tall closed, 40” tall with basket, 14” wide. A 5′ power cord is included.
Convert the Mash & Boil to a still with optional Mash & Boiling Distilling Package (see at right).


Check out our Hands on Review of the Mash & Boil System

Brewer’s Edge Mash & Boil

Check sale or product page for current availability & pricing


This post may contain affiliate links. We may make a commission when you use our links. This will never cost you extra. Thank you for supporting Homebrew Finds!

pinned

Visit William’s Brewing – Web Only Clearance Sale

williams

tag:wmmandb

Buy a Mash & Boil System from William’s Brewing – get a free ultimate growler + Hands on Review

Mash and Boil via William’s Brewing


From the product description, check product page for current description, price and availability:

Do you want to get into mashing but want something simple? The patented Brewer’s Edge® Mash & Boil makes it easy. No need for an outdoor burner, complicated brewing stand, or a 220 volt special circuit – it plugs into any 110 volt GFI household outlet. The Mash and Boil’s exclusive double wall stainless construction conserves heat to achieve a rolling boil with only 110 volts and 1600 watts, and its precise thermostat and internal sparging basket lets you mash and boil in the same vessel. Protected by U.S. patent D819,385 S.

A typical brew day with the Mash & Boil begins with formulating your 5 gallon all grain recipe (up to 16 pounds of crushed grain can be mashed), and then heating your strike water to 162° F, the preset heat temperature. After 40 minutes or so, your strike water is 162° F, and you mix your crushed grain into the sparging basket already inside the Mash and Boil. The mash will cool to 152° or so, and then you set your thermostat to 150°, cover, and let mash for 1 hour. During this mash time you will need to separately heat 3 gallons of sparge water to 175° in a separate pot you provide. A thermometer hole is provided in the lid, in case you want to monitor the temperature of the top of the mash with any long probe analog or digital thermometer.

After one hour, lift the sparging bucket and lock on its included legs, and let the malt sugar drip into your Mash & Boil, which has now became a boiling pot. Turn the thermostat up to 218° F. and give it about 40 minutes to heat to a boil. During this time, ladle one gallon of hot sparge water at a time into the top of the sparging basket until you get to 5½ gallons. Now remove the grain basket, and when the boil begins, add your hops as per your recipe. Boil for 1 hour, and then cool with a suitable wort chiller (not included, our item E81 works well as does any immersion chiller that is up to 11″ in diameter). Or use the stainless valve with ½” hose barb to run the wort through your external chiller.

The Mash & Boil features an adjustable thermostat with a range of 45° F. to 218° F. (switchable from Fahrenheit to Centigrade) with an adjustable run time preset at 3½ hours for safety. It also features a delayed start timer, so you can program the Mash and Boil to turn on up to 24 hours after setting. For example, load it with strike water, and have it set to be hot when you come home from work to save time. Intended for 5 gallon batches, maximum capacity is 7½ gallons. 28” tall closed, 40” tall with basket, 14” wide. A 5′ power cord is included.
Convert the Mash & Boil to a still with optional Mash & Boiling Distilling Package (see at right).


Check out our Hands on Review of the Mash & Boil System

Brewer’s Edge Mash & Boil

Check sale or product page for current availability & pricing


This post may contain affiliate links. We may make a commission when you use our links. This will never cost you extra. Thank you for supporting Homebrew Finds!

pinned

Visit William’s Brewing – Web Only Clearance Sale

williams

tag:wmmandb

Inkbird PID Temperature Controller with Relay and Probe

Inkbird ITC-106VH PID Temperature Thermostat Controllers, Fahrenheit & Centigrade, 100ACV - 240ACV, K Sensor, Solid State Relay for Sous Vide, Home Brewing (ITC-106VH + K + 40A SSR)

PID Temperature Controller with Sensor and Relay from Inkbird

PID Temperature Controllers can be used in conjunction with a relay and a temperature probe to control the your kegerator and fermentation temps. You can also integrate a PID controller into your brew system to control mash temps and more.

Update: Since this post was published the price, availability or promotion has changed.  Check the product page for current description, price and availability.

Looking for a current deal?  Inkbird Temperature Controller Deals and Reviews!

Inkbird ITC-106VH PID Temperature Thermostat Controllers, Fahrenheit & Centigrade, 100ACV – 240ACV, K Sensor, Solid State Relay for Sous Vide, Home Brewing (ITC-106VH + K + 40A SSR)

This post contains affiliate links. We may make a commission when you use our Amazon links. This will never cost you extra. Thank you for supporting Homebrew Finds!

pinned

amazon

Continue reading

Mash & Boil System from William’s Brewing – $269.99 + Hands on Review

Mash and Boil via William’s Brewing


From the product description, check product page for current description, price and availability:

Do you want to get into mashing but want something simple? The patented Brewer’s Edge® Mash & Boil makes it easy. No need for an outdoor burner, complicated brewing stand, or a 220 volt special circuit – it plugs into any 110 volt GFI household outlet. The Mash and Boil’s exclusive double wall stainless construction conserves heat to achieve a rolling boil with only 110 volts and 1600 watts, and its precise thermostat and internal sparging basket lets you mash and boil in the same vessel. Protected by U.S. patent D819,385 S.

A typical brew day with the Mash & Boil begins with formulating your 5 gallon all grain recipe (up to 16 pounds of crushed grain can be mashed), and then heating your strike water to 162° F, the preset heat temperature. After 40 minutes or so, your strike water is 162° F, and you mix your crushed grain into the sparging basket already inside the Mash and Boil. The mash will cool to 152° or so, and then you set your thermostat to 150°, cover, and let mash for 1 hour. During this mash time you will need to separately heat 3 gallons of sparge water to 175° in a separate pot you provide. A thermometer hole is provided in the lid, in case you want to monitor the temperature of the top of the mash with any long probe analog or digital thermometer.

After one hour, lift the sparging bucket and lock on its included legs, and let the malt sugar drip into your Mash & Boil, which has now became a boiling pot. Turn the thermostat up to 218° F. and give it about 40 minutes to heat to a boil. During this time, ladle one gallon of hot sparge water at a time into the top of the sparging basket until you get to 5½ gallons. Now remove the grain basket, and when the boil begins, add your hops as per your recipe. Boil for 1 hour, and then cool with a suitable wort chiller (not included, our item E81 works well as does any immersion chiller that is up to 11″ in diameter). Or use the stainless valve with ½” hose barb to run the wort through your external chiller.

The Mash & Boil features an adjustable thermostat with a range of 45° F. to 218° F. (switchable from Fahrenheit to Centigrade) with an adjustable run time preset at 3½ hours for safety. It also features a delayed start timer, so you can program the Mash and Boil to turn on up to 24 hours after setting. For example, load it with strike water, and have it set to be hot when you come home from work to save time. Intended for 5 gallon batches, maximum capacity is 7½ gallons. 28” tall closed, 40” tall with basket, 14” wide. A 5′ power cord is included.
Convert the Mash & Boil to a still with optional Mash & Boiling Distilling Package (see at right).


Check out our Hands on Review of the Mash & Boil System

Brewer’s Edge Mash & Boil

Check sale or product page for current availability & pricing


This post may contain affiliate links. We may make a commission when you use our links. This will never cost you extra. Thank you for supporting Homebrew Finds!

pinned

Visit William’s Brewing – Web Only Clearance Sale

williams

tag:wmmandb

Hands on Review: Robobrew (BrewZilla v1) All Grain Brewing System

This review is by Homebrew Finds Contributor Brad Probert.  Brad is an engineer, expert homebrewer and experienced reviewer.  Grab a link to Brad’s website at the end of this review.


Robobrew vs BrewZilla + Our BrewZilla Gen 4 Review

Since this review was released the Robobrew has been rebranded to the BrewZilla. This review is of of the original Robobrew (BrewZilla v1). Beyond the re-branding this system has had multiple version upgrades.

Check out our review of the much newer BrewZilla Gen 4!


Upgrading RoboBrew/BrewZilla to BrewZilla 3:

If you’re looking to convert your Robobrew to a BrewZilla an upgrade board is available

robobrew upgrade board

Robobrew Gen 3.1.1 Upgrade Board Set 110 volt via William’s Brewing


The Robobrew is an electric all-in-one eBIAB system. It allows you to brew the complexity of all-grain batches with the simplicity of electric heat/control in a single vessel system. There is a wide variety of these systems out on the market to choose from. Robobrew aims to be in the midst of these as far as features and function, but at a much lower price to attempt to get this tool in the hands of as many homebrewers as possible.


Compare Prices, Review Continues Below:


This article contains affiliate links. We may make a small percentage if you use our links to make a purchase. You won’t pay more and you’ll be supporting Homebrew Finds and more content like this. Thank you for your support!


Robobrew System Overview

The Robobrew comes in 2 models- one with a built-in pump, and one without. The model without the pump retails for about $350, and the one with a pump for $480. Although a significant price jump, the $480 price tag is several hundred cheaper than its competition. Getting a unit with a pump allows you to take advantage of a lot of the process efficiencies from the eBIAB systems, with convenience of recirculation during mash and pressure-fed wort transfer into your fermenter.

The pump is built into the bottom of the unit, tucked away out of sight and out of the way. There is a stainless steel transfer pipe that takes output flow from the pump and sends it up top where it can be directed to where you want it to go. The pump inlet is through an opening in the bottom of the brew chamber. Also in the bottom is the wort temperature sensor and the two independently switched heating elements (1000W + 500W). Although the heating elements have their own manual on/off switch, the unit’s electric controller also has the ability to shut off and turn on power depending on measured mash temperature compared to your set temperature. Importantly, the controller is smart enough to know when it should be using one or both elements when it’s getting close to your set temperature. It also is smart enough to only switch on the 500W element while trying to hold a steady temperature and things start to drift a bit.

For mashing, you put your crushed grains into the stainless steel malt pipe, which has a false bottom mesh on the bottom of it to keep grains from getting circulated into the pump or scorched to the bottom. There’s also a second false ‘bottom’ screen, which slides down inside the malt pipe after you’ve filled it with your crushed grains. And if two false bottoms aren’t enough for you, Robobrew has you covered with a third false bottom that sits below the malt pipe, giving you another layer of defense against stray grain particles during the mash, but also importantly keeps hop residue from clogging up your pump or wort chiller.

The controller provides basic control function by allowing you to set a target temperature with simple + / – buttons and then letting the controller turn on the elements automatically to heat up and then switch off when the target temperature is reached. There is also a delay feature that allows you to program in a delayed start for when you want the target set temperature to kick in. Set it to something short like a few minutes and make a pseudo mash temperature step profile you program one step at a time. Or for longer times (up to 24 hours) if you want to fill it with water and have the unit turn on to be ready for you after work.

Continue reading

Hands on Review: BrewZilla Gen 4 All Grain Brewing System

Updated: April 1, 2025

This review is by Homebrew Finds Contributor Brad Probert.  Brad is an engineer, expert homebrewer and experienced reviewer.  Grab a link to Brad’s website at the end of this review.

Hands on Review BrewZilla Gen4

I’ve brewed on several different all-in-one units. Like any brew system, they each have their own strengths and weaknesses. I did a hands-on review of the Robobrew when it first came out in late 2016. It has since changed its name to BrewZilla and is on the 4th generation of the brew unit. As you’d expect with repeated generations, they’ve been able to focus on fixing deficiencies in their previous models and also introduce new features.


Limited Time Deal, Closeout Pricing at William’s Brewing

Brewzilla 35 Liter Gen 4 110 volt

Brewzilla 35 Liter Gen 4 via William’s Brewing

  • As of this posting, William’s Brewing has this on sale for just $469.99. That’s a savings of $80.
  • Shipping is free or reasonably priced flat rate to addresses in the contiguous US depending on your order size for most items.

Brewzilla 35 Liter Gen 4 110 volt


Learn More: Hands on Review: BrewZilla All Grain Brewing System!


Kegland’s implementation of dual-probe control is very simple and straightforward in the BrewZilla. To best understand how this works, you need to think of your system in its recirculation loop. The wort drains down from the grain bed to the bottom, gets heated by the elements in the base, then gets sucked into the pump to get dumped on top of the grain again. The Bluetooth probe sits in the middle of the grain bed, and base sensor sits in the small volume of wort getting heated by the elements. When you’re at a steady target temperature, both of these probes should read about the same, as you ideally have uniform temperature throughout your system.


Related: BrewZilla Tips and Tricks!

BrewZilla Gen 4 Temperature Control and Programming Tips and Tricks


The basic premise of an all-in-one brewing system is that your mash and boil kettle are in the

same vessel. So just like Brew In A Bag, after mashing, you pull the grains out and the wort stays behind to be boiled. They use electricity for heat, so they can be used outdoors where you can reach power or indoors where you have a venting system that can take care of all the steam you make during your boil.

BrewZilla Without Jacket

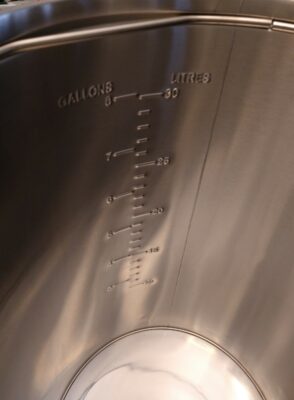
Stamped Volume Markings

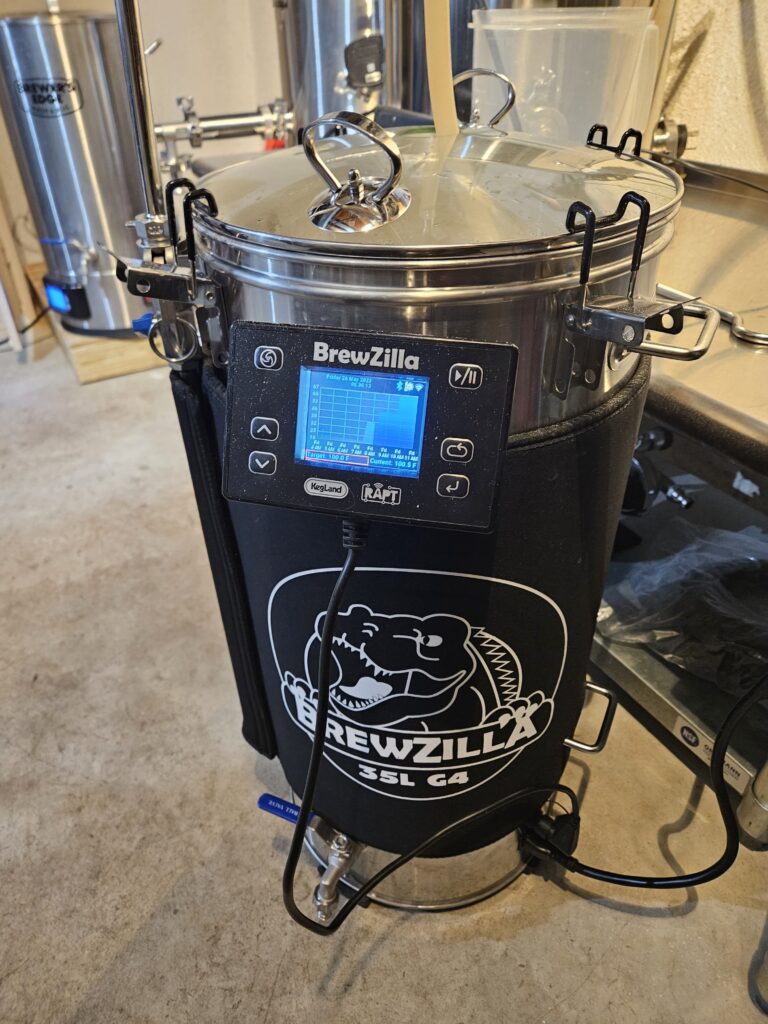
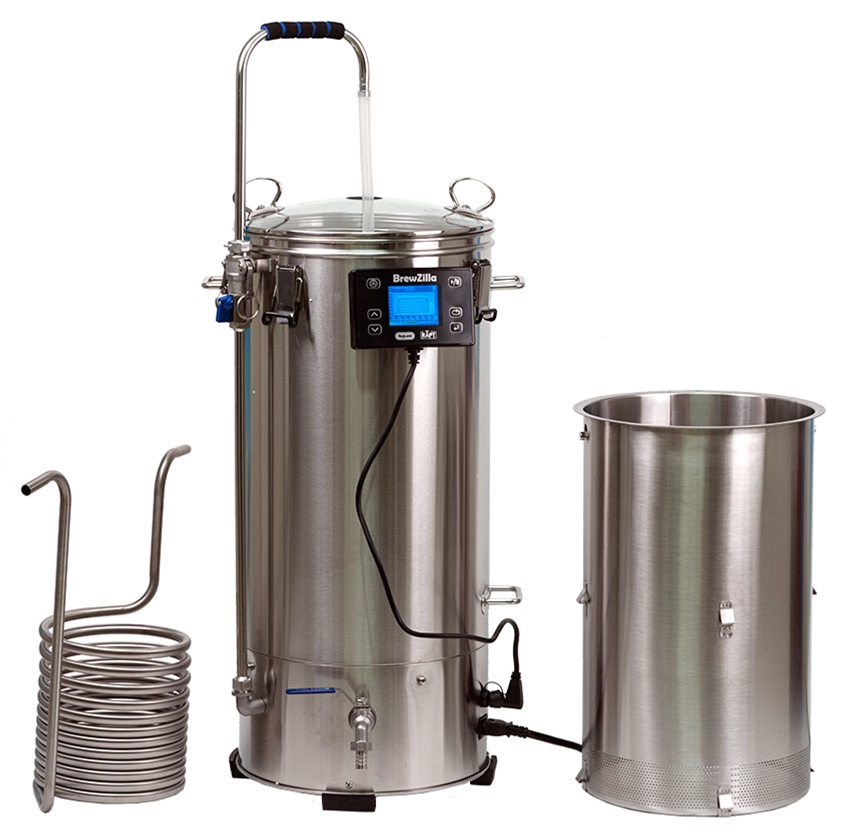
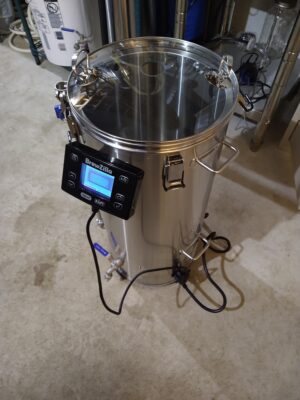
Here are some basic stats on the Gen4 BrewZilla. It’s available in a 35-Liter form (for 5-6 gallon batches) with either a 110V setup, or 220V. There is also a larger 65-Liter that is only 220V (targeted to 10-12 gallon batches). The 35L unit holds 9.25 gallons, the mash basket can hold up to 23.5 lbs. of grain, and its electric heating elements can output up to 1500W of power (110V system) or 2400W of power (220V system). The 65L unit holds 17.1 gallons, the mash basket holds 41.5 lbs. of grain, and 3500W of heating power. All the Gen4 units have a pump bolted into the base. The pump can be used not only for wort recirculation during the mash, but also to pump beer through your wort chiller apparatus (should you choose to not use the immersion chiller coil included with the BrewZilla). The pump is more modular and accessible than previous Gen models. To protect the pump from clogging with hop debris during the boil or whirlpool, there is a filter screen (a perforated stainless disc that sits at the bottom of the unit) that sits at the bottom of the kettle. The small magnetic drive pump has a pump head rating of 1.5 – 2.1 m (4.9 – 6.9 ft) and a max flow rate of 11-12 L/min (2.9 – 3.2 gal/min).

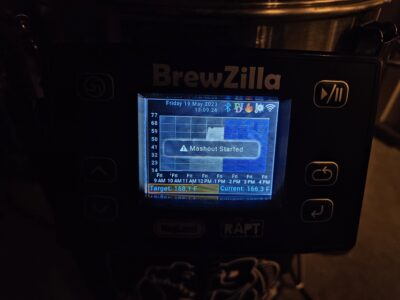
Control Panel Notification During Mash Profile

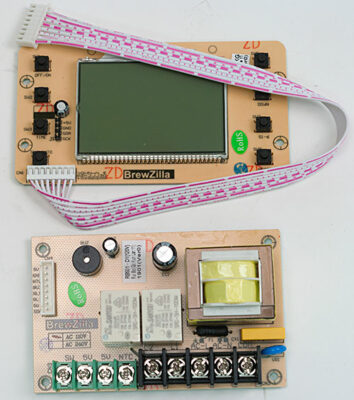
One of the key upgraded features of the Gen4 BrewZilla is the controller. RAPT Is Kegland’s line of wireless connected brewing devices. The BrewZilla now has a RAPT controller so it adds a lot of features that can be monitored and controlled over Wi-Fi. This includes basic things like monitoring temperature from your laptop/cell phone, but also allows you to program complex mash programs online and then download to your BrewZilla. You can also adjust control parameters on the fly such as pump output duty cycle and heater output level. If you get the optional Bluetooth thermometer, you can stick the temperature probe into the middle of your grain bed, and then have the controller use that as its control signal in combination with the built-in temperature sensor that sits on the floor of the unit.

Bluetooth Temp Probe in Middle of Mash

Although All-in-One units are essentially BIAB, they use a stainless steel basket with holes in the bottom of it instead of a bag, and call it a “malt pipe”. These provide functional improvements over a nylon bag. The obvious one is they are way easier to clean. But they also allow you to ensure you get full flow through your grain bed by having holes only on the bottom. This means recirculating wort has no sneak paths out the side. The other benefit is malt pipes have simple brackets/feet welded onto the outside that allow you to lift your wet grains up and prop the malt pipe on the brew rig to drain or sparge. The BrewZilla has 2 sets of feet for this. One set is halfway up, allowing you to do the deadlift of grain & wort halfway and then let the liquid level drain down. Then when you lift it the full height, it’s not as heavy. It’s simple, but makes the process much better.

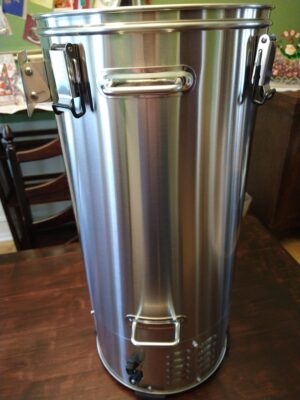
Welded-on Carry Handle (top) and Tip Handle (bottom)

There is a cool feature in the BrewZilla which normally only comes on much higher end systems, and that’s the central drain. With a concave bottom with a drain at the lowest point in the center, you don’t have to leave wort behind or goof around with tilting it to get the last drops of wort out at the end. This also enables the malt pipe to extend down lower and thus you can hold more grain (30% more than their Gen3). If you compared to other All-in-one units in the “5 gallon batch” size range, the 23.5 lbs. grain capacity is 30 – 50% more. This of course only matters if you’re trying to make high gravity brews. The drain in the floor is plumbed to the inlet of the pump below, and then you can direct pump output either to an external spigot for fast/easy transfer of wort out after brewing, or up the recirculation pipe for wort to get directed down on top of the mash.

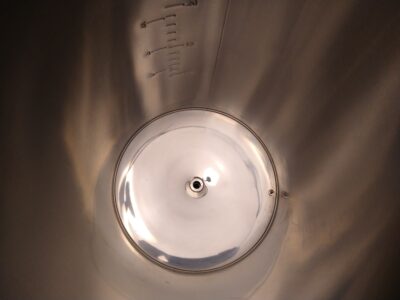
Polished Bottom with Center Drain and Built-in Temp Sensor to Side

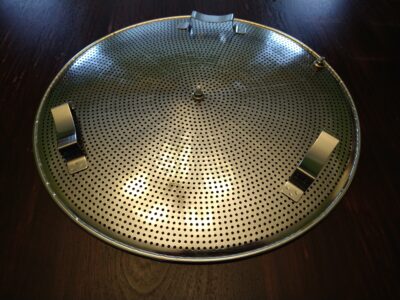
Bottom Side of Pump Filter Plate

To help with mash efficiency and mash temperature uniformity, they offer a Heat Exchanger Dish, which is just a stainless dish/plate that sits below your malt pipe and above the central drain. Without this dish in place, the flow of recirculating wort tends to go through the center of your grain bed, and straight out the drain. With the dish there, it directs the flow around the full circumference before it gets to the drain, which helps ensure a broader portion of the grist sees the flow.


Compare Prices, Review Continues Below:

Related: BrewZilla Gen 4 Temperature Control and Programming Tips and Tricks

Continue reading

Inkbird PID Temperature Controller with Relay and Probe

Inkbird ITC-106VH PID Temperature Thermostat Controllers, Fahrenheit & Centigrade, 100ACV - 240ACV, K Sensor, Solid State Relay for Sous Vide, Home Brewing (ITC-106VH + K + 40A SSR)

PID Temperature Controller with Sensor and Relay from Inkbird

PID Temperature Controllers can be used in conjunction with a relay and a temperature probe to control the your kegerator and fermentation temps. You can also integrate a PID controller into your brew system to control mash temps and more.

Update: Since this post was published the price, availability or promotion has changed.  Check the product page for current description, price and availability.

Looking for a current deal?  Inkbird Temperature Controller Deals and Reviews!

Inkbird ITC-106VH PID Temperature Thermostat Controllers, Fahrenheit & Centigrade, 100ACV – 240ACV, K Sensor, Solid State Relay for Sous Vide, Home Brewing (ITC-106VH + K + 40A SSR)

This post contains affiliate links. We may make a commission when you use our Amazon links. This will never cost you extra. Thank you for supporting Homebrew Finds!

pinned

amazon

Continue reading

Hands on Review: Brewer’s Edge Mash & Boil Electric Brewery

Updated: 5/3/2024

This review is by Homebrew Finds Contributor Brad Probert.  Brad is an engineer, expert homebrewer and experienced reviewer.  Grab a link to Brad’s website at the end of this review.

Brewer’s Edge Mash & Boil

I reviewed a number of electric all-in-one brewing systems a little over a year ago. As a collective group, these systems offer a lot to the homebrewer. They provide the flexibility and control of brewing process of all-grain, and the equipment simplicity of brew-in-a-bag. The fact that they’re electric gives you the ability to brew inside and convenience of not having to chase propane tank fill-ups. The electric systems also have the ability to set a target temperature and control to it, giving you better control of your brew day. All of these combine to create a more streamlined and less stressful brew day.

Each system has its own strengths and they all span a wide price range. The units I tried last year ranged from $470 at the low end to $2,500 at the high end. When I saw the Brewer’s Edge Mash & Boil coming in at $300, I was intrigued to see how this unit would work and if you really could go all-grain with an electric system at such an affordable price point.

Continue reading