Category Archives: Brew Hardware

The SpinCycle Whirlpool Returns from Brew Hardware!

spincycle whirlpool return

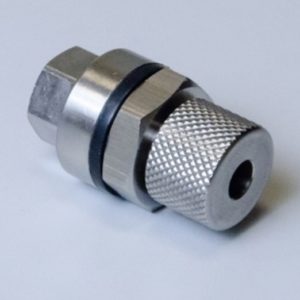
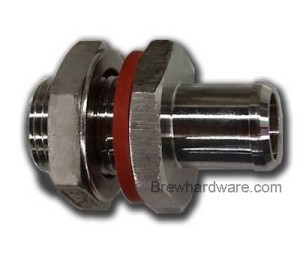
Recirculating wort back into the kettle to whirlpool the wort makes for much faster cooling and will also make a concentrated pile of trub and hop particles in the center of the kettle bottom. This whirlpool port assembly installs high up on your kettle wall above the typical wort level and then extends down before curving to the side to force the recirculated liquid towards the sidewall.

The BrewHardware purpose-built unit called the Spin Cycle starts with a weldless bulkhead design with captured O-ring and extended male threads and has the 1/2″ drop tube fully welded in. The result is a compact way to whirlpool without the need to put a ball valve on the port (the port is meant to be installed well above the max liquid level). It includes the base unit with the welded drop tube, the captured high temp silicone oring, a thin SS washer and a 1/2″ NPS locknut to hold it all together.

pinned

This post may contain affiliate links. We may make a commission when you use our links. This will never cost you extra. Thank you for supporting Homebrew Finds!

greatdeals

Price, promotions and availability can change quickly. Check the product page for current price, description and availability. prod:spincycle

BeerSmith 3 Gold Membership – 1 Year – $10.95, Save 27%

beersmith deal

BEERSMITH 3 GOLD MEMBERSHIP 1 YEAR

More Info

From the product description, check product page for current description, price and availability:

This is the option where you get one year of gold membership which includes the following:

  • Gold Cloud Membership
  • All Major and Minor Updates
  • Cloud Space: 125 Recipes
  • Activate Two Computers
  • Archiving of Cloud Recipes
  • BeerSmith 3 Desktop
  • Personal Use License
  • Upcoming online features
  • Subscription or 1 Year


As of this posting, this is on sale for $10.95.  That’s a 27% savings.  Check page for current price and availability.

BEERSMITH 3 GOLD MEMBERSHIP 1 YEAR

Also Consider:

Check sale or product page for current availability & pricing

Price, promotions and availability can change quickly.  Please note that product prices and availability are subject to change. Prices and availability were accurate at the time this post was published; however, they may differ from those you see when you visit the product page.  Check the product page for current price, description and availability

pinned

This post may contain affiliate links. We may make a commission when you use our links. This will never cost you extra. Thank you for supporting Homebrew Finds!

greatdeals

rp:bhbs3gold

BeerSmith 3… One Time Purchase, No Monthly Fees – $26.95

BEERSMITH 3 PURCHASE OPTION

More Info

From the product description, check product page for current description, price and availability:

This is the option where you purchase the software outright. It Includes:

  • Basic Cloud Membership
  • Minor Updates Only
  • Cloud Space: 15 Recipes
  • Activate Two Computers
  • No Cloud Archive
  • BeerSmith 3 Desktop
  • Personal Use License
  • One Time Purchase
  • Limited online features
  • Version 3, 3.1, 3.x only


If you’re looking for a brewing program that you can purchase outright with no monthly fees… here you go.  Includes desktop license for up to two computers and basic cloud membership.  As of this posting this is no sale for $26.95.

BEERSMITH 3 PURCHASE OPTION

Also Consider:

Check sale or product page for current availability & pricing

Price, promotions and availability can change quickly.  Please note that product prices and availability are subject to change. Prices and availability were accurate at the time this post was published; however, they may differ from those you see when you visit the product page.  Check the product page for current price, description and availability

pinned

This post may contain affiliate links. We may make a commission when you use our links. This will never cost you extra. Thank you for supporting Homebrew Finds!

greatdeals

rp:bhbs3purch

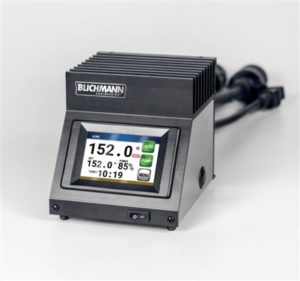
Blichmann BrewCommander Bulkhead Assembly – $17 at Brew Hardware + BrewCommander Hands on Review

BLICHMANN BREWCOMMANDER TEMPERATURE SENSOR BULKHEAD ASSEMBLY (RP-081-00)

Blichmann Brew Commander Temp Sensor Bulkhead Assembly from Brew Hardware

More Info

From the product description, check product page for current description, price and availability:

If you already installed the temp sensor probe from your BrewCommander in one kettle and you want to install an extra probe in another vessel, you can buy this fitting as well as an extra sensor.


BLICHMANN BREWCOMMANDER TEMPERATURE SENSOR BULKHEAD ASSEMBLY (RP-081-00)

Prices, shipping and availability can change quickly. Please note that product prices and availability are subject to change. Prices and availability were accurate at the time this post was published; however, they may differ from those you see when you visit the product page. Check the product page for current price, description and availability.

pinned

This post may contain affiliate links. We may make a commission when you use our links. This will never cost you extra. Thank you for supporting Homebrew Finds!

greatdeals

Pin Lock Users Catch a Break… New Pin Lock Weldless Bulkhead from Brew Hardware

WELDLESS BULKHEAD WITH PIN LOCK GAS

WELDLESS BULKHEAD WITH PIN LOCK GAS

from Brew Hardware

More Info

From the product description, check product page for current description, price and availability:

We know our loyal customers have been looking for this one for a while and we’re happy to have finally developed a version that works like a charm and NOW even in PINLOCK. One of the biggest disappointments for new keggers that purchased Pinlock style kegs is the realization that a lot of the cool 3rd party gadgets are only made for Ball Lock kegs. Not anymore!

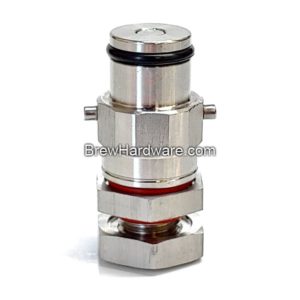
This assembly allows you to install a corny keg style pin lock gas post into anything with a wall up to 3/16″. The main body of the fitting has 19/32″ keg post thread on one side and 1/4″ NPT on the other. The large center hex provides a great backup for the included silicone oring and even features a recessed groove to keep the oring contained just like our line of true bulkheads.

This assembly includes everything in the picture.
Note that this assembly does not support the insertion of a standard keg diptube. The bore is a little too small and just wasn’t designed for that use.

Install instructions:
Drill and deburr a 9/16″ diameter hole.
Insert the 1/4″ NPT side of the fitting through the hole.
Thread the locknut down the threads and tighten up with a wrench on both sides.

WARNING: These parts could potentially be misused to pressurize a vessel that is not rated for pressure applications and we are adamantly advising customers to take caution and not to do this. Any sealable vessel that has a way to add pressurized gas should also have a non-defeatable pressure relief valve or similar safety mechanism.

Metal is 304SS and the rubber parts are silicone


  • It seems like ball lock keg users generally get the love when it comes to cool add-ons.  It’s great to see a new pin lock gadget!
  • This is selling for $14.99.

WELDLESS BULKHEAD WITH PIN LOCK GAS

Closely Related…

Price, promotions and availability can change quickly.  Please note that product prices and availability are subject to change. Prices and availability were accurate at the time this post was published; however, they may differ from those you see when you visit the product page.  Check the product page for current price, description and availability

pinned

This post may contain affiliate links. We may make a commission when you use our links. This will never cost you extra. Thank you for supporting Homebrew Finds!

greatdeals

Brew Hardware 10 Gallon Cooler to Mash Tun Conversion Kit – $68 + Hands on Review

cooler conversion kit

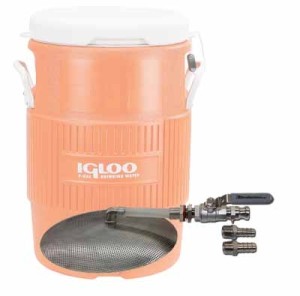
This Brew Hardware Mash Tun Conversion Kit includes everything you need to convert a 10 gallon Igloo or Home Depot Rubbermaid Cooler to a Mash Tun.  Note that it does not includes a cooler.

More Info

From the product description, check product page for current description, price and availability:

  • 12″ stainless steel domed false bottom with upgraded large ID connection elbow
  • One piece (Brew Hardware custom designed) machined bulkhead with interior barb
  • 2 piece stainless ball valve – can be upgraded to 3 piece
  • Required length of high temp silicone tubing
  • Does not include cooler or barb/camlock.  Barb and camlock fitting options are available under accessories on the right side of the screen.

What makes our kit different than the competition? Ugh, now we have to brag just a little. The bulkhead we include in this kit is custom machined out of hex bar stock to our exact specifications making it extremely simple to install and leak free from day one. It’s not a bunch of off the shelf parts made with half a roll of teflon tape. We also use a high flow elbow connector at the false bottom which also features a custom made smooth bore retainer. Long story short, we’ve held off on offering cooler false bottom kits for a long time until we had all the high end components described here.


Options are available both for an Igloo 10 gallon cooler and for Home Depot’s 10 gallon cooler.   A complete converted option is also available.  That includes the cooler along with your choice of connection fittings.  In my experience it’s cheaper to grab the conversion kit from Brew Hardware and source the cooler separately.  See some links to compatible coolers below.

This is the conversion kit I use and it’s… awesome.   tn_img_0322-300x225Check out my Hands on Review.

  • Pricing and, especially, availability can vary.  Check Brew Hardware for current, description, price and availability.

COOLER TO MASH TUN CONVERSION KIT

Check sale or product page for current availability & pricing

Related:

pinned

This post may contain affiliate links. We may make a commission when you use our links. This will never cost you extra. Thank you for supporting Homebrew Finds!

greatdeals

adamztop5

Price, promotions and availability can change quickly.  Please note that product prices and availability are subject to change. Prices and availability were accurate at the time this post was published; however, they may differ from those you see when you visit the product page.  Check the product page for current price, description and availability rp:bhconversion

Convert Blichmann BrewCommander to Wall Mount + BrewCommander Hands on Review

Looking to get a wall Mount Blichmann Brew Commander?  Brew Hardware has you covered.  Check Brew Hardware for current pricing and availability.

Brew Commander at Brew Hardware

Brew Commander Hands on Review:

https://www.homebrewfinds.com/2019/10/hands-on-review-blichmann-brewcommander-controller.html

pinned

This post may contain affiliate links. We may make a commission when you use our links. This will never cost you extra. Thank you for supporting Homebrew Finds!

greatdeals

Prices, shipping and availability can change quickly. Please note that product prices and availability are subject to change. Prices and availability were accurate at the time this post was published; however, they may differ from those you see when you visit the product page. Check the product page for current price, description and availability. rp:wmbc

The Steam Slayer from Brew Hardware – Kettle Steam Condenser Assembly – eliminates need to vent from your brewing room

STEAM SLAYER - KETTLE BOIL STEAM CONDENSER ASSEMBLY

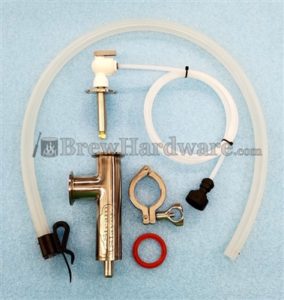
The Steam Slayer via Brew Hardware is designed to eliminate the need to vent steam from your brewing room.

More Info

From the product description, check product page for current description, price and availability:

The Steam Slayer(tm) is a brand new product that eliminates the need to vent steam from your brewing room. More and more people are converting over to electric brewing systems allowing brewing indoors and even in quite confined spaces. The rude awakening occurs when you evaporate a gallon or more water into the air and your walls and ceiling drips with condensation. In some cases it is impossible or unreasonable to install fan-based exhaust systems to vent that steam. Enter the Steam Slayer!

Condensing boil steam is a relatively common practice in large scale industry and some breweries. Homebrewtalk.com user “Brundog” did a lot of experimentation and documentation and many folks built clone systems in turn. When it came time to install one on the shop brewing kettle, we couldn’t leave well enough alone with off the shelf parts.

How It Works:
You will install a 1.5″ TC port in the upper sidewall of your electric powered boil kettle, typically as high as you can get it without interfering with the closure of the kettle’s lid. The unit is equipped with a fine mist sprayer that fits inside the main body and is fed with cold tap water. When you reach a boil in your kettle, you will put the lid on and start the flow of cold water into the unit. Steam will enter the tee and encounter the spray turning the steam back into water. The waste water runs out the bottom of the unit into the included silicone hose which you will position over a catch bucket. Depending on your tap water pressure, and the selected sprayer option, you will typically consume 6-10 gallons of water in a 60 minute boil. This water can be discarded or saved for cleaning your equipment afterwards.

What’s Included:

  • Main Body Tee with 1.5″ TC top and side flanges and welded 5/8″ hose barb on the bottom.
  • 1.5″ TC sprayer adapter with your choice of 6 or 9 gallon per hour sprayer tip. The GPH ratings are at 40 PSI. We find the 6GPM works great on 45 PSI on a 7 gallon boil. If you have low pressure, you may need the 9GPM sprayer. If you are doing 10 or 15 gallon batches, you may need the 9 GPH. We are still trying to figure out better guidelines.
  • Right angle water shut off valve with push in connection five feet of 1/4″ poly supply line (5ft is standard, select longer runs in the dropdown selection above.
  • Water supply connection fitting with push in connection: Your choice of 3/4″ Female Garden Hose or In-Line faucet connection valve (select in the drop down above). More about this in the instructions below.
  • 3 feet of 1/2″ ID silicone hose for waste water drain. The tubing must reach from the bottom of the steam slayer body to the TOP of your catch bucket. If you need more tubing, it can be purchased by the foot and we can combine the added length onto the standard 3′ if you direct us to.
  • Hose holder clip to keep drain hose positioned at the inside top of your collection bucket.

* Note that the clamp and gasket to attach the unit to the kettle is not included, nor is the hardware to install the actual TC port in the kettle. See the list of available accessories if you need any of those parts.

Instructions:
First, keep in mind that this is a new process for small scale homebrewing and we’re all learning the best practices. When you buy this unit, consider yourself a part of a beta test. These instructions will evolve.

  1. Clamp the main unit to the existing kettle port and the sprayer TC to the top of the unit. The integrated hose barb should be facing down towards the floor.
  2. Install your water source fitting. If you selected the Garden Hose fitting, attach it to your garden hose bib, a garden hose, a slop sink faucet, or a washing machine supply port. If you selected the inline faucet supply fitting, shut off the cold water valve under your sink, remove the hose feeding your faucet and install the inline fitting. Replace the faucet hose on top and turn the water back on to check for leaks. The inline faucet fitting is shown on the right. Just below that we show where it would install under a sink or toilet.
  3. Connect the 1/4″ Poly line to your source water fitting and the shutoff valve on the top of the Steam Slayer. Making sure the ends are cut cleanly, simply push the tubing into the fittings all the way and install the C-shaped retaining clips.
  4. Install the silicone waste tubing on the unit’s barb and attach the holder clip to the end. We include a 5/8″ OD stainless steel ring that should be inserted into the end of the silicone to expand the tubing large enough to fit the holder clip tightly. The waste tubing should be trimmed so that it only extends into your catch bucket/vessel by 1-2 inches. The open end of this tubing must never be submergedor the steam slayer will not work properly.
  5. Once your boil begins, turn on the cooling water and place your kettle lid on the kettle. Since the condensing action creates a mild vacuum, the lid does not need a gasket. If you notice steam leaking out of the lid, make sure it is not warped creating extra spaces.
  6. Adjust your boil intensity to approximately HALF of what you’re used to using and plan for about half as much boil off. For a typical example, we used to run our 5500 watt element at 65% when the kettle is full of 7 gallons and the lid off. We experienced 1.5 gallons per hour of boil off. With the Steam Slayer installed, we run at 32% and experience .75 gallons of boil off per hour. In other words, to use the Steam Slayer, your electric kettle must be equipped with a power controller.

Frequently Asked Questions:

1. Can I go through the lid?

Yes. In order to through the lid, you will need to install a 1.5″ TC port towards the edge and then clamp on a 1.5″ TC 90 degree elbow. From there the Steam Slayer gets clamped on as noted above. You may need to place a counterweight on top of the lid, opposite the TC port to keep it firmly seated on the kettle.

2. I use the BIAB method and I’m concerned that a side mount TC port will reduce my kettle capacity.

You can put a TC blank cover over the port during the mash and then fit the Steam Slayer after you pull the grain bag.

3. How do I run the hot waste water directly to a plumbing drain.

We don’t know for sure. We do know that you want the water to freely drain out. Even in cases where the output hose bends into a loop where water collects in the hose is enough to stop the vacuum on the kettle. You may get steam to escape via the lid if there is any back pressure on the drain hose. If your sewer pipe is well below your brewing location, you can run a horizontal drain line over to the kettle, install a P-trap and then end in an oversized vertical entrance pipe. Treat this like the catch bucket and run the silicone drain hose to it using the holder clip to hold it to the upper lip of the pipe.

About, from Brew Hardware: “Sometimes we have a grand plan for a given fitting. This time we’re just spit balling to see what sticks. We took the profile of a ball lock keg post and replaced the poppit and spring with just two large bored out holes. The other end is a generous 3/8″ OD hose barb that will work with 3/8′ ID silicone, 5/16″ Racking tubing, or whatever.”


  • Since Brew Hardware introduced this, availability has been an issue.
  • We keep a close eye on the Steam Slayer.  If it’s sold out again – connect with us – and we’ll give you a heads up when it’s back.

STEAM SLAYER – KETTLE BOIL STEAM CONDENSER ASSEMBLY

pinned

This post may contain affiliate links. We may make a commission when you use our links. This will never cost you extra. Thank you for supporting Homebrew Finds!

greatdeals

Make sure the components you use are compatible and rated for your intended application.  Contact manufacturer with questions about suitability or a specific application.  Always read and follow manufacturer directions. prod:bwsslay

6 Gallon ITALIAN Made Glass Carboy – $35 at Brew Hardware

ITALIAN 6 GALLON GLASS CARBOY

6 Gallon Italian Made Glass Carboy via Brew Hardware

Note from HBF:  From what I have gathered, I think there is a belief that Italian made carboys are of a higher quality as compared to carboys produced in Asia.  That’s a broad generalization that may not always hold true.

As of this posting, this Italian made 6 gallon carboy is selling for just $35.  Flat rate and free shipping options are available depending on shipping address and order size.  See Shipping Info on Brew Hardware.  Price, promotions and availability can change quickly.  Please note that product prices and availability are subject to change. Prices and availability were accurate at the time this post was published; however, they may differ from those you see when you visit the product page.  Check the product page for current price, description and availability

ITALIAN 6 GALLON GLASS CARBOY

Also: Kegerator Tips & Gear | Keg Repair Part #s | Recent Keg Finds

Our Top Draft Resources!

Check our our Top Draft Related Resources

standarddraft

pinned

This post may contain affiliate links. We may make a commission when you use our links. This will never cost you extra. Thank you for supporting Homebrew Finds!

greatdeals

Inkbird ITC-308 Digital Temperature Controller| Review

prod:bh6gic

Announcing: Auber Cube 240V/30A Controller now at Brew Hardware

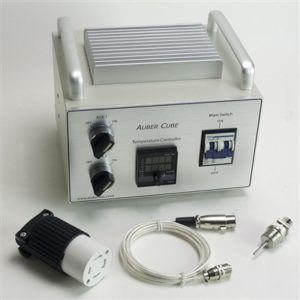
TEMP CONTROLLER, 240V/30A AUBER CUBE ECONOMY CONTROLLER

TEMP CONTROLLER, 240V/30A AUBER CUBE ECONOMY CONTROLLER via Brew Hardware.

More Info

From the product description, check product page for current description, price and availability:

The Auber Instruments Cube controller is a feature rich tabletop style controller capable of providing precise temperature control as well as boil intensity control for boil kettles. It can handle up to a 6000 watt element. The heart of the system is the EZboil “brain” that is unsurpassed by any other industry PID. We’ve been recommending Auber controllers for years and finally started stocking units for your convenience. This is essentially a single vessel controller, suited very well for BIAB vessels but it could also be used for a budget multi-vessel controller if you’re willing to swap plugs between elements.

In Mash Mode, set a target temperature by twisting the input knob and pressing in the knob to set it. An advanced PID algorithm will run the element as aggressively as possible without overshooting to get you brewing as fast as possible. When the temp is reached it will sound an internal alarm and start an internal mash timer.

In Boil Mode, the unit will run the element 100% output to ramp to a boil quickly but as soon as it approaches boil, it will sound an alarm and automatically ramp the power down to whatever power setting you’ve entered. This avoids boilovers without having to watch the kettle like a hawk.

This economical version of the Cube controller has two auxiliary 120 volt outlets that are each controlled by panel-mount on/off switches. This is typically used to control a pump or two. Due to this feature, the power input for the entire controller is 4-wire (hot, hot, neutral, ground). This package includes the L14-30R receptacle for power input but not the cable or the male plug. See an accessory cable in the list on the right.

The standard temperature probe we offer with this controller is 4″ long and has a built in weldless bulkhead. The hole required in your pot is 9/16″. The sensor cable is quick disconnectable from both the controller box via XLR plug and also on the probe end so you can move your kettles easily for cleaning without removing the entire probe.


TEMP CONTROLLER, 240V/30A AUBER CUBE ECONOMY CONTROLLER

pinned

This post may contain affiliate links. We may make a commission when you use our links. This will never cost you extra. Thank you for supporting Homebrew Finds!

greatdeals

Brew Hardware 10 Gallon Cooler to Mash Tun Conversion Kit – $68 + Hands on Review

cooler conversion kit

This Brew Hardware Mash Tun Conversion Kit includes everything you need to convert a 10 gallon Igloo or Home Depot Rubbermaid Cooler to a Mash Tun.  Note that it does not includes a cooler.

More Info

From the product description, check product page for current description, price and availability:

  • 12″ stainless steel domed false bottom with upgraded large ID connection elbow
  • One piece (Brew Hardware custom designed) machined bulkhead with interior barb
  • 2 piece stainless ball valve – can be upgraded to 3 piece
  • Required length of high temp silicone tubing
  • Does not include cooler or barb/camlock.  Barb and camlock fitting options are available under accessories on the right side of the screen.

What makes our kit different than the competition? Ugh, now we have to brag just a little. The bulkhead we include in this kit is custom machined out of hex bar stock to our exact specifications making it extremely simple to install and leak free from day one. It’s not a bunch of off the shelf parts made with half a roll of teflon tape. We also use a high flow elbow connector at the false bottom which also features a custom made smooth bore retainer. Long story short, we’ve held off on offering cooler false bottom kits for a long time until we had all the high end components described here.


Options are available both for an Igloo 10 gallon cooler and for Home Depot’s 10 gallon cooler.   A complete converted option is also available.  That includes the cooler along with your choice of connection fittings.  In my experience it’s cheaper to grab the conversion kit from Brew Hardware and source the cooler separately.  See some links to compatible coolers below.

This is the conversion kit I use and it’s… awesome.   tn_img_0322-300x225Check out my Hands on Review.

  • Pricing and, especially, availability can vary.  Check Brew Hardware for current, description, price and availability.

COOLER TO MASH TUN CONVERSION KIT

Check sale or product page for current availability & pricing

Related:

pinned

This post may contain affiliate links. We may make a commission when you use our links. This will never cost you extra. Thank you for supporting Homebrew Finds!

greatdeals

adamztop5

Price, promotions and availability can change quickly.  Please note that product prices and availability are subject to change. Prices and availability were accurate at the time this post was published; however, they may differ from those you see when you visit the product page.  Check the product page for current price, description and availability rp:bhconversion

The SpinCycle Whirlpool Returns from Brew Hardware!

spincycle whirlpool return

Recirculating wort back into the kettle to whirlpool the wort makes for much faster cooling and will also make a concentrated pile of trub and hop particles in the center of the kettle bottom. This whirlpool port assembly installs high up on your kettle wall above the typical wort level and then extends down before curving to the side to force the recirculated liquid towards the sidewall.

The BrewHardware purpose-built unit called the Spin Cycle starts with a weldless bulkhead design with captured O-ring and extended male threads and has the 1/2″ drop tube fully welded in. The result is a compact way to whirlpool without the need to put a ball valve on the port (the port is meant to be installed well above the max liquid level). It includes the base unit with the welded drop tube, the captured high temp silicone oring, a thin SS washer and a 1/2″ NPS locknut to hold it all together.

pinned

This post may contain affiliate links. We may make a commission when you use our links. This will never cost you extra. Thank you for supporting Homebrew Finds!

greatdeals

Price, promotions and availability can change quickly. Check the product page for current price, description and availability. prod:spincycle

The Steam Slayer from Brew Hardware – Kettle Steam Condenser Assembly – eliminates need to vent from your brewing room

STEAM SLAYER - KETTLE BOIL STEAM CONDENSER ASSEMBLY

The Steam Slayer via Brew Hardware is designed to eliminate the need to vent steam from your brewing room.

More Info

From the product description, check product page for current description, price and availability:

The Steam Slayer(tm) is a brand new product that eliminates the need to vent steam from your brewing room. More and more people are converting over to electric brewing systems allowing brewing indoors and even in quite confined spaces. The rude awakening occurs when you evaporate a gallon or more water into the air and your walls and ceiling drips with condensation. In some cases it is impossible or unreasonable to install fan-based exhaust systems to vent that steam. Enter the Steam Slayer!

Condensing boil steam is a relatively common practice in large scale industry and some breweries. Homebrewtalk.com user “Brundog” did a lot of experimentation and documentation and many folks built clone systems in turn. When it came time to install one on the shop brewing kettle, we couldn’t leave well enough alone with off the shelf parts.

How It Works:
You will install a 1.5″ TC port in the upper sidewall of your electric powered boil kettle, typically as high as you can get it without interfering with the closure of the kettle’s lid. The unit is equipped with a fine mist sprayer that fits inside the main body and is fed with cold tap water. When you reach a boil in your kettle, you will put the lid on and start the flow of cold water into the unit. Steam will enter the tee and encounter the spray turning the steam back into water. The waste water runs out the bottom of the unit into the included silicone hose which you will position over a catch bucket. Depending on your tap water pressure, and the selected sprayer option, you will typically consume 6-10 gallons of water in a 60 minute boil. This water can be discarded or saved for cleaning your equipment afterwards.

What’s Included:

  • Main Body Tee with 1.5″ TC top and side flanges and welded 5/8″ hose barb on the bottom.
  • 1.5″ TC sprayer adapter with your choice of 6 or 9 gallon per hour sprayer tip. The GPH ratings are at 40 PSI. We find the 6GPM works great on 45 PSI on a 7 gallon boil. If you have low pressure, you may need the 9GPM sprayer. If you are doing 10 or 15 gallon batches, you may need the 9 GPH. We are still trying to figure out better guidelines.
  • Right angle water shut off valve with push in connection five feet of 1/4″ poly supply line (5ft is standard, select longer runs in the dropdown selection above.
  • Water supply connection fitting with push in connection: Your choice of 3/4″ Female Garden Hose or In-Line faucet connection valve (select in the drop down above). More about this in the instructions below.
  • 3 feet of 1/2″ ID silicone hose for waste water drain. The tubing must reach from the bottom of the steam slayer body to the TOP of your catch bucket. If you need more tubing, it can be purchased by the foot and we can combine the added length onto the standard 3′ if you direct us to.
  • Hose holder clip to keep drain hose positioned at the inside top of your collection bucket.

* Note that the clamp and gasket to attach the unit to the kettle is not included, nor is the hardware to install the actual TC port in the kettle. See the list of available accessories if you need any of those parts.

Instructions:
First, keep in mind that this is a new process for small scale homebrewing and we’re all learning the best practices. When you buy this unit, consider yourself a part of a beta test. These instructions will evolve.

  1. Clamp the main unit to the existing kettle port and the sprayer TC to the top of the unit. The integrated hose barb should be facing down towards the floor.
  2. Install your water source fitting. If you selected the Garden Hose fitting, attach it to your garden hose bib, a garden hose, a slop sink faucet, or a washing machine supply port. If you selected the inline faucet supply fitting, shut off the cold water valve under your sink, remove the hose feeding your faucet and install the inline fitting. Replace the faucet hose on top and turn the water back on to check for leaks. The inline faucet fitting is shown on the right. Just below that we show where it would install under a sink or toilet.
  3. Connect the 1/4″ Poly line to your source water fitting and the shutoff valve on the top of the Steam Slayer. Making sure the ends are cut cleanly, simply push the tubing into the fittings all the way and install the C-shaped retaining clips.
  4. Install the silicone waste tubing on the unit’s barb and attach the holder clip to the end. We include a 5/8″ OD stainless steel ring that should be inserted into the end of the silicone to expand the tubing large enough to fit the holder clip tightly. The waste tubing should be trimmed so that it only extends into your catch bucket/vessel by 1-2 inches. The open end of this tubing must never be submergedor the steam slayer will not work properly.
  5. Once your boil begins, turn on the cooling water and place your kettle lid on the kettle. Since the condensing action creates a mild vacuum, the lid does not need a gasket. If you notice steam leaking out of the lid, make sure it is not warped creating extra spaces.
  6. Adjust your boil intensity to approximately HALF of what you’re used to using and plan for about half as much boil off. For a typical example, we used to run our 5500 watt element at 65% when the kettle is full of 7 gallons and the lid off. We experienced 1.5 gallons per hour of boil off. With the Steam Slayer installed, we run at 32% and experience .75 gallons of boil off per hour. In other words, to use the Steam Slayer, your electric kettle must be equipped with a power controller.

Frequently Asked Questions:

1. Can I go through the lid?

Yes. In order to through the lid, you will need to install a 1.5″ TC port towards the edge and then clamp on a 1.5″ TC 90 degree elbow. From there the Steam Slayer gets clamped on as noted above. You may need to place a counterweight on top of the lid, opposite the TC port to keep it firmly seated on the kettle.

2. I use the BIAB method and I’m concerned that a side mount TC port will reduce my kettle capacity.

You can put a TC blank cover over the port during the mash and then fit the Steam Slayer after you pull the grain bag.

3. How do I run the hot waste water directly to a plumbing drain.

We don’t know for sure. We do know that you want the water to freely drain out. Even in cases where the output hose bends into a loop where water collects in the hose is enough to stop the vacuum on the kettle. You may get steam to escape via the lid if there is any back pressure on the drain hose. If your sewer pipe is well below your brewing location, you can run a horizontal drain line over to the kettle, install a P-trap and then end in an oversized vertical entrance pipe. Treat this like the catch bucket and run the silicone drain hose to it using the holder clip to hold it to the upper lip of the pipe.

About, from Brew Hardware: “Sometimes we have a grand plan for a given fitting. This time we’re just spit balling to see what sticks. We took the profile of a ball lock keg post and replaced the poppit and spring with just two large bored out holes. The other end is a generous 3/8″ OD hose barb that will work with 3/8′ ID silicone, 5/16″ Racking tubing, or whatever.”


  • Since Brew Hardware introduced this, availability has been an issue.
  • We keep a close eye on the Steam Slayer.  If it’s sold out again – connect with us – and we’ll give you a heads up when it’s back.

STEAM SLAYER – KETTLE BOIL STEAM CONDENSER ASSEMBLY

pinned

This post may contain affiliate links. We may make a commission when you use our links. This will never cost you extra. Thank you for supporting Homebrew Finds!

greatdeals

Make sure the components you use are compatible and rated for your intended application.  Contact manufacturer with questions about suitability or a specific application.  Always read and follow manufacturer directions. prod:bwsslay
304 Stainless Steel Clip on Trub Guard from Brew Hardware – $10

CLIP-ON TRUB GUARD

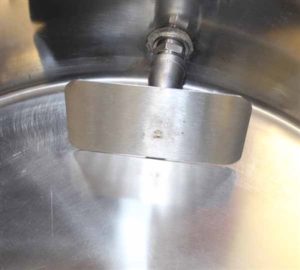
CLIP-ON TRUB GUARD via Brew Hardware

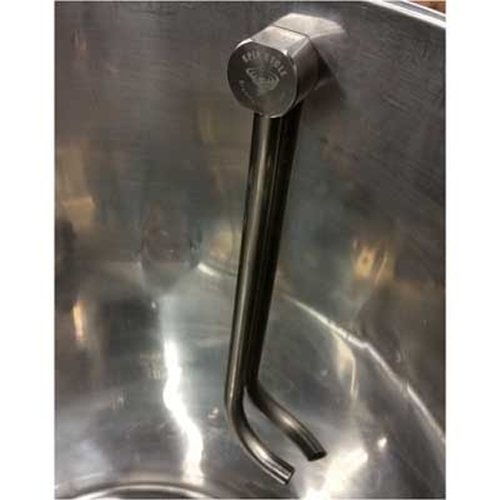
From the description: “Keep most of that trub out of your drain without a filter device.

This is a slight reconfiguration of our heat shield assembly that allows clipping to the side of a kettle dip tube to keep your pile of trub away from the exit point. This is especially useful when you whirlpool your boiled wort to make a neat pile in the center of the pot. That pile usually stays put until it becomes exposed to air and then it collapses and falls towards the sidewalls of your pot. This simple clip on guard will stay in place during the whole boil and keep most of the trub out of the pickup at the end of the draining process.

We position the clip for best fit on our truebulkheadelbarb but it will also work with a street elbow threaded into a welded coupling bulkhead that acts as a mini diptube.

The 3″ high x 5″ wide stainless plate should be touching the bottom of the pot for best results. The plate and clip are 304 stainless steel.”

CLIP-ON TRUB GUARD

pinned

This post may contain affiliate links. We may make a commission when you use our links. This will never cost you extra. Thank you for supporting Homebrew Finds!

greatdeals

The Steam Slayer from Brew Hardware – Kettle Steam Condenser Assembly – eliminates need to vent from your brewing room

STEAM SLAYER - KETTLE BOIL STEAM CONDENSER ASSEMBLY

The Steam Slayer via Brew Hardware is designed to eliminate the need to vent steam from your brewing room.

More Info

From the product description, check product page for current description, price and availability:

The Steam Slayer(tm) is a brand new product that eliminates the need to vent steam from your brewing room. More and more people are converting over to electric brewing systems allowing brewing indoors and even in quite confined spaces. The rude awakening occurs when you evaporate a gallon or more water into the air and your walls and ceiling drips with condensation. In some cases it is impossible or unreasonable to install fan-based exhaust systems to vent that steam. Enter the Steam Slayer!

Condensing boil steam is a relatively common practice in large scale industry and some breweries. Homebrewtalk.com user “Brundog” did a lot of experimentation and documentation and many folks built clone systems in turn. When it came time to install one on the shop brewing kettle, we couldn’t leave well enough alone with off the shelf parts.

How It Works:
You will install a 1.5″ TC port in the upper sidewall of your electric powered boil kettle, typically as high as you can get it without interfering with the closure of the kettle’s lid. The unit is equipped with a fine mist sprayer that fits inside the main body and is fed with cold tap water. When you reach a boil in your kettle, you will put the lid on and start the flow of cold water into the unit. Steam will enter the tee and encounter the spray turning the steam back into water. The waste water runs out the bottom of the unit into the included silicone hose which you will position over a catch bucket. Depending on your tap water pressure, and the selected sprayer option, you will typically consume 6-10 gallons of water in a 60 minute boil. This water can be discarded or saved for cleaning your equipment afterwards.

What’s Included:

  • Main Body Tee with 1.5″ TC top and side flanges and welded 5/8″ hose barb on the bottom.
  • 1.5″ TC sprayer adapter with your choice of 6 or 9 gallon per hour sprayer tip. The GPH ratings are at 40 PSI. We find the 6GPM works great on 45 PSI on a 7 gallon boil. If you have low pressure, you may need the 9GPM sprayer. If you are doing 10 or 15 gallon batches, you may need the 9 GPH. We are still trying to figure out better guidelines.
  • Right angle water shut off valve with push in connection five feet of 1/4″ poly supply line (5ft is standard, select longer runs in the dropdown selection above.
  • Water supply connection fitting with push in connection: Your choice of 3/4″ Female Garden Hose or In-Line faucet connection valve (select in the drop down above). More about this in the instructions below.
  • 3 feet of 1/2″ ID silicone hose for waste water drain. The tubing must reach from the bottom of the steam slayer body to the TOP of your catch bucket. If you need more tubing, it can be purchased by the foot and we can combine the added length onto the standard 3′ if you direct us to.
  • Hose holder clip to keep drain hose positioned at the inside top of your collection bucket.

* Note that the clamp and gasket to attach the unit to the kettle is not included, nor is the hardware to install the actual TC port in the kettle. See the list of available accessories if you need any of those parts.

Instructions:
First, keep in mind that this is a new process for small scale homebrewing and we’re all learning the best practices. When you buy this unit, consider yourself a part of a beta test. These instructions will evolve.

  1. Clamp the main unit to the existing kettle port and the sprayer TC to the top of the unit. The integrated hose barb should be facing down towards the floor.
  2. Install your water source fitting. If you selected the Garden Hose fitting, attach it to your garden hose bib, a garden hose, a slop sink faucet, or a washing machine supply port. If you selected the inline faucet supply fitting, shut off the cold water valve under your sink, remove the hose feeding your faucet and install the inline fitting. Replace the faucet hose on top and turn the water back on to check for leaks. The inline faucet fitting is shown on the right. Just below that we show where it would install under a sink or toilet.
  3. Connect the 1/4″ Poly line to your source water fitting and the shutoff valve on the top of the Steam Slayer. Making sure the ends are cut cleanly, simply push the tubing into the fittings all the way and install the C-shaped retaining clips.
  4. Install the silicone waste tubing on the unit’s barb and attach the holder clip to the end. We include a 5/8″ OD stainless steel ring that should be inserted into the end of the silicone to expand the tubing large enough to fit the holder clip tightly. The waste tubing should be trimmed so that it only extends into your catch bucket/vessel by 1-2 inches. The open end of this tubing must never be submergedor the steam slayer will not work properly.
  5. Once your boil begins, turn on the cooling water and place your kettle lid on the kettle. Since the condensing action creates a mild vacuum, the lid does not need a gasket. If you notice steam leaking out of the lid, make sure it is not warped creating extra spaces.
  6. Adjust your boil intensity to approximately HALF of what you’re used to using and plan for about half as much boil off. For a typical example, we used to run our 5500 watt element at 65% when the kettle is full of 7 gallons and the lid off. We experienced 1.5 gallons per hour of boil off. With the Steam Slayer installed, we run at 32% and experience .75 gallons of boil off per hour. In other words, to use the Steam Slayer, your electric kettle must be equipped with a power controller.

Frequently Asked Questions:

1. Can I go through the lid?

Yes. In order to through the lid, you will need to install a 1.5″ TC port towards the edge and then clamp on a 1.5″ TC 90 degree elbow. From there the Steam Slayer gets clamped on as noted above. You may need to place a counterweight on top of the lid, opposite the TC port to keep it firmly seated on the kettle.

2. I use the BIAB method and I’m concerned that a side mount TC port will reduce my kettle capacity.

You can put a TC blank cover over the port during the mash and then fit the Steam Slayer after you pull the grain bag.

3. How do I run the hot waste water directly to a plumbing drain.

We don’t know for sure. We do know that you want the water to freely drain out. Even in cases where the output hose bends into a loop where water collects in the hose is enough to stop the vacuum on the kettle. You may get steam to escape via the lid if there is any back pressure on the drain hose. If your sewer pipe is well below your brewing location, you can run a horizontal drain line over to the kettle, install a P-trap and then end in an oversized vertical entrance pipe. Treat this like the catch bucket and run the silicone drain hose to it using the holder clip to hold it to the upper lip of the pipe.

About, from Brew Hardware: “Sometimes we have a grand plan for a given fitting. This time we’re just spit balling to see what sticks. We took the profile of a ball lock keg post and replaced the poppit and spring with just two large bored out holes. The other end is a generous 3/8″ OD hose barb that will work with 3/8′ ID silicone, 5/16″ Racking tubing, or whatever.”


  • Since Brew Hardware introduced this, availability has been an issue.
  • We keep a close eye on the Steam Slayer.  If it’s sold out again – connect with us – and we’ll give you a heads up when it’s back.

STEAM SLAYER – KETTLE BOIL STEAM CONDENSER ASSEMBLY

pinned

This post may contain affiliate links. We may make a commission when you use our links. This will never cost you extra. Thank you for supporting Homebrew Finds!

greatdeals

Make sure the components you use are compatible and rated for your intended application.  Contact manufacturer with questions about suitability or a specific application.  Always read and follow manufacturer directions. prod:bwsslay

Brew Hardware 10 Gallon Cooler to Mash Tun Conversion Kit – $68 + Hands on Review

cooler conversion kit

This Brew Hardware Mash Tun Conversion Kit includes everything you need to convert a 10 gallon Igloo or Home Depot Rubbermaid Cooler to a Mash Tun.  Note that it does not includes a cooler.

More Info

From the product description, check product page for current description, price and availability:

  • 12″ stainless steel domed false bottom with upgraded large ID connection elbow
  • One piece (Brew Hardware custom designed) machined bulkhead with interior barb
  • 2 piece stainless ball valve – can be upgraded to 3 piece
  • Required length of high temp silicone tubing
  • Does not include cooler or barb/camlock.  Barb and camlock fitting options are available under accessories on the right side of the screen.

What makes our kit different than the competition? Ugh, now we have to brag just a little. The bulkhead we include in this kit is custom machined out of hex bar stock to our exact specifications making it extremely simple to install and leak free from day one. It’s not a bunch of off the shelf parts made with half a roll of teflon tape. We also use a high flow elbow connector at the false bottom which also features a custom made smooth bore retainer. Long story short, we’ve held off on offering cooler false bottom kits for a long time until we had all the high end components described here.


Options are available both for an Igloo 10 gallon cooler and for Home Depot’s 10 gallon cooler.   A complete converted option is also available.  That includes the cooler along with your choice of connection fittings.  In my experience it’s cheaper to grab the conversion kit from Brew Hardware and source the cooler separately.  See some links to compatible coolers below.

This is the conversion kit I use and it’s… awesome.   tn_img_0322-300x225Check out my Hands on Review.

  • Pricing and, especially, availability can vary.  Check Brew Hardware for current, description, price and availability.

COOLER TO MASH TUN CONVERSION KIT

Check sale or product page for current availability & pricing

Related:

pinned

This post may contain affiliate links. We may make a commission when you use our links. This will never cost you extra. Thank you for supporting Homebrew Finds!

greatdeals

adamztop5

Price, promotions and availability can change quickly.  Please note that product prices and availability are subject to change. Prices and availability were accurate at the time this post was published; however, they may differ from those you see when you visit the product page.  Check the product page for current price, description and availability rp:bhconversion

Vinyl Vessel Decals “WATER, MASH, BOIL” – from $3.75

VINYL VESSEL DECALS "WATER, MASH, BOIL"

Vinyl vessel decals from Brew Hardware

More Info

From the product description, check product page for current description, price and availability:

Every time we build a three vessel system for someone here in the shop, we put these vessel labels on the front just as a nice extra touch of class. Until now, it hadn’t occurred to us that a lot of you would also appreciate the ability to DIY.

These labels are made from black 7-year outdoor rated vinyl so they can stand up to the heat and repeated washings.

You have a choice of either the bold or stylish fonts as seen in the picture. The letters are about 1.5″ high.


These are $3 each.  If you buy 4, you’ll automatically receive a 25% discounting making them $3.75 each.  Details on that promotion can be found on the Vinyl Decals landing page.

.VINYL VESSEL DECALS “WATER, MASH, BOIL”

Also Consider – CARBOY CALIBRATION DECALS | Complete Lineup of Vinyl Decals

pinned

This post may contain affiliate links. We may make a commission when you use our links. This will never cost you extra. Thank you for supporting Homebrew Finds!

greatdeals

Prices, shipping and availability can change quickly. Please note that product prices and availability are subject to change. Prices and availability were accurate at the time this post was published; however, they may differ from those you see when you visit the product page. Check the product page for current price, description and availability. rp:vesseldecals

TRUE Weldless Bulkheads from Brew Hardware!

TrueBulkheadBarb-2T

True Weldless bulkheads are available in a number of configurations for varied applications.  The 5/8″ Barb version is included in their Cooler Conversion Kit.  I’ve used that extensively


If you’ve dealt with other weldless kits and bulkheads you’ll know that typically a certain finesse is required when installing.  They can be a bit of a pain to to get working correctly and can require some adjustments over time to keep leaks under control.  Depending on the design “just tight enough” is really close to “too tight, your o-ring just popped out”.  True Weldless bulkheads – at least the style I have – are well thought out, well built and you can actually tighten them down.

A real issue with these and a lot of other stuff that Brew Hardware carries is availability.  They seem to struggle.  Along with that offerings can change quickly.

bulkhead deal


pinned

This post may contain affiliate links. We may make a commission when you use our links. This will never cost you extra. Thank you for supporting Homebrew Finds!

greatdeals

Price, promotions and availability can change quickly. Check the product page for current price, description and availability. pst:bhtwbis