Category Archives: Reviews & Top Posts

BrewZilla Gen 4 Temperature Control and Programming Tips and Tricks

Updated: February 27, 2025

This write up is by Homebrew Finds Contributor Brad Probert.  Brad is an engineer, expert homebrewer and experienced reviewer.  Grab a link to Brad’s website at the end of this review.

BrewZilla Gen4 Temperature Control and Programming Tips and Tricks

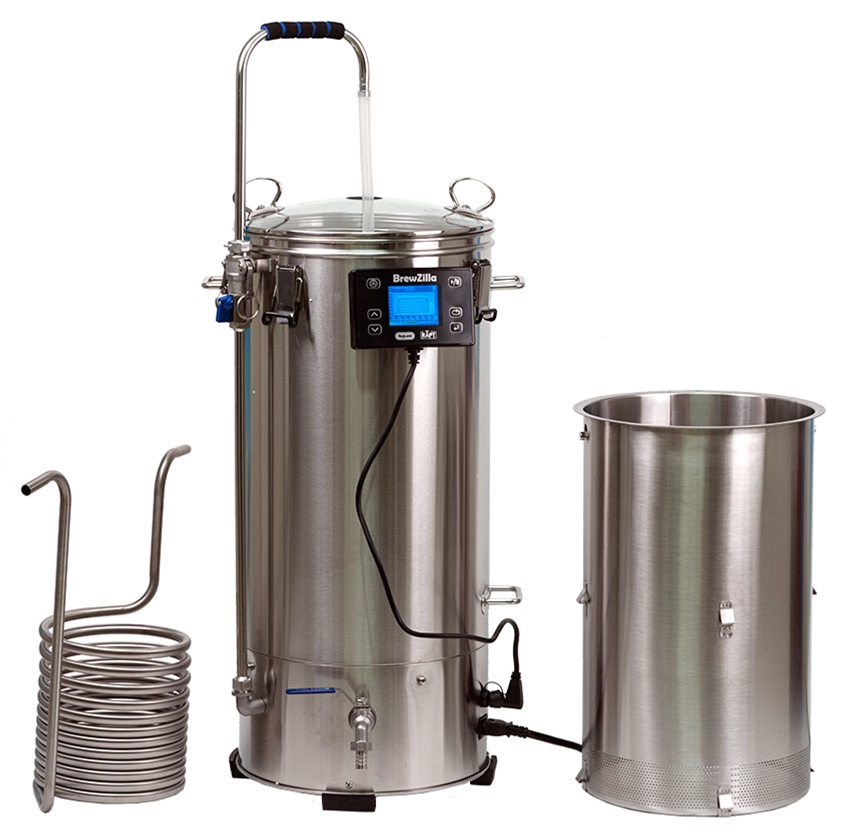
The BrewZilla Gen4 has a list of features that make it unique from other All-In-One brew units. Those are covered here: https://www.homebrewfinds.com/hands-on-review-brewzilla/. But there are some significant functions and features that need a deeper look to fully understand them. In this write-up, I will focus on temperature control as well as programming tips to automate your brew day.

Temperature

When I first got the BrewZilla Gen 4 with the Bluetooth temperature probe, I didn’t understand it. I thought it just gave me the option to use either the temperature sensor in the base of the unit (like most other AIO units), or the Bluetooth as a wireless probe sitting in the grain bed. But that’s not it. It uses both sensors SIMULTANEOUSLY. No mass market controller does that- AIO or otherwise. To get that kind of functionality you’re talking a custom-built controller running some of the advanced brew control software.


Limited Time Deal, Closeout Pricing at William’s Brewing

Brewzilla 35 Liter Gen 4 110 volt

Brewzilla 35 Liter Gen 4 via William’s Brewing

  • As of this posting, William’s Brewing has this on sale for just $469.99. That’s a savings of $80.
  • Shipping is free or reasonably priced flat rate to addresses in the contiguous US depending on your order size for most items.

Brewzilla 35 Liter Gen 4 110 volt


Learn More: Hands on Review: BrewZilla All Grain Brewing System!


Kegland’s implementation of dual-probe control is very simple and straightforward in the BrewZilla. To best understand how this works, you need to think of your system in its recirculation loop. The wort drains down from the grain bed to the bottom, gets heated by the elements in the base, then gets sucked into the pump to get dumped on top of the grain again. The Bluetooth probe sits in the middle of the grain bed, and base sensor sits in the small volume of wort getting heated by the elements. When you’re at a steady target temperature, both of these probes should read about the same, as you ideally have uniform temperature throughout your system.


Compare BrewZilla Prices, How-To Continues Below:

Continue reading

Not Just for Bars Anymore… Using Interlocking Bar Mats Around Your Home Brewery!

In spite of not actually having a formal home bar, I’m a big fan of… bar mats.  Generally speaking these are made for food-related uses and  they’re designed to be wet from time to time.  They provide a nice surface to set things on all the while increasing air flow.  That increased air flow helps get and keep things dry.  Better airflow can also help regulate temperature better.

Personally, I’ve used San Jamar’s Versa Mat, but many other similar products are available.  Mine are 12″ x 12″, lock together for use in larger areas and can be trimmed when needed.

On the shelf of my brewing area work table – TRINITY EcoStorage NSF Stainless Steel Table, 48-Inch – Hands on Review – helps things dry.

Continue reading

Short On Time? Time Saving Homebrew Tips!

time saving homebrew tips

Time can be a big factor when it comes to homebrewing.  Sure, it may be nice to spend sunrise until sunset carefully hand crafting a batch (or batches) of beer, but the practicalities of life can and do factor in when we’re deciding if we can brew a batch of beer.  For your stage of life, time may not be a factor.  If so, that’s awesome.  For others, time saving tips and techniques could help you brew more often.

With those thoughts in mind, I put the call out to the HBF community [8 Ways to Connect with HBF] to get some time saving tips and tricks.  A selection  of those along with some of my own thoughts follows.  Thanks to all who participated!  A full list of contributors is at the end of this post.


Limited Time DEAL, save on 30 minute ktis!

  • William’s Brewing has reformulated their popular lineup of extract kits with extract that has been preboiled for 15 minutes. That enables them to shorten the boil from 1 hour to 30 minutes without compromising flavor
  • For a limited time William’s is discounting these recently releases kits by 15% when you buy two or more, mix and match is okay. No coupon code required.
  • Shipping is free or reasonably priced flat rate to addresses in the contiguous US depending on your order size for most items.

William’s Brewing Recipe Kits

How do I save time home brewing? Continue reading

Hands on Review: Thermapen ONE Thermometer!

thermapen one hands on review

Updated: January 27, 2025

The Thermapen is a thermocouple thermometer produced by ETI, Ltd and sold by ThermoWorks. It’s used by restaurants, home cooks, homebrewers, grillers, bbq-ers and more


Limited Time Deal!

ThermoWorks Thermapen ONE Private Open Box Sale!


Check Current Price, Models & Availability:

My Thermapen ONE Review is hosted on my BBQ site BBQ Finds – it covers use for homebrewing and more.

Continue reading

Make Your Own Canned Cocktails – Get a Home Canner!

Updated: September 9, 2024

If you’re looking to make your own home canned cocktails, you’re going to need a… canner. When I started a homebrewing years ago an an “affordable” system that was in the $10k, range. That was considered affordable at the time. I’m happy to say that times have changed. Home sized systems are available at a relatively reasonable cost.

Home Canning Systems:


Rare, Limited Time Deal:

Cannular Bench Top Can Seamer CAN100

  • MoreBeer has Cannular on sale for $399.99. That’s a $150 savings.
  • For some pricing clarity, I’ve seen USED units sell for more than this.
  • This is a rare deal because the regular version of the Cannular is under a MAP agreement.  That means that it, generally speaking, cannot be discounted.  I don’t know if this is a one-off thing or if the reverse roller version will be an ongoing offering.
  • Get Free Shipping: Shipping is also free to most US addresses with a qualifying $59 order.  This includes bulky cases of new cans.
  • Learn More! Hands on Review: Kegland Cannular Bench Top Can Seamer – Homebrew Canner

Cannular Bench Top Can Seamer CAN100


Continue reading

What’s the difference between Primary and Secondary CO2 Regulators?

VEVOR CO2 Regulator Gauge with 0-60PSI, Heavy Duty CO2 Gauge Gas System, Draft Beer Regulator with Check Valve, Adjustable Pressure Regulator for Draft Beer Homebrew (Triple Gauge Regulator)Pictured: VEVOR CO2 Regulator Gauge with 0-60PSI, Heavy Duty CO2 Gauge Gas System, Draft Beer Regulator with Check Valve, Adjustable Pressure Regulator for Draft Beer Homebrew (Triple Gauge Regulator) – affiliate link, note that multiple variations of this product may be available, as such a different version may appear at this link

July 4, 2024

In the context of homebrewing or serving beer, a CO2 regulator hooks up to a compatible CO2 tank and steps down the pressure to carbonate and serve the beer properly. See: Balancing Your Kegerator Draft System  and Diagnosing and Fixing Kegerator Foam Problems

Single Body vs Multi Body Regulators

A typical CO2 regulator provides a single output pressure. It usually has two gauges, one for the high pressure side and one for the low pressure side, although it can have a single gauge. A multi-body regulator, provides multiple output pressures and typically has one high side gauge and one gauge for each serving pressure.


Get a Regulator!

Continue reading

Hands on Review: Safecid Beer Line Cleaner

This review is by Homebrew Finds Contributor Brad Probert.  Brad is an engineer, expert homebrewer and experienced reviewer.  Grab a link to Brad’s website at the end of this review.

Safecid Cleaner

Those of us that have kegerators know that cleaning the beer lines is a necessary thing. We also know that cleaning them is a pretty unexciting event. Products for cleaning them are generally unexciting as well because they’re all pretty similar. There is one product that is different- Safecid Beer Line Cleaner.


Check Current Pricing & Availability:

These are affiliate links. Note that multiple variations of these products may be available, as such a different version may appear at these links


Safecid has both an acid cleaner and an alkaline/caustic cleaner. The cleaners are as potent as other cleaners, but their patented chemistry makes it non-toxic. This means it is neither harmful to people (skin, eyes), nor harmful to the water supply when rinsed down the drain. And that’s what makes it different from other cleaners.

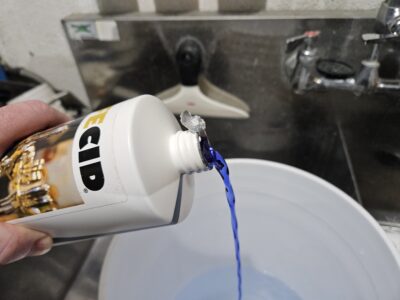
Alkaline Cleaner Distinct Blue Color

See-Through Volume Markings

The Brewer’s Association publishes draft beer cleaning guidelines for bars/breweries. They recommend a cleaning period of every 2 weeks, based on research looking at bacteria build-up in the lines. The research looked at the growth of both aerobic bacteria (leading to sour and vinegar off-flavors) and anaerobic bacteria (leading to butter and caramel off-flavors). This bi-weekly cleaning is to be done with an Alkaline cleaner, and then every 3 months an acid cleaner should be used. The alkaline cleaner deals with organic compounds (bacteria) and the acid cleaner deals with inorganic compounds (beer stone). They point out that the cleaning frequency is not dependent on how much beer is flowed through the lines- busy taps or slow ones alike.

Continue reading

Hands on Review: Kegland Cannular Bench Top Can Seamer – Can Your Homebrew!

Updated: February 18, 2025

This review is by Homebrew Finds Contributor Brad Probert.  Brad is an engineer, expert homebrewer and experienced reviewer.  Grab a link to Brad’s website at the end of this review.

Kegland Cannular Can Seamer

It’s been a long road for craft beer to be accepted in cans and not bottles. But it has been well established that cans are OK, too, and some take it even further to tout cans as a superior storage vessel for beer. I’ll avoid a full-blown comparison of the pros & cons of each, but I do feel it worth noting a couple of the selling points cans have. One is the claim that cans provide better storage with a more oxygen-proof seal than bottle caps, and 100% light blocking versus even brown colored glass. There is probably lots of debate on those two topics, but one benefit that is universally recognized is transportability. Cans are lighter and more compact, a whole lot less fragile, and you can take them to beaches and pools where glass containers are banned.

On the homebrew scale, until recently, the canners available have either been hand-crank monstrosities that look like an exhibit from a museum on the industrial revolution, or electrically driven units that look like steampunk movie props and cost a couple thousand dollars. Then in 2019, KegLand from Australia started exporting their Cannular can seamer that sells for $525 for the unit + power supply and is electrically powered. This changed the landscape significantly in the homebrew world, making canning much more within reach.


Compare Prices, Review Continues Below:

Related Reviews:


Empty CanLid on Foam

The Cannular operates with a combination of manual lever pulling and electric motor spinning. You start the process out with an empty aluminum can with no top on it. You sanitize the can, fill it with beer, and then take a sanitized lid and set it down on top of the can (ideally on foam, to ensure minimization of air in your canned product). From there, it gets placed on a small pedestal and a lever turn raises the can up into the machinery of the can seaming operation and locks it at that height. The push of a button gets the motor spinning and the can on its platform starts spinning around. Grabbing a different lever, you push back and hold it for a couple seconds, then pull it toward you for a couple seconds, and you’re done. Turn off the motor, lower your can back down on the pedestal, and you’ve canned one beer.

Continue reading

Hands on Review: BrüMate Hopsulator Trio

brumate hopsulator trio review

BrüMate Hopsulator Trio

I received a BruMate Hopsulator Trio as a birthday present from my beloved daugher. I had seem them around, but hadn’t had a chance to pick one up yet, so I was excited about the present.

BruMate makes a number of can coolers or high end coozies. These generally double wall insulated stainless steel construction and are designed to work with different sizes of cans and for some models (like the Trio), they’ll also function as tumblers all by themselves.

Hands on Review

Continue reading

Get a Bigger CO2 Tank… Save Time and Money!

co2 tank salePictured: CO2 Tank from Beverage Elements

Get a Bigger CO2 Tank… Save Time and Money

Many times CO2 suppliers don’t charge a whole lot more to swap out or fill larger tanks. At my supplier it’s about $10 more to exchange a 20 lb tank vs a 5 lb tank.

At William’s Brewing a 10 lb exchange is $10 more vs a 5 lb tank. That’s double the CO2 for $10 more. A 20 lb tank is $20 more than a 5 lb tank. That’s 4 times the CO2 for $20 more.

See: C02 and Beer Gas Cylinder Exchange at William’s Brewing for current pricing.

Beyond that, getting a larger tank means a lot of time savings.  Less lugging your tank around to swap out or refill. With these savings a tank upgrade will could pay for itself in short order.

Of course you’ll want to make sure your system is leak free including the most difficult spot to check for leaks to so you don’t needlessly drain that big new tank.

More CO2 Related:

Continue reading

Hands on Review: StirStarter Stir Plate

This review is by Homebrew Finds Contributor Michael Gom.  Read more about Michael below.

Hands on Review: The StirStarter Yeast Stir Plate

Why make a yeast starter?

A yeast starter can really help insure you have healthy, viable yeast for your beer especially when using liquid yeast. For this reason I always prefer to build up a starter whenever using a liquid yeast (or re-pitching a saved yeast). I won’t get into effectiveness of different starter methods but a popular choice for homebrewers is to use a stir plate, a magnetic stir-bar and a flask of some sort (erlenmeyer flask in most cases).

Full disclosure, I was sent this product for free to do this review. Though I did try and put it through multiple real-world tests and have given my honest opinion on function and performance.


Compare Prices, Review Continues Below:

Also Mentioned in this Review: Cole-Parmer elements AO-34502-65 Cole-Parmer Elements Erlenmeyer Flask| 3 Pack, Magnetic Stir Bar – 50mm / 1.96 Inch


Unboxing and packaging

All the parts and components arrived in a single, compact zip-loc bag.In the bag, an information sheet with info on the company, yeast starters, etc.

Also included is an envelope with an instruction sheet, as well as the “keeper” magnet taped to the back.

As well as the power adapter (in it’s own cardboard box), the stir plate itself, and the stir bar.

Continue reading

Make an E-Paper Tap Handle!

Credit for this photo and build to UnworkableProphet via Printables

Updated: February 27, 2025

Waveshare makes a 2.7″ e-paper display that… requires no power. This is the same sort of technology that some versions of Amazon Kindle use. A small amount of power is used to “paint” the screen and then it stays that way with no power. In the case of the Waveshare display the energy that’s generated by the setting device (a compatible smart phone) is enough to to power the process of setting the display.

What are Other’s Saying?   Search this product’s Amazon reviews for “tap handle” – affiliate link, note that multiple variations of this product may be available, as such a different version may appear at this link

waveshare 2.7inch Passive NFC-Powered E-Paper Module No Battery Wireless Powering & Data Transfer Provides Android APP Black and White Display – affiliate link, note that multiple variations of this product may be available, as such a different version may appear at this link

Parts List

The build to UnworkableProphet via Printables (pictured above) seems to be one of the more popular 3D print builds that utilizes this display.

More: 3D Printer Projects!

These projects 3D printer projects appear to utilize a similar e-paper display

Share your build!

If you put together a build… We’d love to share the details with your fellow homebrewers.  Email us the deets.

Continue reading

Mash Efficiency Tests… The problem with store milled malt

Stored milled grain is notoriously under crushed. The general theory on this is that shops under crush to prevent stuck mashes. I think that’s true but I also wonder if it’s to prevent wear and tear on their equipment and potentially mill faster.

Side by side crush tests

These are side by side mash tests using default setting of a homebrew scale grain mill vs store crushed grain.  The Rahr 2 Row both milled and unmilled were sourced at a reputable local homebrew shop.  Note that it did not come from Northern Brewer.  To produce as consistent results as possible, I measured everything (water and grain) in grams to the nearest single gram.


Procedure:

  1. Weigh 906 grams (1.997 lbs) of grain
  2. Weigh 2,715 grams of strike water (.717 gallons)
  3. Heat up strike water to 162 deg F.  Overheat by a degree or so and then stir back down to temperature.  It’s easier to hit a stable temp going down vs hitting it going up.
  4. While strike water is heating pre-heat mash tun with 1/2 gallon of 212 deg F water.
  5. Place grain (inside of bag) in cooler.
  6. Add strike water.
  7. Stir and record temperature.
  8. Mash for 60 minutes.
  9. Drain first runnings.
  10. Grain back in mash tun.
  11. Add 1,884 grams (.497 gallons) of 212 deg F water to the grain and stir.  I normally would not sparge with boiling water.  I used boiling water to take one more variable out of the equation.
  12. Drain second runnings.  Let grain bag sit on strainer for 5 minutes.
  13. Record volume and gravity.

Continue reading

Pin Lock Keg Pricing and Availability

Pin Lock Keg Pricing…

There’s been a real reversal in used keg pricing. When I started brewing pin locks were cheaper than ball locks, but that has changed.

It’s been hard to find good used pin locks at times with some suppliers selling out even when selling at high prices.For example, see MoreBeer’s Pin Lock offering has been selling for a whopping $85 for many months. At times they have sold out for long periods of time even at that high price.

This is all related to availability. New pin lock kegs are not coming into the homebrewing market in mass and we’ve hit an availability wall.

Considering the current climate, I think now is the time to stock up. Things have been getting consistently worse and worse on the pin lock front. The same has been generally true for ball lock kegs, but the process has been slower than pin locks.

Update: MoreBeer’s $85 offering has sold out… again

MoreBeer’s $85 offering has sold out again. This offering has experience MULTIPLE sellouts at this price point.

This is a testament to the scarcity and cost of pin lock kegs.

Used 5 Gal. Pin Lock Kegs KEG432 – at MoreBeer


An OUTSTANDING DEAL on Pin Locks

5 Gallon Pin Lock Keg – Dual Handle – Reconditioned

Good used pin locks have been hard to find…  When I started brewing pin locks were cheaper than ball locks, but that has changed. There’s been a real reversal in used keg pricing. Used pin locks have been tough to find in stock, especially at anything close to what I would call a good price. This is supply related. New pin lock kegs are not coming into the homebrewing market and we’ve finally hit an availability wall.

As of this posting Beverage Elements has these for just $34.95. That’s an outstanding deal! This the kind of price we saw 5+ years ago. Get them while you can!

5 Gallon Pin Lock Keg – Dual Handle – Reconditioned

Continue reading

Hands on Review: VineCo Wine Kits!

Updated: February 12.2025

Thank you to HBF Contributor Aaron Nord for this hands on review!  Aaron is an advanced award winning brewer, a long time reader and a serial tipster!

VineCo Wine Making Kits

First and foremost, it should be known that I am a homebrewer and what follows detail my nascent experience as a hobbyist winemaker. The way I entered the world of homebrewing was by means of a boxed kit (I think it was a Brewer’s Best kit) and a starter equipment kit. Therefore, it felt familiar to me to do the same for this foray into winemaking. Knowing that the box would hopefully contain nearly everything I needed to turn out a tasty beverage (aside from adding my own water and some wine bottles) provided comfort and allayed some concerns I had about being a first-time winemaker.

The VineCo Series wine making kits are available from MoreBeer and come in a myriad of varieties and categories including basic fruited wines (almost in the style of a wine cooler) to premium ones presumably designed for the more refined palate. What’s more, they also tailor them to country or region-specific wines like a Washington Riesling or an Australian Shiraz. My partner and I are fans of red wines and for that reason the California Cabernet Merlot and the Italian Amarone appealed to me. The Amarone style is offered in two different categories from VineCo, the Signature and the Estate. The Signature kit is a little pricier but comes with grape skins, oak cubes, and bottle labels. I chose the Estate kit to keep it simple for my first experience. The California Cabernet Merlot is only offered in the Estate line so that choice was easier.


Make Your Own Wine!

Continue reading

Hands on Review: Tubby “The Lifetime Glassware” Ultimate Beer Pint

Updated: March 27, 2025

It’s not often that I add to my collection of beer glasses. I’ve been a homebrewer and craft beer lover for a good number of years now and have many opportunities to pick up beer glassware. When I ran across these they looked cool and sported some unique features so I wanted to give them a try.

Hands on Review Tubby The Lifetime Glassware – The Ultimate Beer Pint Glass

Front of the box. It reads… Tubby Two hand-blow 16oz glasses

Back of the box. It reads… While on the journey to find the perfect beer glass, our eureka moment hit us – wider and shorter is better for beer. With a Tubby you can smell your beer like you’re standing next to an ocean of craft brew. You can confidently put down your beer wherever you want since it won’t tip over like those silly tall & skinny pint glasses. Our personal favorite part? The rolled rim for ultra-comfy drinking. We hope the Tubby becomes your favorite glass for every beverage. Let us know what you’re drinking @whatsinyourtubby. Cheers, Same and Craig Founders of Tubby


Check Current Price, Description and Availability:

All variations of these glasses have been out of stock for months. As of this update, a limited number of the 6 oz glasses are in stock. Hoping that this is a sign of things to come as these are some of my favorite glasses.

These are affiliate links. Note that multiple variations of these products may be available, as such a different version may appear at these links.

Continue reading

Hands on Review: Third Party Dolly for Brewzilla 65L

Thanks to HBF Reader Kevin for this write up!  Let’s be friends!  8 Ways to Connect with HBF

Hands on Review Netfish Trash Can Dolly

In the last year I was gifted the ability to upgrade to Brewzilla 65L 220v brewing system and I was excited to shift to a simpler brewing system. When I built out a corner of the basement for my brewery I installed a hood to vent moisture out. Recognizing the weight of the malt pipe if I brew a 10 gallon batch I installed a Unistrut with a pulley on a rail dolly to raise up the pipe/grains and move them over the sink so I can dump them after the last few drips fall in the sink.

With this plan I then needed to move the Brewzilla from under the hood to out under the Unistrut/pulley. Kegland dealers have a specific dolly for the Brewzilla but they are either $79.99 or $99.99 so I began searching for an alternative. (William’s BrewingMoreBeer)

When I found the Netfish Dolly I decided I would order it and see if it would work. I was pleasantly surprised to find how well built it is and how easily I can move the Brewzilla even up over mats I have on the floor. The dolly is adjustable and the feet for the Brewzilla are inside a lip that makes sure the Brewzilla doesn’t fall off.


From HBF: Using caution when moving kettles especially when full. We do not recommend moving hot liquid or equipment.


Check Current Price & Availability:

Nefish Trash Can Dolly Wheels, 15-19 Inch Adjustable Round Furniture Dolly with 4 Wheels, Heavy Duty Drum Dollies 440lbs Tire Dolly, Multi Functional Rolling Dolly Cart – affiliate link, note that multiple variations of this product may be available, as such a different version may appear at this link

Official Kegland Dolly


Related: Hands on Review BrewZilla Gen 4!


Thanks to HBF Reader Kevin for this write up!  Let’s be friends!  8 Ways to Connect with HBF

More potential brewing applications: Use to assist with moving compatible carboys, kegs and other heavier items around on brew day and beyond.

Important Notes: I don’t recommend moving hot equipment or hot liquid. This is Kevin’s experience. This dolly isn’t specifically made for BrewZilla. Make sure the components you use are compatible and rated for your intended application.  Contact manufacturer with questions about suitability or a specific application.  Always read and follow manufacturer directions.

Nefish Trash Can Dolly Wheels, 15-19 Inch Adjustable Round Furniture Dolly with 4 Wheels, Heavy Duty Drum Dollies 440lbs Tire Dolly, Multi Functional Rolling Dolly Cart – affiliate link, note that multiple variations of this product may be available, as such a different version may appear at this link

Related: Kegland BrewZilla Heavy Duty Dolly

65 & 100 Liter Brewzilla Heavy Duty Dolly

BrewZilla Review!

Hands on Review: BrewZilla Gen 4 All Grain Brewing System

Tip: Plant Caddies For Moving Kegs & Carboys – give your back a break

Kegland Gear Reviews!

More Homebrew Finds!

Recent Deals!

We are Homebrew Review HQ!  See Our 10 Most Recent Reviews

pinned

This post may contain affiliate links. We may make a commission when you use our links. This will never cost you extra. Thank you for supporting Homebrew Finds!

greatdeals

Price, promotions and availability can change quickly. Check the product page for current price, description and availability.

Make sure the components you use are compatible and rated for your intended application.  Contact manufacturer with questions about suitability or a specific application.  Always read and follow manufacturer directions. tag:lnksfxd review:brewzillacaddy tag:tpr

Hands on Review: VineCo Winemaking Equipment Kit from MoreBeer!

Thank you to HBF Contributor Aaron Nord for this hands on review!  Aaron is an advanced award winning brewer, a long time reader and a serial tipster!

Winemaking Equipment Starter Kit Review

There are many ways for someone to enter a hobby like beer and winemaking. One of the more common avenues is by way of an equipment starter kit. This is how I made my foray into the world of homebrewing in 2009 and in retrospect I am glad for the experience. Buying an off the shelf kit that had nearly everything I needed was a great place to start since I really didn’t know what I was getting into. It helped me avoid the analysis paralysis that would likely have ensued in trying to figure out what I needed, in what quantity, size or quality all on my own. Thankfully, there were experienced minds who put thought and effort into packaging a collection of gear for the nascent homebrewer to be able to focus on the task of making beer. Let the analysis paralysis come later when the brewer decides to advance in the hobby.

An opportunity arose recently for me to start down a new path with winemaking by way of Winemaking Equipment Starter Kit. Since I had fond memories of a similar kit helping me get started in a hobby that became a passion (and near obsession at times), I was excited for the chance.

This review will cover the contents of the Winemaking Equipment Kit for VineCo Concentrate Kits from MoreBeer which consists of the following items:

  • 7.9 gallon food grade bucket and lid with airlock hole
  • 6 gallon plastic carboy for aging
  • Airlock and stopper
  • 7/16″ Siphon assembly
  • Bottle brush
  • Sample taker/thief
  • Triple scale hydrometer
  • Bottle filler with removable spring
  • Bottle corker
  • 100 Corks – 1 3/4 in.
  • One Step Cleanser

Make Your Own Wine!

Continue reading