
Hands on Review: Anvil Bucket Fermentor Cooling System
This review is by Homebrew Finds Contributor Brad Probert. Brad is an engineer, expert homebrewer and experienced reviewer. Grab a link to Brad’s website at the end of this review.
Anvil Bucket Fermentor Cooling System
Blichmann created the Anvil line of equipment to provide good gear at an affordable price. Across the line-up, you can find great quality stuff that’s notably cheaper than other high-end brew gear. By making it more affordable, it allows more homebrewers to step up their equipment. I reviewed their 7.5 gallon stainless bucket fermentor a little over a year ago. It was a great product, but it wasn’t compatible with my existing fermentation temperature control systems. So I was excited to see they came out with a custom system. And as per their formula, it was upper tier brewing capability at an attainable price.
Compare Models, Prices and Availability, Review Continues Below:
- Anvil Bucket Fermentors at Adventures in Homebrewing
- Anvil Bucket Fermentors at MoreBeer
- Anvil Bucket Fermentors at Keg Connection
- Anvil Bucket Fermentors at Great Fermentations
- Anvil Bucket Fermentors at homebrewsupply.com
- Anvil Bucket Fermentors at Beer & Wine Hobby
- Anvil Bucket Fermentor 7.5 gallon affiliate link, note that multiple variations of this product may be available, as such a different version may appear at this link
- Search Amazon for “Anvil Bucket Fermentor” – offerings vary
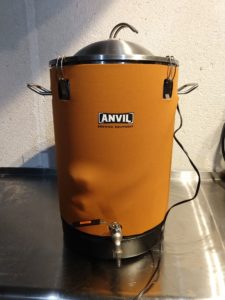
The system is targeted to those looking to control their temperatures in the 50-55F temperature zone where lager yeast provides its cleanest flavors. It comes with a neoprene insulating jacket to insulate the walls of the bucket, a cooling coil & thermowell mated to a special stopper, a submersible pump and cooling lines to circulate your cooling water, and a digital controller. The neoprene jacket is custom-made for the Anvil fermentor, with cut-outs for the handles, the lid clamps, and the spigot.
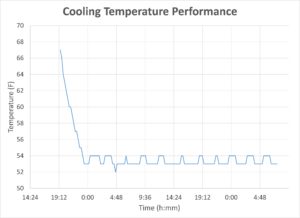 Plot of Cooling System Performance
The cooling coil is a length of small diameter polished stainless steel tubing. The tubing is narrow so the cooling loop can fit through the standard opening in the lid where the bung normally sits to fit the airlock. The cooling loop goes down to the bottom of the fermentor, loops back a little past halfway back up, before looping back down and making the trip out the lid. Cooling performance is all about surface area in contact with the wort/beer, and to try to compensate for the narrow diameter tubing to fit through the lid, they take a long trip up & down inside the fermentor.
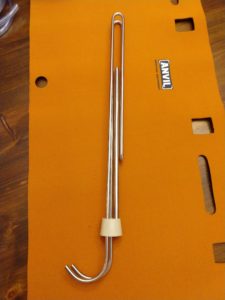 Coil, Thermowell, and Bung Assembled
The drilled out bung has a lot going on. It routes the cooling line in & out, locates the thermowell to nest down inside the cooling loop, and then also provides a hole for an airlock or overflow tube. It gets a bit crowded, but it works, keeping everything in the proper position.
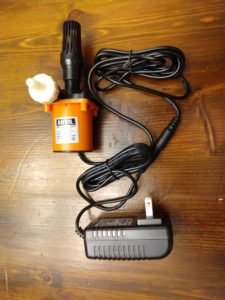 Submersible Pump
The submersible pump in these systems provides a pretty thankless job of operating out of sight and out of mind. You have to provide your own cooling liquid & vessel. That could be a cooler filled with ice water (use re-purposed empty 2L pop bottles that you can cycle in & out of the freezer once they melt), or might be a bucket of water in a refrigerator, or perhaps a glycol system. With the pump plugged in to the controller, if the temperature gets too warm, it provides power to the pump (plugged in to the ‘Cooling’ outlet on the controller) and recirculates your cooling liquid through the stainless tubing until the temperature gets down to your set point again.
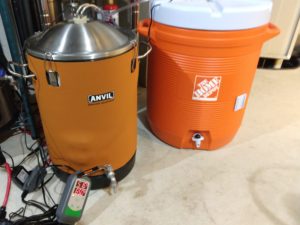 System hooked up to cooling water reservoir
The controller provided is a standard Inkbird ITC-308 model [Hands On Review]. A standard in the homebrewing world, it provides simple temperature set-point adjustment, and a display that shows you the current measured temperature as well as your set point. It comes hardwired with a temperature probe on a length of wire that you simply slide down inside the thermowell in the stopper. This gets you measuring the temperature inside the heart of your fermenting beer, not the ambient temperature outside the fermentor. During high fermentation activity this is an important distinction. The controller has a ‘Cooling’ outlet that you plug the cooling water pump into, and a ‘Heating’ outlet you use to plug in a heating element. Although this Anvil kit doesn’t come with a heating element, the controller is ready for you whenever you want to get one.
Hands on Review
For my hands-on trial, I hooked up a 20W heating wrap that I had. With its flat profile, it fit easily underneath the neoprene jacket, to keep all the heat trapped inside by the fermentor. The zipper on the jacket was something I hadn’t seen before, but loved. It made putting the jacket on less like trying to squeeze into your old jeans, and more like the revelation the first time you discovered flex denim- “Wow, why don’t they all come this way?” The zipper also made it easy to remove the jacket when it came time to clean the fermentor. Although most of the time that isn’t necessary, occasionally some slop can get on the outside, and the zippered jacket makes it easy to clean both fermentor and jacket.
The polished finish on the cooling coil made it look good out of the box, but it also helped it clean up easily, as fermentation debris didn’t want to stick to it very hard. I liked how the length of the coil and the thermowell meant the set-up would work both with a full 5-gallon batch, as well as a smaller ~3.5 gallon batch (limited by tip of the thermowell). And although I found the skinny tubing an innovative way to keep the price of the kit down by making it compatible with the base lid, I was concerned about its ability to cool. So I did some temperature cooling experiments on a batch of beer.
In my trial, the narrow cooling coils were able to drop the temperature on my 5.5 gallons of fermenting beer at a rate of about 4 degrees F an hour. This compares to the SS Brewtech Brew Bucket FTSS, which was able to drop temperature about 8 degrees F per hour. While that’s a big difference, the BrewJacket immersion rod system cools at about 1 degree per hour. So although this Anvil system doesn’t take first prize in the cooling race, it certainly performs well enough to be viable for lager fermentations.
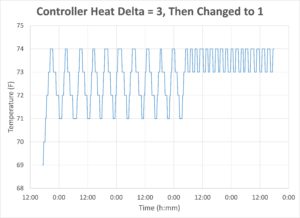 Default 3 degree offset vs 1 degree
In my brewing trial, I also found that the default settings of the Inkbird controller would let the temperature drop 3 degrees below the set point before kicking on the heater, or 3 degrees above before kicking on the cooling pump. I wasn’t satisfied with that level of variation, so I changed it to 1 degree, and the system worked great. In my opinion, if I’m controlling and monitoring temperatures, 3 degrees is just way too much of a difference, so I was glad to see the system still performed well while holding it within 1 degree.
Conclusions
Overall, I felt this system outperformed its price point. Although the Anvil brand has been spot on with delivering great quality at a value price, I was still surprised at how well this performed. To make it fully usable you have to have a cooler or something for cold water supply, and a heat wrap addition makes this versatile enough to handle robust diacetyl rests and ale fermentation. But there are lots of economical options out there for heat wraps so you can add this without too much trouble.
Compare Models, Prices and Availability, Review Continues Below:
- Anvil Bucket Fermentors at Adventures in Homebrewing
- Anvil Bucket Fermentors at MoreBeer
- Anvil Bucket Fermentors at Keg Connection
- Anvil Bucket Fermentors at Great Fermentations
- Anvil Bucket Fermentors at homebrewsupply.com
- Anvil Bucket Fermentors at Beer & Wine Hobby
- Anvil Bucket Fermentor 7.5 gallon affiliate link, note that multiple variations of this product may be available, as such a different version may appear at this link
- Search Amazon for “Anvil Bucket Fermentor” – offerings vary
Related Reviews:
- Hands on Review: Anvil Bucket Fermentor
- Hands On Review: Inkbird ITC-308 Dual Stage Temperature Controller
- Hands On Review: Anvil Brewing Equipment Brew Kettle
- Our 10 Most Recent Reviews | Complete Library of Reviews
More Photos
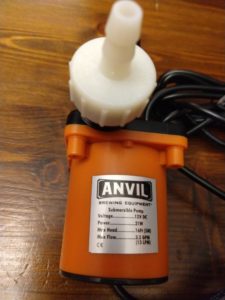 Closeup of Submersible Pump – Shows Specs
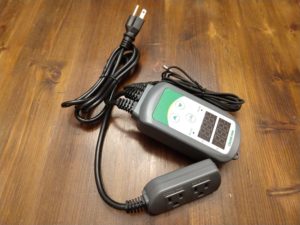 Included Inkbird Controller – Hands On Review
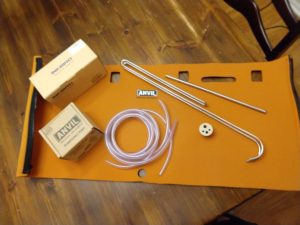 Contents of Kit
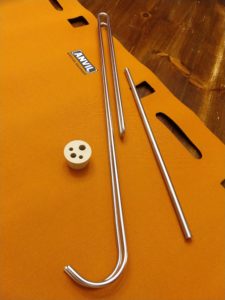 Coil, Thermowell, and Bung Disassembled
More Anvil Brewing Equipment Reviews+Related:
Special Thanks to Blichmann Engineering for providing the unit used for evaluation in this review.
By Brad Probert. Check out Brad’s website – beersnobby.com
pinnedThis post may contain affiliate links. We may make a commission when you use our links. This will never cost you extra. Thank you for supporting Homebrew Finds!
greatdealsInkbird ITC-308 Digital Temperature Controller| Review
review:anvilbucketcooling tag:tpr

Nice review on the Anvil Bucket Fermentor Cooling System. I see you used a cooler with ice/water. Do you have any experience on how often you needed to refresh the ice?
Wonder if you could use glycol in a kegerator to recirculate through the tubing instead.