
Hands on Review: Blichmann Engineering RIMS Rocket
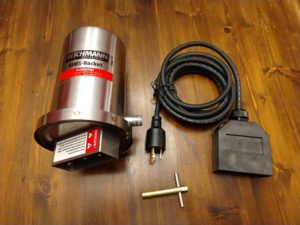
This review is by Homebrew Finds Contributor Brad Probert. Brad is an engineer, expert homebrewer and experienced reviewer. Grab a link to Brad’s website at the end of this review.
Blichmann RIMS Rocket
I heard the term ‘RIMS’ long before I really knew what it was. The decoded acronym ‘Recirculating Infusion Mash System’ didn’t help much, either. In hindsight, the acronym has all the info in it to describe what it is. It’s a system to control mash temperature by adding heat to your recirculating wort. You use a pump to draw wort out of your mash tun, push it past a heating element, and then return that heated wort back to your main mash tun. Connected to a controller, a temperature sensor monitors the temperature of your recirculating wort and turns your heat source on or off based on the measured temperature, as compared to your target temperature. And since this heating element is outside of your mash tun, a RIMS can be used whether your mash tun is a plastic cooler or a steel pot.
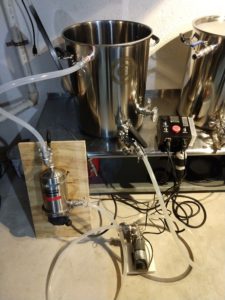 Connected to a RIMS Controller and Mash Tun
Blichmann offers two levels of RIMS. The first is a 120V system that has a 2000-Watt heating element, and the other is a 240V system with a 3500-Watt heating element. The 120V system is designed for up to 10 gallon batches, and the 240V system is up to 20 gallons. To get an idea of the heating potential, Blichmann provides a formula on their website to calculate the heating potential.
°F/minute = 0.0068*(Wattage/gallons of wort).
So with 6 gallons of wort in your mash tun, the 2000W/120V system can heat at about 2.3 degrees/minute. The 3500W/240V system on the same 6 gallons can heat it 4 degrees/minute.
The heating element sits inside a stainless steel canister that holds about 0.75 gallons of wort. With the heating element’s large corkscrew design, it has a lot of surface area to transfer heat to your wort without scorching. There are 1/2″ NPT fittings on the inlet and outlet of the canister. On the outlet you need a Y-fitting so you can install a temperature sensor to monitor the temperature of the wort as it exits the RIMS Rocket.
The heating element connects through Blichmann’s custom heating element connection. The large, robust connection ensures a solid electrical connection and grounding to the housing for safety. You disconnect your cable to make cleaning and storage easier, so you don’t have to drag the cord around like a tail. And although not waterproof to dunk in a bucket of water, it has a good-sized splash shield to protect the connection from the splashes that come with the wet sport of brewing.
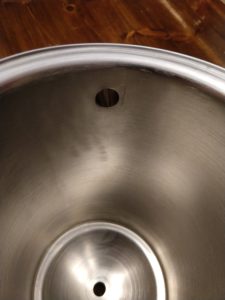 Smooth Machined Inside of Housing
The inside of the housing is machined and designed to be free of crevices or cracks. This is important since mash recirculation is practically guaranteed to have some level of grain particles passing through that you don’t want to get stuck. The heating element built into the base seals to the main cone of the housing with a large O-ring. And it is held together and tightened with a circular band clamp with a threaded nut/bolt combination. This clamp makes for fairly easy disassembly to clean inside as often as you’d like.
Compare Models, Prices and Availability, Review Continues Below:
- Blichmann Engineering RIMS Rocket at MoreBeer
- Blichmann Engineering RIMS Rocket at Adventures in Homebrewing
- Blichmann Engineering RIMS Rocket at Great Fermentations
- Blichmann Engineering RIMS Rocket at Beer & Wine Hobby
- Blichmann Engineering RIMS Rocket at Keg Connection
- Blichmann Engineering RIMS Rocket at homebrewsupply.com
- Search Amazon “Blichmann RIMS Rocket” – offerings vary
Hands on Review
I trialed the 120V RIMS Rocket on my 2-vessel electric set-up. In my set-up, one vessel is a Mash Tun, and the other has an electric heating element in it used for boiling. Without the RIMS Rocket, I would have to use the Boil Kettle to heat mash water and to try to hold mash temperature while circulating wort through both kettles. This worked, but not great. With the RIMS Rocket connected to my Mash Tun, the heating element was close to the wort so I was able to maintain temperature much better, and step mashes were able to raise the temperature much faster. It transformed my “functional system” into a “well performing system”.
The key challenge is figuring out how to mount it. With its rocket-like rounded housing, it didn’t lend itself to obvious ways to mount it. According to the Blichmann instructions, it needed to be mounted vertically, and at a level below the bottom of the mash tun. I settled on a 3/4″ thick piece of marine plywood (for water resistance) to which I mounted a couple L-brackets to support the flat base of the Rocket. I then got a large 6” worm clamp, and after drilling a couple holes in the plywood, I fed the clamp through it to make a kind of halo to hold the top of the rocket back against the plywood. With that assembly, I could just set the board on the floor and lean the whole thing against the table. It definitely doesn’t look very ‘bling’ but it was easy and cheap to make.
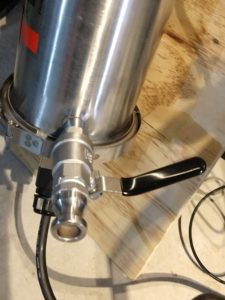 Ball Valve Installed
I screwed on a ‘Y’ to the output side (top) of the RIMS Rocket for the temperature probe feeding my controller. To the inlet side, I attached a ball valve. The 0.75 gallons of wort inside the Rocket was too big to simply discard. So after the mash was finished, I would disconnect the hose and drain the wort into a pitcher to add to my boil kettle. The ball valve let that be a controlled draining process.
The last thing I did for set-up was modify how the cable came out of the Blichmann special connector. As shipped, the cable comes out directly from the middle of the plug. But it is also designed to come out at an angle. Seeing how you have to mount the Rocket at a height below the bottom of your kettle, the Rocket sat pretty close to the floor for me. So having the cable come out of the connector at an angle was beneficial. The connector disassembled with a couple of screws, and was fairly obvious inside for how to adjust it, but if you’re not comfortable with electrical- don’t do it.
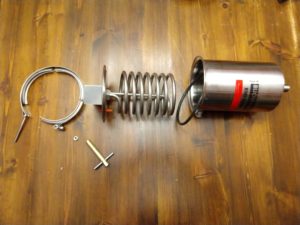 Disassembled RIMS Rocket
One tip I had read about was lubricating the threads of the tightening screw on the band clamp to avoid thread galling. Galling is when the threads of the nut and the bolt weld themselves together due to pressure & friction. To avoid this, the threads should be greased to reduce friction (I used food-safe keg lube), and make sure you use the included little hand tool T-wrench to tighten instead of a power tool. The hand tool forces your tightening to happen slowly, and hence not cause a build-up of heat from the friction of spinning the nut fast. With the smooth interior walls of the Rocket, I found it cleaned quite easily without disassembly of the band clamp. But since I lubed the threads and used the hand wrench, I had no problems with thread galling.
While heating 6 gallons of strike water and 13 lbs. of grain with the 2000W element, I was able to heat at a rate of 1.7 – 3.2°F/min, with most of time being 2.1 – 2.2°F/min. Heating times showed the same while doing multi-rest step mash profiles. So this was in line with the equation Blichmann provided.
Conclusions
Overall, I found the RIMS Rocket to be extremely well made, cleaned easily, and was leak-free. I used a Brew-Control mash controller with it, and the ability to hold temperature and heat wort met my needs well.
Compare Models, Prices and Availability:
- Blichmann Engineering RIMS Rocket at MoreBeer
- Blichmann Engineering RIMS Rocket at Adventures in Homebrewing
- Blichmann Engineering RIMS Rocket at Great Fermentations
- Blichmann Engineering RIMS Rocket at Beer & Wine Hobby
- Blichmann Engineering RIMS Rocket at Keg Connection
- Blichmann Engineering RIMS Rocket at homebrewsupply.com
- Search Amazon “Blichmann RIMS Rocket” – offerings vary
Related Reviews and Products
- Hands on Review: Brew-Control Electric Mash Tun/RIMS (Recirculating Infusion Mash System) Tube Controller
- Hands on Review: Blichmann Engineering AutoSparge
- Hands on Review: Blichmann Engineering Riptide Homebrew Pump
- Hands On Review: Blichmann G2 BoilerMaker Kettle
- Hands on Review: Spike Brewing Equipment Spike+ Kettle
- RIMS Tubes & Electric Brewing at Brewers Hardware
More Photos
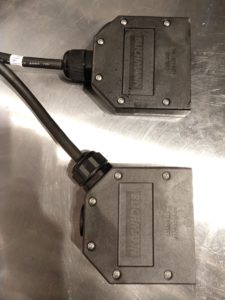 Two Different Cable Configurations
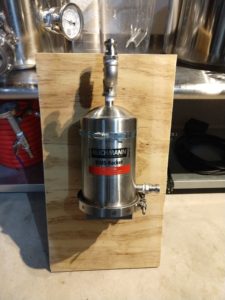 RIMS Rocket Mounted on Board
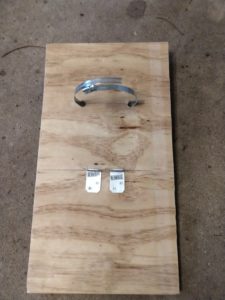 Custom Made Mounting Platform
More Blichmann Engineering Reviews!
More Homebrew Finds!
- Last 50 Finds!
- Top Deals – a curated list of the best deals
- Homebrew Reviews – one of the largest libraries of homebrew reviews in existence!
- Our Top Posts – tips, how-tos, resources posts and more
This post may contain affiliate links. We may make a commission when you use our links. This will never cost you extra. Thank you for supporting Homebrew Finds!
greatdealsSpecial Thanks to Blichmann Engineering for providing the unit used for evaluation in this review.
By Brad Probert. Check out Brad’s website – beersnobby.com
review:blichrr tag:tpr


The Y-fitting I used came from Brew-Control together with the RIMS Controller I got from them. But you can also use a commonly found T fitting. One end screws onto the top of the RIMS Rocket and the opposite end you screw in your temperature probe for your controller. The T coming out the middle between the two is where you’d screw in whatever fitting you want to connect your recirc hose (barbed fitting, camlock fitting).
I would appreciate some detail on the configuration of the “y” fitting you used to mount the temperature probe of the controller. Thanks.