
Hands on Review: Brew Hardware Cold Crash Guardian
Thank you to HBF Contributor Aaron Nord for this hands on review! Aaron is an advanced award winning brewer, a long time reader and a serial tipster!
What is Cold Crashing?
The concept of cold crashing first came across my radar when I was researching the benefits of conical fermenters. The idea of rapidly bringing a fermentation vessel down to near freezing temperatures after fermentation is complete is known in the brewing world as cold crashing. The closer to freezing without freezing the beer the better.
Benefits of Cold Crashing
The reasons that attracted me to the practice are mainly two-fold: to enable nearly full harvest of the yeast and to promote a clearer finished beer. The act of bringing the temperature down promotes the dropping of particulates in the beer, be it yeast, trub, or hop debris, which, in a conical fermenter, settles down into the bottom cone. This can then be dropped out into a sanitized vessel to enable rinsing and reusing of the yeast. Then when the beer is packaged it is done so without a lot of the yeast and other particulate material that may not be desirable in the finished product. This allows for a much brighter beer in the end.
Caveats of Cold Crashing – Oxygen intake & airlock fluids
When cold crashing, the drop in temperature will create a pressure difference that can draw in whatever may be in the airlock (e.g. StarSan solution) or what is on the other end of a blow-off tube. A little bit of StarSan is not likely to harm the finished beer, but if there is another substance other than that (e.g. vodka) or the entire solution is pulled in then the potential for undesirable effects rises. Most brewers don’t want vodka in their beer and no finished beer benefits from having oxygen touching it. The latter is what will happen if one cold crashes to the point that the StarSan is exhausted: after the liquid is gone the oxygen will find its way in. Oxygen is the enemy, especially for hoppy beers and those on the paler end of the spectrum, as it will lead to staling the beer much more quickly.
Potential Solutions
There are several products and techniques available to the homebrewer to enable one to cold crash a beer once it has fermented. What I started with was simply lowering the temperature of my fermenter slowly. I would turn down the thermostat by two degrees in the morning and two in the evening. This way I could check on the airlock regularly and ensure it had plenty of StarSan solution. Performing the drop slowly also prevented such a dramatic drop in pressure that a suck-back wasn’t as likely. The downside was that it took a long time to drop a temperature from 68 degrees F to 34 degrees F. For this reason, I started to investigate alternatives.
As an avid listener of the Brulosophy podcast and I heard the host, Marshall, detail his homemade contraption made from PVC tubing and a mylar balloon attached to the opening of a fermenter. The apparatus would be connected a day or two into fermentation so as not to capture blowoff from vigorous fermentation and would fill up with CO2 in the ensuing days. This CO2, when cold crashing, would then be a reservoir to be drawn into the vessel as the pressure in it dropped. I created my own apparatus according to Marshall’s instructions and used it a couple of times with mixed success. It definitely prevented oxygen form entered my fermenter when rapidly cold crashing over a 24-48 hour time frame, much quicker than the week it was taking me before. The downside was that in one particularly active fermentation, some blow-off from the fermenter ended up in the mylar balloon which resulted in a potential contamination risk and the end of that mylar bag. Another downside was that once the balloon is filled to capacity there is no where else for the CO2 to go so attaching it at the outset needs to be done at precisely the right time.
Another device that I had seen advertised to capture CO2 during fermentation and promote cold crashing technique was the CO2 harvest kit from NorCal Brewing Solutions. This solution involves two Mason jars with one being connected by tubing to the fermenter and the other being connected to that jar with an airlock connected to another port in the jar’s lid. Each jar would contain StarSan solution. During fermentation the first jar would fill with CO2 and push excess CO2 out through the tubing to the second jar and then eventually out that jar’s airlock. It was an attractive setup; I was especially keen on the glass Mason jars as it would allow for an easier clean up compared to a mylar bag. However, the purchase price was unexpectedly high and didn’t even come with everything needed (jars were not supplied).
duotightreview
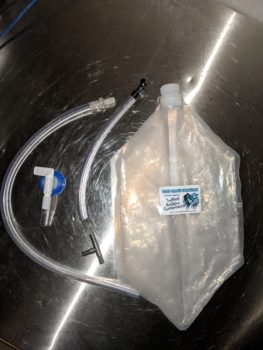
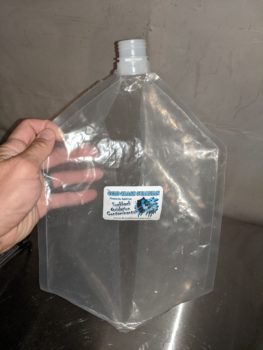
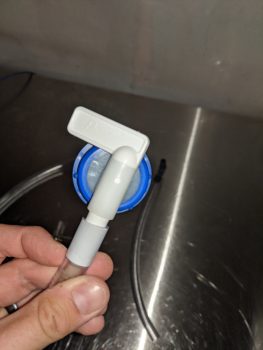
Keeping my eyes peeled for other solutions, I was reading my daily Homebrewfinds email one day and found an alert that a high demand/low supply product called the Cold Crash Guardian was back in stock at Brewhardware at a limited quantity. Upon reading the description it looked to solve the issues I was hoping to overcome with my cold crashing at a fraction of a price of the NorCal Brewing Solutions kit – search Jaybird Yeast Harvester on Amazon. Furthermore, this was version 3 of the Cold Crash Guardian having been improved after feedback from the field of homebrewers using versions 1 and 2. It came with the following pieces: either a 1 or 2.5 gallon (the former to support smaller batches and the latter for 3 plus gallon fermenters) high quality plastic bladder with a valve hose connection with an on/off swivel knob, a nylon hose barb to connect tubing to a fermenter’s grommet, a barbed one-way check valve, 3/8” PVC tubing, and a 3/8” barbed stainless steel tee valve. I decided to pull the trigger and order the kit which was an easy decision given the reasonable price ($19.99).
Enter the Cold Crash Guardian
The concept behind the Cold Crash Guardian was like both the mylar balloon solution and the CO2 harvest kit from NorCal Brewing Solutions. The bladder would fill with CO2 from fermentation and could be drawn back in during cold crashing. The added benefit the Cold Crash Guardian offered that the mylar balloon solution did not was that the tee valve sent CO2 both to the bladder and to the one-way check valve. This way, once the bladder was a capacity, the excess CO2 would escape through the one-way valve. Compared to the NorCal Brewing Solutions kit it is also slightly more attractive as with that kit there is still the slightest chance that suck-back could be strong enough to pull sanitizing solution out of the airlock from the second Mason jar.
Hands on Review Cold Crash Guardian
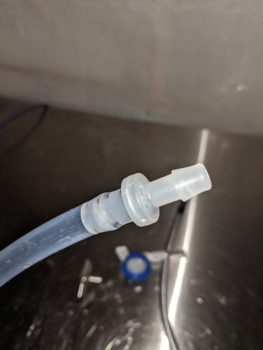
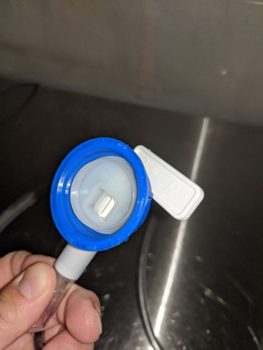
Upon receiving the Cold Crash Guardian, I was immediately struck by the quality of materials. Sure, the 3/8” PVC tubing was pretty run of the mill, but the thickness of the bladder’s plastic material was immediately impressive and stood out. The joints in that bladder were solid and I could see how it will stand the test of time, especially compared to the mylar balloon I had been using. The connection to the valve was secure and appeared to be airtight. The one-way check valve was also standard, but of quality material and the stainless-steel tee was par for the course of stainless elements I’ve used in homebrewing before but nonetheless of high quality.
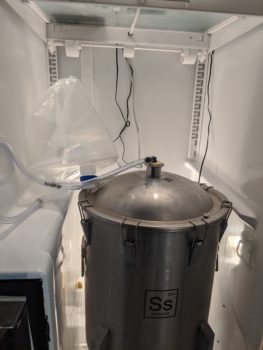
Assembly was straightforward. I cut the lengths of 3/8” tubing to fit my setup and connected the pieces together: a length of tubing to the nylon hose barb with one end connecting to my fermenter’s grommet and the other to the tee valve; one piece of tubing exiting the tee valve going to the valve for the bladder; the last piece of tubing connecting to the other end of the tee valve with the one-way check valve on the end of that tubing. I screwed the bladder onto its valve and the only thing left to do was drop the one-way valve into a container with StarSan.
I have used the Cold Crash Guardian while fermenting half a dozen beers now and am pleased with nearly all aspects of it. It does exactly what it sets out to do: I can cold crash rapidly and have no fear that anything but CO2 will be drawn back into the fermenter. Excess CO2 escapes through the check valve once the bladder is filled up and I don’t have to babysit it like I did the mylar balloon rig. An added benefit is that I use less CO2 when I transfer my beer to the kegs. I have a setup where I connect my CO2 tank to the top of my fermenter to help push beer into kegs. When I start transferring, I can use what CO2 is left in the Cold Crash Guardian before tapping my CO2 tank which saves me money on CO2, and I don’t have to hassle with refilling it as often.
There are a couple of downsides I’ve found to the product. One is that it isn’t easy to dry after cleaning. Cleaning is easy; the bladder opening is large enough to fit the standard nylon bottle brushes that a homebrewer usually has on hand to clean bottles and Erlenmeyer flasks and the rest of the parts can be cleaned with the narrower gauge of nylon brushes. However, as with all the other tubing we homebrewers are used to cleaning, there is no great way to get them fully dry. This seems nitpicky, but it is especially annoying with the piece of tubing connected to the one-way check valve. I’ve tried swinging it around my head like a helicopter rotor, blowing air through it with an air compressor, and letting it drip dry and no method really gets it completely dry. The other downside is that the supply at Brewhardware seems to be volatile. It really must be a high demand/low supply product as I’ve noticed that when they are available, they aren’t that way for long.
Conclusions
I am glad that I was able to get my hands on a Cold Crash Guardian as it has made my cold crashing process worry free from day one. It is made of quality materials, doesn’t break the bank to purchase, and is easy to use. Anyone who regularly cold crashes would certainly benefit from shelling out an Andrew Jackson (plus shipping) to have some piece of mind that their beer will drop to temperature without dropping anything else into the chamber but CO2.
More Homebrew Finds!
- Last 50 Finds!
- Top Deals – a curated list of the best deals
- Homebrew Reviews – one of the largest libraries of homebrew reviews in existence!
- Our Top Posts – tips, how-tos, resources posts and more
- Let’s be Friends!
pinned
This post may contain affiliate links. We may make a commission when you use our links. This will never cost you extra. Thank you for supporting Homebrew Finds!
greatdealsMore Fermentation Related!
More Fermentation Related Reviews!
review:ccguardian tag:tpr




If needed, are you able to add CO2 from a tank into the bladder?