
Hands on Review: Milwaukee MW600 Dissolved Oxygen Meter
This review is by Homebrew Finds Contributor Brad Probert. Brad is an engineer, expert homebrewer and experienced reviewer. Grab a link to Brad’s website at the end of this review.
Brewing is a mix of art and science. When you get it just right, the results are incredibly rewarding. For us nerds out there, sometimes the science can be its own reward, even if it doesn’t lead to better beer. The homebrewing world has LoDo brewers that are interested in reducing oxygen pick up at every stage of the brewing process. And hoppy beer lovers devote a lot of effort trying to reduce oxygen pickup to stave off the evils of hop oxidation. So this is a point where the science can help you make the better beer you want. A Dissolved Oxygen (DO) meter is a tool you can use to experiment and learn more.
Milwaukee Instruments makes a wide variety of digital measuring instruments to measure all manner of things in liquids. Those of relevance to the brewing world include digital refractometers, pH meters, and dissolved oxygen meters. Their MW600 Dissolved Oxygen Meter is the subject of this review. This meter functions using the polarographic method. It passes a small current through the liquid it is submerged in, and the amount of Oxygen present affects the sensor reading as the current flows through it.
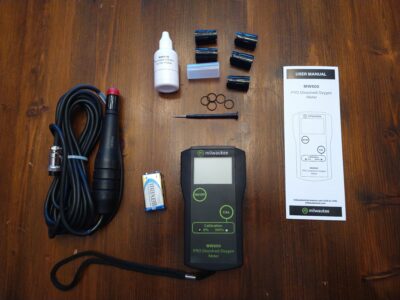 Contents of Kit
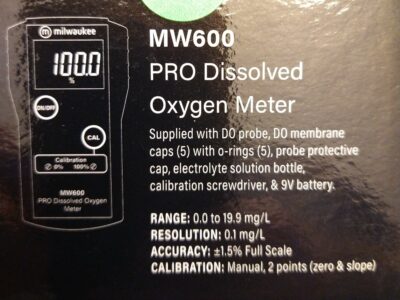 Description of Box Contents
Check Current Price, Availability & Specifications, Review Continues Below:
- Milwaukee MW600 LED Economy Portable Dissolved Oxygen Meter with 2 Point Manual Calibration, 0.0 – 19.0 mg/L, 0.1 mg/L Resolution, +/-1.5 percent Accuracy, 100 Percent Saturation Range affiliate link, note that multiple variations of this product may be available, as such a different version may appear at this link, affiliate link, note that multiple variations of this product may be available, as such a different version may appear at this link
- Milwaukee Instruments MW600 Standard Portable Dissolved Oxygen Meter affiliate link, note that multiple variations of this product may be available, as such a different version may appear at this link, affiliate link, note that multiple variations of this product may be available, as such a different version may appear at this link
Related: Hands on Review: Milwaukee MA871 Digital Refractometer
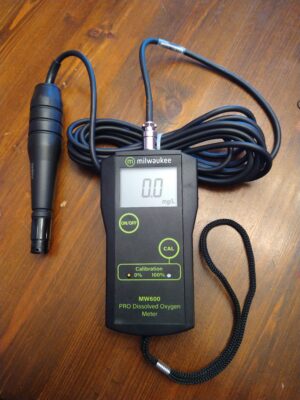
The meter consists of the base unit, which has the digital display window, houses the 9V battery, and has the connection to the measuring probe. The base also contains small set screws that are adjusted in order to calibrate the meter at 0 (open air measurement) and the slope (utilizing provided MA9071 electrolyte solution). The probe is heavy, encased in heavy-duty reinforced plastic and is about the size of a thick marker. It has a 10-foot cable on it so you have lots of flexibility between where you place the base and where you are measuring your sample. The polarographic sensor is covered by a protective cap, with a PTFE membrane to allow your measuring solution to pass through and be read by the sensor.
 Probe Connected to Base Unit
The MW600 can read dissolved oxygen levels from 0 – 19.9 mg/L (mg/L = ppm). The digital display reads to the nearest 0.1 mg/L, and the sensor accuracy is +/- 0.3 mg/L. The probe has a temperature sensor on it and does Automatic Temperature Correction within the usable range of 0 – 30 C (32 – 86 F). The battery life of an average 9V battery is 70 hours of use, and the digital display will indicate when the battery is low and needs to be replaced. An important aspect of the measuring process is buried within the small manual, and that is that due to the nature of the sensor, the liquid you’re measuring needs to be in movement past the probe. So you need to be sure to stir/swirl your probe in the beer sample while measuring.
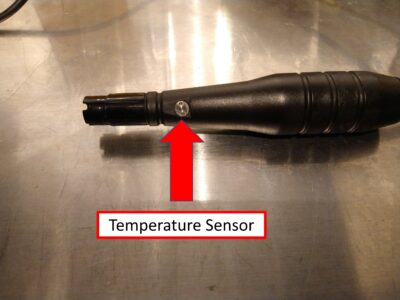 Location of Temperature Sensor on Probe
Hands on Review
The quality of the main body and probe is very high, with good quality materials and very nice fit & finish. It’s obvious that it is very well put together. The calibration process was fairly straightforward, other than some user error of turning the wrong screw at one point, and then having to go back through the process again.
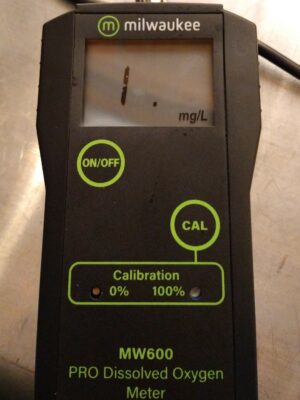 Meter Reading Maxed Out
Before I get into my various experiments, I will share some general observations and tips. First off is that before you take your first measurement, the sensor must go through a brief polarization cycle. This only takes a few seconds, and you know it’s complete when the display goes to max value “1 .” When taking measurements, there needs to be some movement of the sample past the sensor, so a slight swirling motion of the probe is needed. According to Milwaukee technical support team, it does not need to be stirred continually, just a couple stirs.
The last key process steps relate to temperature. First, make sure the temperature sensor of the probe is submerged in your sample (the little silver “button” on the side of the probe about 1-2” away from the tip). There is Automatic Temperature Correction, but obviously you need to make sure the sensor is in your measuring liquid. Don’t get confused by the spreadsheet you see on the website, as it is for the older version of the MW600 (main unit has a white body), and the ones they sell now (black body) have this obvious temperature sensor on the side and you don’t need to use the spreadsheet. But if you do play around with the spreadsheet, you can see how significant the temperature effect is on the measurement values, so it’s important to have a stable temperature reading. And of course, make sure you don’t exceed the 86F maximum temperature (cool your wort samples).
Test: Mash Recirculation Dissolved Oxygen
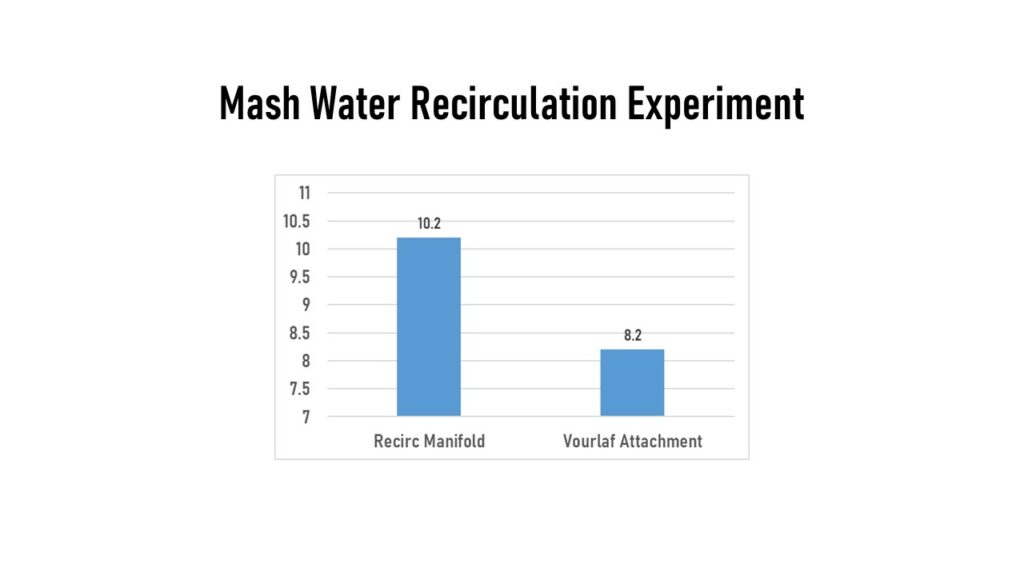
My other trial on mash water was looking at my recirculation hardware. I did this trial with just water (no grain) for ease of data collection. I mashed using a RIMS set-up, so continually pumped/recirculated water in the mash tun. I used two different mash tun fittings from SS Brewtech. One was a manifold with 4 spokes that go out in a wheel shape with multiple holes in each spoke. This manifold would normally sit on top of the grain bed, but in my water-only mash it sat submerged under the water level. The other attachment I used was a short tube that spills out wort onto a flat plate to make a splash/spray pattern, which they call their vourlaf attachment. With this attachment in place, the recirculated wort sprayed out in a dispersed pattern and fell to the top of the mash water, from a height of about 6-8”. This comparison had surprising results with the manifold stabilizing DO at 10.2 ppm, and the vourlaf fitting dropping the DO to 8.2 ppm. My only thought here was that maybe the impact of the water on the dispersion plate somehow broke free oxygen out of solution, much like happens in a boil.
Test: Boil Kettle Dissolved Oxygen
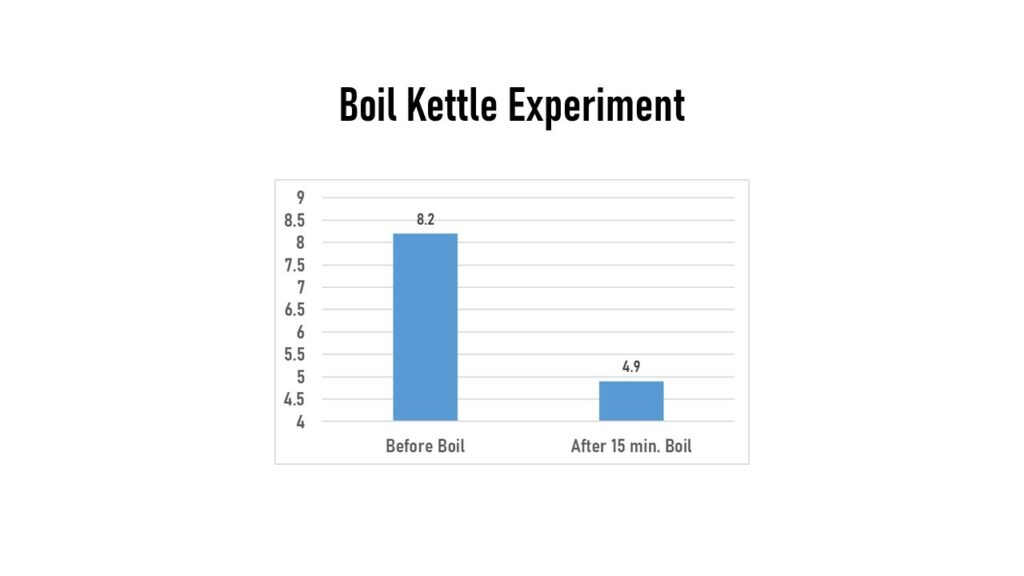
I transferred the water from the mash tun that was at 8.2 ppm into my boil kettle. I measured the water there after it had heated up, but just prior to boiling and it measured 5.2 ppm. After 15 minutes of rolling boil, it was nearly the same (within the 0.3 ppm accuracy of the meter) with 4.9 ppm. Some feedback I got from Imperial Yeast was that these numbers seemed high, as they expected post-boil the water should be really very near 0 ppm. I checked the DO on an IPA batch just to see if my “water only” boil experiment was maybe affecting my results. Unfortunately on that one, I didn’t get the pre-boil numbers, but post-boil it had DO level of 3.0 ppm. So either something was off on my calibration process, my measuring method, or maybe “0 oxygen” is really more like “near 0 oxygen”.
Test: Wort Chilling Dissolved Oxygen
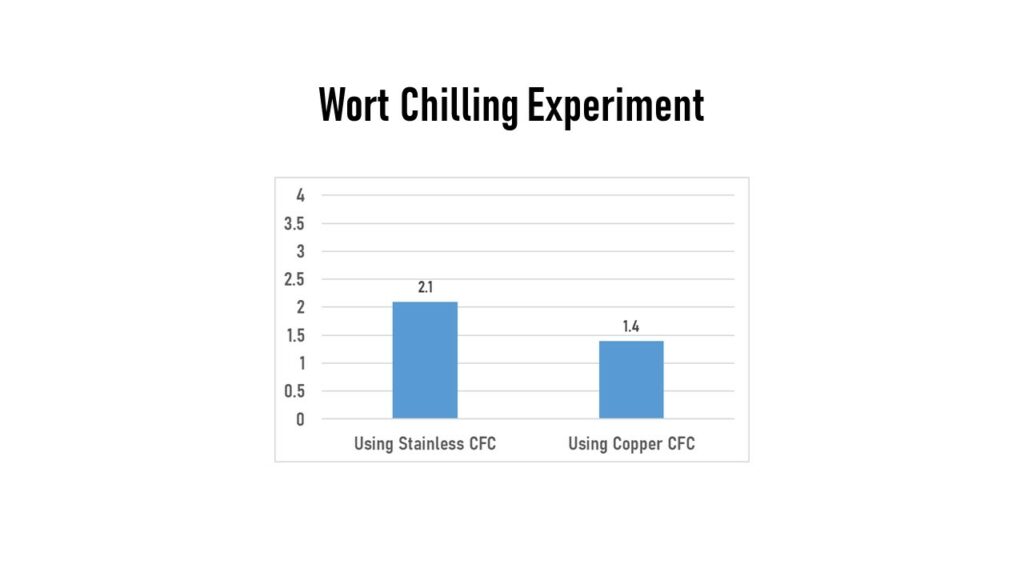
Within the LoDo literature, there are suggestions to eliminate contact with copper, as it can lead to higher levels of oxygen in your wort. So I continued my water-only tests by chilling the water post-boil via two methods. First was running it through a stainless steel counterflow chiller for 10-12 minutes to get to 65F, and the water sample measured 2.1 ppm. Another trial used a counterflow chiller that was plumbed with copper tubing inside, again for 10-12 minutes until reaching 65F. That sample read 1.4 ppm. So no significant difference between these two chillers, and the copper CFC was even slightly lower.
Test: Oxygen and Aeration Dissolved Oxygen
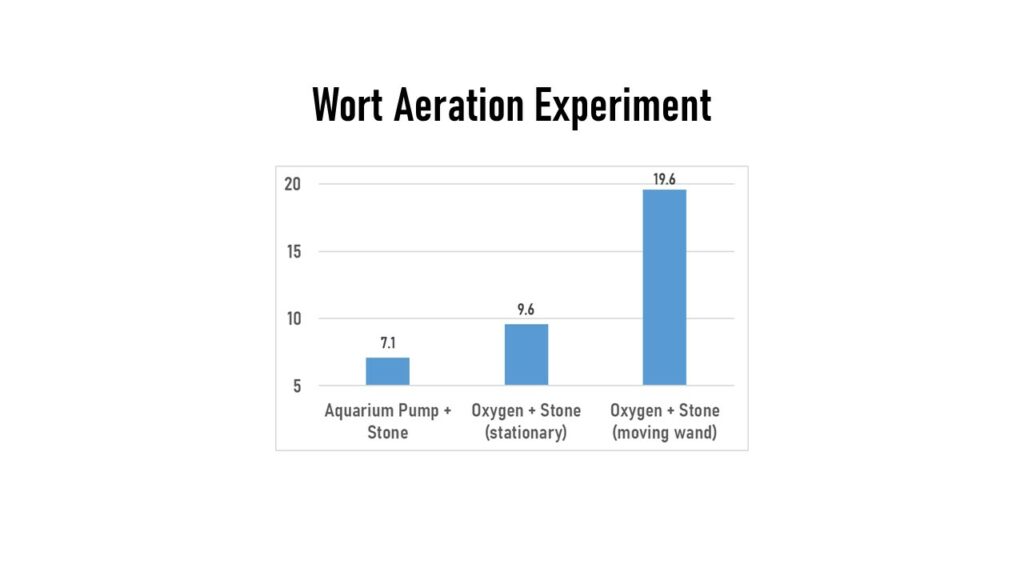
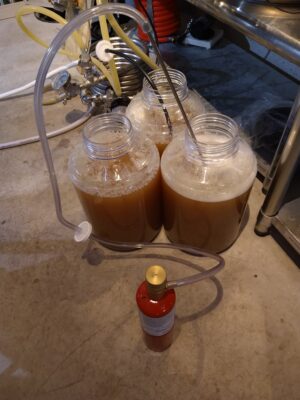
I wanted to capture some fermentation aspects, so I switched from my water-only experiments and brewed a Pale Ale. I made a large batch and split it into 3 different fermentors to assess different aspects. First up, I looked at methods of aerating the wort for the yeast fermentation process. I had been told by Imperial Yeast that I needed to move around my oxygen stone wand in my wort to get the higher levels of oxygen they recommended for their A38 Juice yeast (20 – 25 ppm). I thought this sounded silly since I could see bubbles rolling the top of the wort, so I decided I’d test it. In the first fermentor I used my aquarium pump & stone, with the oxygen stone mainly stationary through 18 minutes of running (other than relocating it 3 times during the 18 minutes). Measured DO level in this sample was 7.1 ppm. Next, I used bottled oxygen & stone, and let the wand just sit in one position for 3 minutes. This measured 9.6 ppm. Last, I used the bottled oxygen & stone, but continually moved the wand around in the wort in all directions for 3 minutes. This one measured 19.6 ppm. So big thanks to Jess Caudill at Imperial Yeast for talking me through this and helping educate me!
 Related: Hands on Review: Fermonster Fermentors
Related: Hands on Review: MoreBeer’s OxyWand Oxygenation Kit – with Side by Side Trials
Test: Post Fermentation Transfer to Keg Dissolved Oxygen
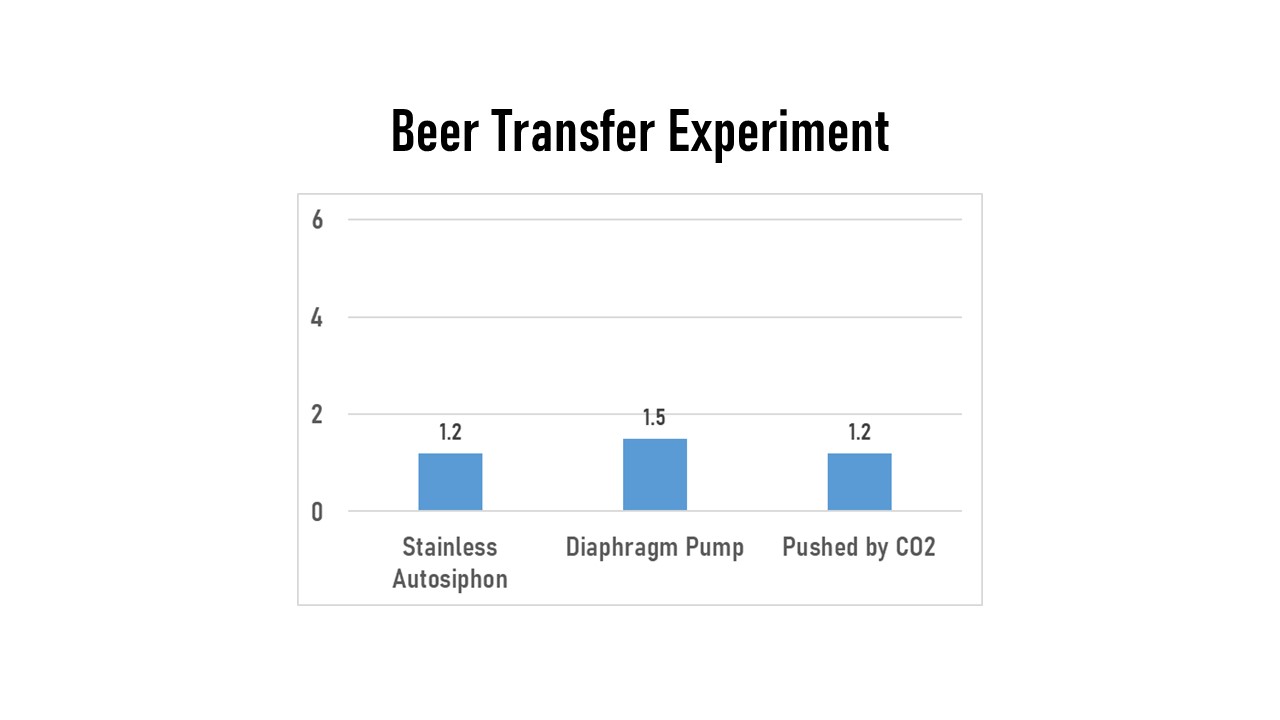
On the last experiment I did looking at DO, I encountered the measurement limitations of the MW600. I brewed a large batch of beer and then split it into 3 different fermentors. I let them ferment completely and evaluated 3 different methods of transferring the beer from fermentor to keg. These are methods that I expected to have differences in the amount of oxygen they introduce to the kegged beer, so I set out to use the meter to measure it.
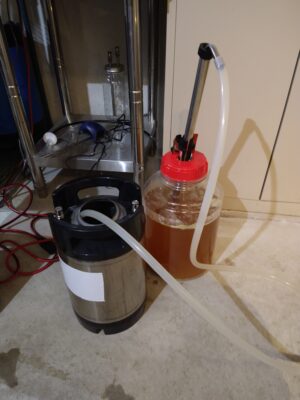 BrewSSSiphon Transfer for Beer Transfer Study
For all 3 of these, I first purged the kegs by filling with StarSan and then pushing all the StarSan out with bottled CO2. The first batch was transferred using my stainless BrewSSSiphon. I had to open the lid of the purged keg, thus introducing it to atmospheric oxygen, so this should’ve been the worst for oxygen uptake. The second one I used my NB Anti-Gravity diaphragm pump. With this one I hooked up the output to a liquid disconnect, let it pump until only beer was coming through the line and then hooked that up to the keg. I thought this one would be better than the siphon due to the design of the diaphragm pump, but wanted to get some data. The third one I pushed out from my pressurized fermentor using bottled CO2, again waiting until liquid was coming out the disconnect before hooking up to the keg. I expected this last one to be the best.
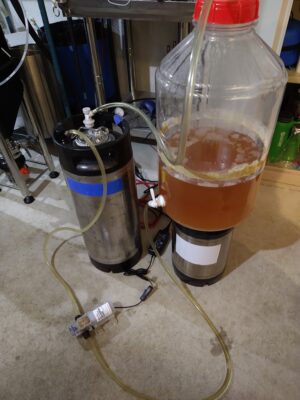 Diaphragm Pump Transfer for Beer Transfer Experiment. Related: Northern Brewer – Anti Gravity Self Priming Beer Transfer Pump Kit – Hands on Review
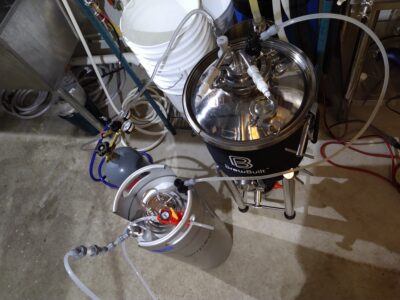 Closed Transfer for Beer Transfer Experiment. Related: Oxygen Free Transfer and Cold Crash Using a Spunding Valve
All 3 of these measured the same (within the +/- 0.3 PPM accuracy of the meter). After reviewing these results in a forum online afterwards, I found out that the amount of staling DO commercial brewers try to stay below is around 20 Parts Per Billion, or 0.020 PPM. Therefore the accuracy of the MW600 is ineffective at distinguishing between these transfer methods. So there are limitations of where this tool can be used.
Conclusions
Overall, this was a really well-made and nice-looking measurement device. It looked like it would be up to the challenge of many years of brewery use. It did seem like there was some measurement variation, and some samples that the measurement seemed to not completely follow my expectations. So if I were to really study a process, I would want to do several measurements along the way to see how things were changing. And there’s probably a lot to be learned about good sample preparation to make sure your wort/beer is well mixed when you’re sampling it and make sure the temperature has stabilized at room temperature. But all this being said, I found there were a lot of things I wanted to understand their influence on Dissolved Oxygen, and the MW600 was an easy-to-use tool to start to understand them.
Check Current Price, Availability & Specifications, Review Continues Below:
- Milwaukee MW600 LED Economy Portable Dissolved Oxygen Meter with 2 Point Manual Calibration, 0.0 – 19.0 mg/L, 0.1 mg/L Resolution, +/-1.5 percent Accuracy, 100 Percent Saturation Range affiliate link, note that multiple variations of this product may be available, as such a different version may appear at this link, affiliate link, note that multiple variations of this product may be available, as such a different version may appear at this link
- Milwaukee Instruments MW600 Standard Portable Dissolved Oxygen Meter affiliate link, note that multiple variations of this product may be available, as such a different version may appear at this link, affiliate link, note that multiple variations of this product may be available, as such a different version may appear at this link
Related: Hands on Review: Milwaukee MA871 Digital Refractometer
More Photos
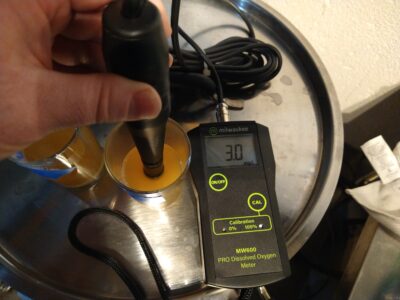 Measuring Sample in Small Glass
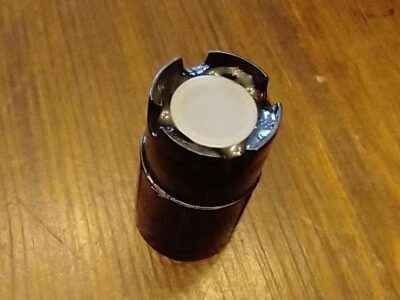 Measurement Cap with PTFE Membrane
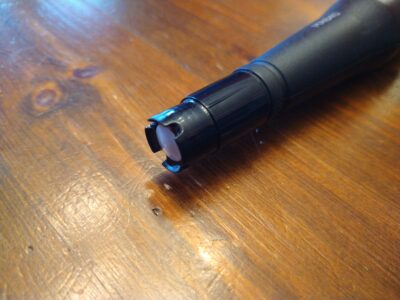 Measurement Probe with Cap Installed
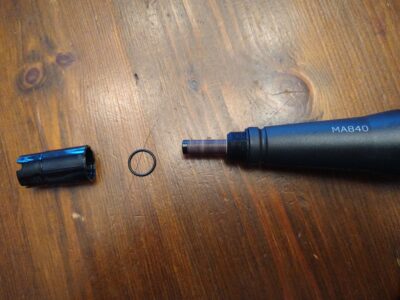 Measurement Probe with Sample Cap Removed
More Homebrew Finds!
- Last 50 Finds!
- Top Deals – a curated list of the best deals
- Homebrew Reviews – one of the largest libraries of homebrew reviews in existence!
- Our Top Posts – tips, how-tos, resources posts and more
- Let’s be Friends!
Recent Deals!
10 Most Recent Homebrew Resource Posts & How-To’s!
We are Homebrew Review HQ! Our 10 Most Recent Reviews
More Fermentation Related!
Special Thanks to Milwaukee Instruments for providing the unit used used for evaluation in this review.
By Brad Probert. Check out Brad’s website – beersnobby.com
pinnedThis post may contain affiliate links. We may make a commission when you use our links. This will never cost you extra. Thank you for supporting Homebrew Finds!
greatdealsPrice, promotions and availability can change quickly. Check the product page for current price, description and availability.
Make sure the components you use are compatible and rated for your intended application. Contact manufacturer with questions about suitability or a specific application. Always read and follow manufacturer directions. review:mw600oxy tag:tpr


The info on my potassium metabisulfite says 1 tablet treats up to 20 gallons of water, I was using 1/2 tablet in 8 gallons of water. The meter was calibrated at 0 ppm and at 100% of range per the calibration instructions provided by Milwaukee, including their calibration solution.
This experiment is simple enough to do, I can repeat it.
There is something wrong with this meter. Boiling water even for a few minutes reduces DO to zero. Not just close, but zero. Please take a minute to look up how to make zero (DO) solution so that you can confirm the inaccuracy of this DO meter. You should also look up how much metabisulfite it takes to scavenge a certain amount of oxygen in your solution. It helps greatly to understand more about the chemistry of your experiments, the equipment your using and how to test and calibrate it before you make guesses based on erroneous data and post those obviously flawed conclusions the web.