Tip: Consider Oetiker Stepless Clamps for Kegerator Gas and Beer Lines
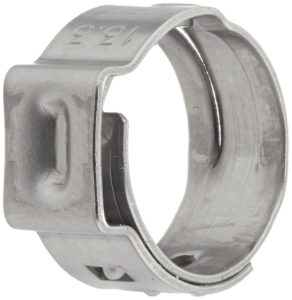
 Pictured: Oetiker 16700010 Stepless Ear Clamp via Amazon
Updated: July 30, 2024
Part of Our Homebrew Tips and Tricks Series. Check out the complete list – Homebrewing Tips, Tricks & Shortcuts! This is a Top Post! See: All Top Posts
- I use stainless steel Oetiker-style stepless clamps for most gas and beer applications. I like the fact that they are, generally… stainless steel, stepless and the fact that they stay tight and will not loosen over time.
- These clamps are designed so that there are no steps (gaps) on the inside. That reduces the possibility that tubing will be torn or damaged.
- These are single use clamps. The upside of that is… Oetiker-style stepless clamps will not loosen over time. When they’re tight, they’re tight. I really like that for kegerator applications because… A: I don’t like to empty CO2 tanks for no good reason and B: I don’t like standing beer in my kegerator.
- A sizing note – Oetiker-style Stepless clamp sizes generally refer to the largest diameter in mm. So a size 13.3 means that the Oetiker Stepless clamp is 13.3 millimeters (about .52″) in diameter uncrimped.
- Search Amazon for “Stepless Hose Clamps” to shop around and see what’s available
- Related Top Post: Tips: Cleaning, Drying & Storing Tubing
- Resource Page: Tips and Gear for your Kegerator
- Related Categories: Draft, Tubing
This article contains affiliate links. We may make a small percentage if you use our links to make a purchase. You won’t pay more and you’ll be supporting Homebrew Finds and more content like this. Thank you for your support!
Some specific sizes to consider…
- Oetiker 16700010 Stepless Ear Clamp, One Ear, 7 mm Band Width, Clamp ID Range 10.8 mm (Closed) – 13.3 mm (Open) (Pack of 25) – affiliate link, note that multiple variations of this product may be available, as such a different version may appear at this link
- Oetiker 16700012 Stepless Ear Clamp, One Ear, Clamp ID Range 11.5 mm (Closed) – 14 mm (Open) (Pack of 25) – affiliate link, note that multiple variations of this product may be available, as such a different version may appear at this link
- Oetiker 16702498 Stepless Ear Clamp, One Ear, 7 mm Band Width, Clamp ID Range 16.6 mm (Closed) – 19.8 mm (Open) (Pack of 25) – affiliate link, note that multiple variations of this product may be available, as such a different version may appear at this link
I use a pair of nail nippers (meant for cutting heads off nails) but there are also purpose made tools for clamping Oetiker-style stepless clamps…
- Oetiker 14100446 Single Action Side Jaw Pincers – affiliate link, note that multiple variations of this product may be available, as such a different version may appear at this link
- Oetiker Clamp Tool – via Keg Connection
- Search Amazon for “Stepless Clamp Tool” to shop around and see what’s available
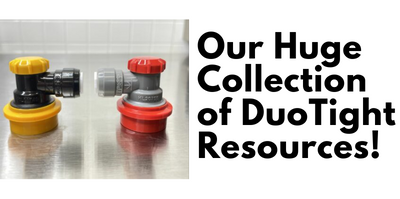
OR… Move to DuoTight and Stop Using Clamps!
duotightreview tsrduotightAlso: Kegerator Tips & Gear | Keg Repair Part #s | Recent Keg Finds
Our Top Draft Resources!
Check our our Top Draft Related Resources- Commentary: Pin Lock Keg Pricing and Availability
- Check Your CO2 Regulator for Leaks!
- How to get a keg ready for first use? New Keg Cleaning and Prep
- Portable Draft Beer Serving Options!
- Pin Lock Keg Pricing and Availability
- The Most Difficult Spot to Check for CO2 Leaks
- Keg O-Ring Materials Selection! – EPDM, Silicone and Buna-N?
- Why Do I Have Bubbles in My Beer Line? Diagnosing and Fixing Kegerator Foam Problems
- Five Benefits of Using Corny Kegs As Fermenters
- Rebuilding & Reconditioning Homebrew Kegs!
- Food Safe Replacement Keg O-Rings in Bulk
- Hands on Review: Kegland DuoTight Fittings & EVABarrier Tubing!
- Why Won’t My Beer Carbonate? Fixing Draft Beer Carbonation Problems
- What Does a Flow Control Faucet Do?
- Upgrade Your Kegerator – 6 Improvements!
- Serve Homebrew on Any Kegerator & Convert Commercial Kegerator to Homebrew
- Tips and Gear for Growler Filling
- What’s the Difference Between Ball Lock Kegs and Pin Lock Kegs?
- Checking for Draft System CO2 Leaks – Using The Pressure Gauge Method
- Tip: Consider Oetiker Stepless Clamps for Kegerator Gas and Beer Lines
- Hands On Review: Inkbird ITC-308 Dual Stage Temperature Controller +WiFi Version
- Universal Poppets Tips and Tricks!
- Convert Your Mark II Keg & Carboy Washer to a Recirculating Draft Line Cleaning Pump!
- Step by Step: Finding and Fixing Keg CO2 Leaks
- Kegerator Temperature Probe Placement – To Immerse or Not To Immerse? – three tests to determine optimal pla…
- Kegerator Beer Line Temperatures & Reducing Foam with a Recirculating Fan
- Kegging CO2 Use Estimations and Calculations
- Balancing Your Kegerator Draft System
- Building a Simple Ball Lock Draft Line Flushing Setup
- Build a Recirculating Draft Line Cleaning Pump
- Home Brew Keg Roundup – New & Used, 5 and 2.5 Gallon & More!
- Damp Kegerator? Fix Kegerator Condensation
- Homebrew Temp Controller Roundup! – Kegerator and Fermentation – concepts, applications and models
- Bulk Keg Orings and Keg Parts Reference
This post may contain affiliate links. We may make a commission when you use our links. This will never cost you extra. Thank you for supporting Homebrew Finds!
greatdealsMake sure the components you use are compatible and rated for your intended application. Contact manufacturer with questions about suitability or a specific application. Always read and follow manufacturer directions. tag:lnksfxd toppost:oetiker rp:tips#34 tag:tpr


Which sizes are recommended for standard beer an gas lines for a kegerator?
It depends on what your outside diameter is. I would go a little bit larger than your OD. If you’re cutting it close on clamp side vs OD, I would put whatever barbed fitting you’re going to use in the tubing and measure to make sure you’re getting the right size.
These are fantastic, but how do you remove them if needed. I have always had issues undoing the clamps should I need to for any reason.
I take my nippers and get under the flap of metal and then peel it back. It’s a little hard to begin with but once you get it moving that flap will peel back pretty easily and relieve pressure from the clamp. I should take a picture of that process.
The way I’ve always done it is to use my crimp tool to cut through the part of the clamp you crimped previously. This is amazingly difficult to explain, but once you cut across the crimped part the clamp splits apart and allows for easy removal.